


Last Updated September 3, 2024
When it comes to vehicle protection and enhancing the visual appeal of your car, ceramic coatings have become a go-to solution for many car enthusiasts and detailing professionals. Ceramic coatings offer a protective layer that bonds with your car’s paint, providing resistance against environmental contaminants, UV rays, and minor scratches, while also delivering a glossy finish. However, when applying ceramic coatings, there’s a crucial term you’ll often encounter: “flashing.”
If you’re new to the world of ceramic coatings, understanding what “flashing” means, why it happens, and how to recognize and manage it is essential to achieving a flawless application. This article will break down the concept of flashing in the context of ceramic coatings, explaining its importance in the application process and how to ensure you get the best results.
What Is “Flashing” in Ceramic Coatings?
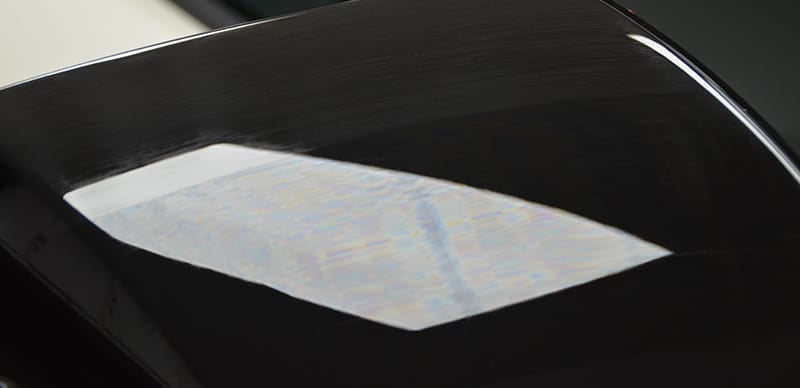
In the context of ceramic coatings, “flashing” refers to a visual and chemical cue that indicates the coating has begun to bond with the surface and is ready to be leveled or wiped off. When a ceramic coating flashes, it typically means the solvents in the coating are evaporating, leaving behind the active ingredients that form a durable, protective layer on the surface of the vehicle.
Flashing is a critical part of the application process because it signals the right time to move on to the next step, usually wiping off the excess coating. If you wipe too early, the coating may not have bonded properly, leading to uneven coverage and reduced effectiveness. If you wait too long, the coating can become difficult to remove, leaving behind high spots or streaks that mar the finish.
The Science Behind Flashing
Ceramic coatings are made up of several components, including solvents, resins, and nano-ceramic particles. The solvents keep the coating in a liquid state, allowing for easy application. Once applied to a surface, the solvents begin to evaporate. This evaporation process is what we refer to as “flashing.” As the solvents evaporate, the remaining resins and nano-particles start to harden and bond with the surface.
The time it takes for a coating to flash can vary depending on several factors, including the type of coating, ambient temperature, humidity, and the condition of the surface being coated. This is why it’s essential to understand the specific product you’re using and monitor the environmental conditions during application.
Recognizing When a Coating Has Flashed
One of the most challenging aspects of applying ceramic coatings is knowing exactly when the coating has flashed. Each product can behave differently, so it’s crucial to follow the manufacturer’s guidelines. However, there are common signs you can look for:
- Visual Cues: As the coating flashes, you’ll notice a change in its appearance. It often begins to look like an oily or rainbow-colored sheen on the surface. This is a clear indication that the solvents are evaporating.
- Tactile Cues: Gently run your finger over the coated surface. If the coating feels slightly tacky but not completely dry, it’s a good indication that it has flashed and is ready to be leveled.
- Timing: Manufacturers often provide a recommended time frame for flashing based on typical conditions. In a warm, dry environment, flashing might occur within a minute or two. In cooler or more humid conditions, it may take longer.
- Environmental Factors: Flashing times can vary significantly with changes in temperature and humidity. In hot and dry climates, the coating may flash more quickly, while in cooler or more humid conditions, it may take longer. Monitoring these factors is crucial for timing the flashing process correctly.
Why Flashing Is Important
Flashing is more than just a visual indicator; it’s a critical step in ensuring the ceramic coating bonds properly with the surface. When the coating flashes at the right time, it ensures the active ingredients can properly adhere to the paint, forming a strong, durable layer. Proper flashing leads to:
- Even Coverage: Flashing ensures that the coating is evenly distributed across the surface, preventing high spots or uneven areas.
- Optimal Bonding: The evaporation of solvents and the subsequent flashing allow the nano-particles to bond with the surface, ensuring maximum protection and durability.
- Ease of Removal: Wiping off the excess coating after flashing is much easier and smoother, reducing the chances of leaving behind streaks or residue.
Failing to recognize flashing or mistiming it can lead to a range of issues, including high spots, streaking, or even a complete failure of the coating to bond properly. These problems can be difficult to correct and may require polishing or reapplication of the coating.
How to Manage Flashing During Application
Successfully managing the flashing process during ceramic coating application requires a combination of preparation, attention to detail, and understanding the specific product you’re using. Here’s how to ensure you get it right:
- Preparation: Ensure that the surface you’re coating is properly prepared. This means washing, decontaminating, and polishing the paint to remove any imperfections. A clean, smooth surface allows the coating to bond more effectively.
- Read the Instructions: Each ceramic coating product will have specific guidelines for application, including recommended flashing times. Make sure to read and follow these instructions closely.
- Test in a Small Area: Before applying the coating to the entire vehicle, test it in a small, inconspicuous area to get a feel for how it flashes in the current environmental conditions.
- Monitor the Environment: As mentioned earlier, temperature and humidity can significantly affect flashing times. Try to apply the coating in a controlled environment where you can manage these factors. If you’re working outdoors, avoid extreme heat or cold, and be mindful of humidity levels.
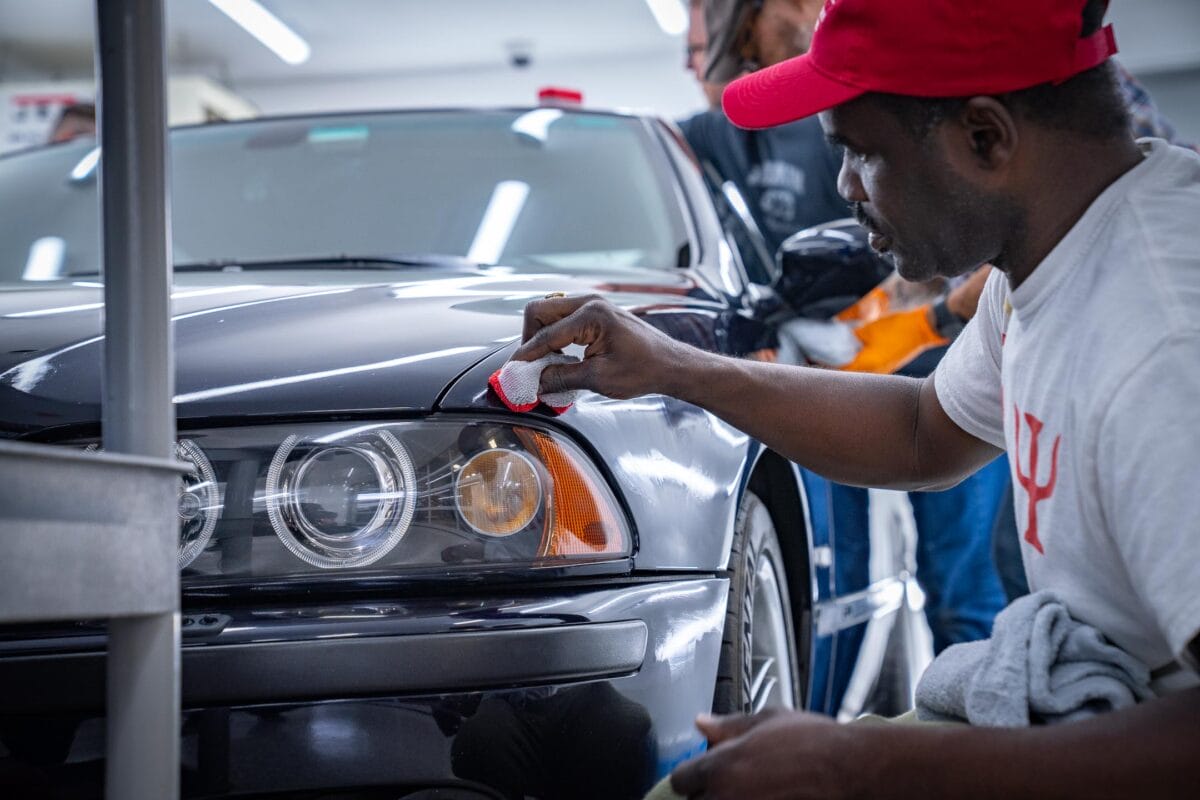
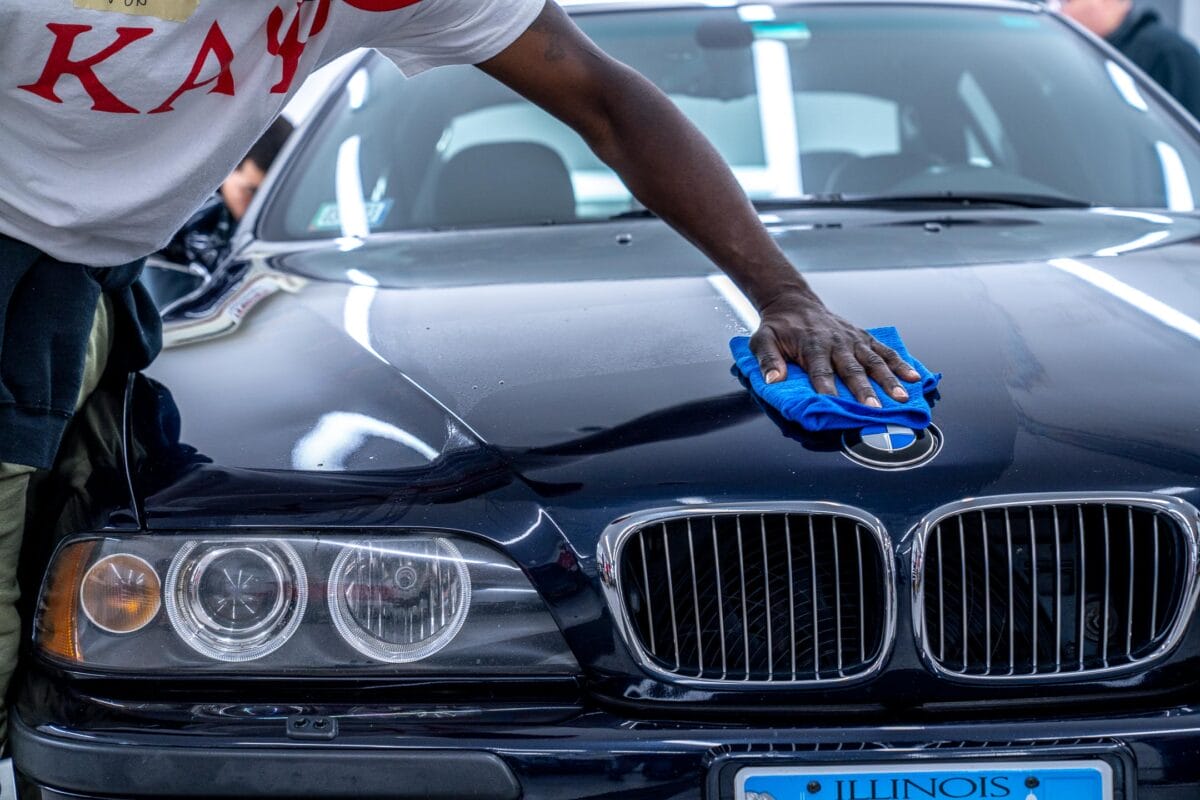
- Work in Sections: Instead of applying the coating to the entire vehicle at once, work in small sections. This allows you to better monitor the flashing process and ensures you don’t miss the right moment to level the coating.
- Use the Right Lighting: Good lighting is essential for spotting the visual cues of flashing. Make sure you have adequate lighting in your workspace to help you see when the coating changes appearance.
- Have the Right Tools Ready: Ensure you have high-quality microfiber towels on hand to level the coating once it has flashed. Using the right tools will help you achieve a smooth, even finish.
What to Do If You Miss the Flashing Window
Sometimes, despite your best efforts, you might miss the ideal flashing window. If the coating has cured too much and becomes difficult to remove, don’t panic. There are a few steps you can take to correct the issue:
- Light Polishing: If the coating has set and left behind high spots or streaks, a light polish can help to level the surface. Be careful not to over-polish, as this can remove too much of the coating.
- Reapply in Problem Areas: If the issue is localized, you can reapply a small amount of coating to the affected area and then remove it at the appropriate time. This can help to blend the coating and correct any issues.
- Consult the Manufacturer: If you’re unsure about how to fix the problem, reach out to the manufacturer of the ceramic coating. They can often provide specific advice on how to resolve flashing issues with their product.
Conclusion
Flashing is a critical concept to understand when applying ceramic coatings. It signals the right moment to move from application to leveling, ensuring the coating bonds properly with the surface and delivers the desired protection and shine. By paying close attention to visual and tactile cues, monitoring environmental conditions, and following the manufacturer’s guidelines, you can master the flashing process and achieve professional-level results with your ceramic coating application.
Nice write up, i have been using nano resin since last year, in my country Panama, Central America, we tried to apply it below 30C , 85% humidity, any recommendation for applcation, does scangrip lights work to see the flashing?
Thank you! No specific recommendations for application beyond what we recommend in the instructions. And yes, a Scangrip light may make it easier to see the flashing if you don’t already have adequate lighting.
Great write up. After about 2 hours of searching and reading references to “flashing”, but not seeing anything that actually explained the process nor showed it in action, I found this link and will definitely bookmark it. Great g-dsend, thank you. By the way, I have a “flashing” issue with a mineral spirit solvent-based oil finish, in which it gets that “oil-slick” appearance after being left on too long before wiping, usually when the ambient temperature is well above 75 and moderately high humidity. I also found a few references to this issue with interior painting, where when looking at an angle at a flat wall an area of lighter colored reflectiveness (“flashing”) shows in the paint (often throught to be due to poor quality primer). Thanks again!