


Last Updated October 25, 2024
Not all scratches on car paint are the same. Some are deep and penetrate into the primer; other scratches are surface-level and barely scrape the clear coat.
Unfortunately, unless you’re a professional detailer or automotive painter, it’s impossible to tell how deep a scratch is at just a glance. But you need to know how deep a scratch is to know whether it can be buffed out with polishing, or whether costly repainting is required.
In this guide, we’ll explore the types of car scratches, how to tell if a scratch is just in the clear coat, and how deep a scratch can be buffed out while also addressing common issues like white scratches on cars.
What Are the Different Layers of Paint on a Car?
Modern automotive paint systems are designed not only to provide a visually appealing finish but also to protect the vehicle’s body from environmental damage, corrosion, and wear.
These paint systems are typically composed of multiple layers, each serving a specific function. Understanding these layers helps explain the process of car painting and repair, especially when dealing with scratches or repainting. Below, we break down the main layers in modern automotive paint systems.
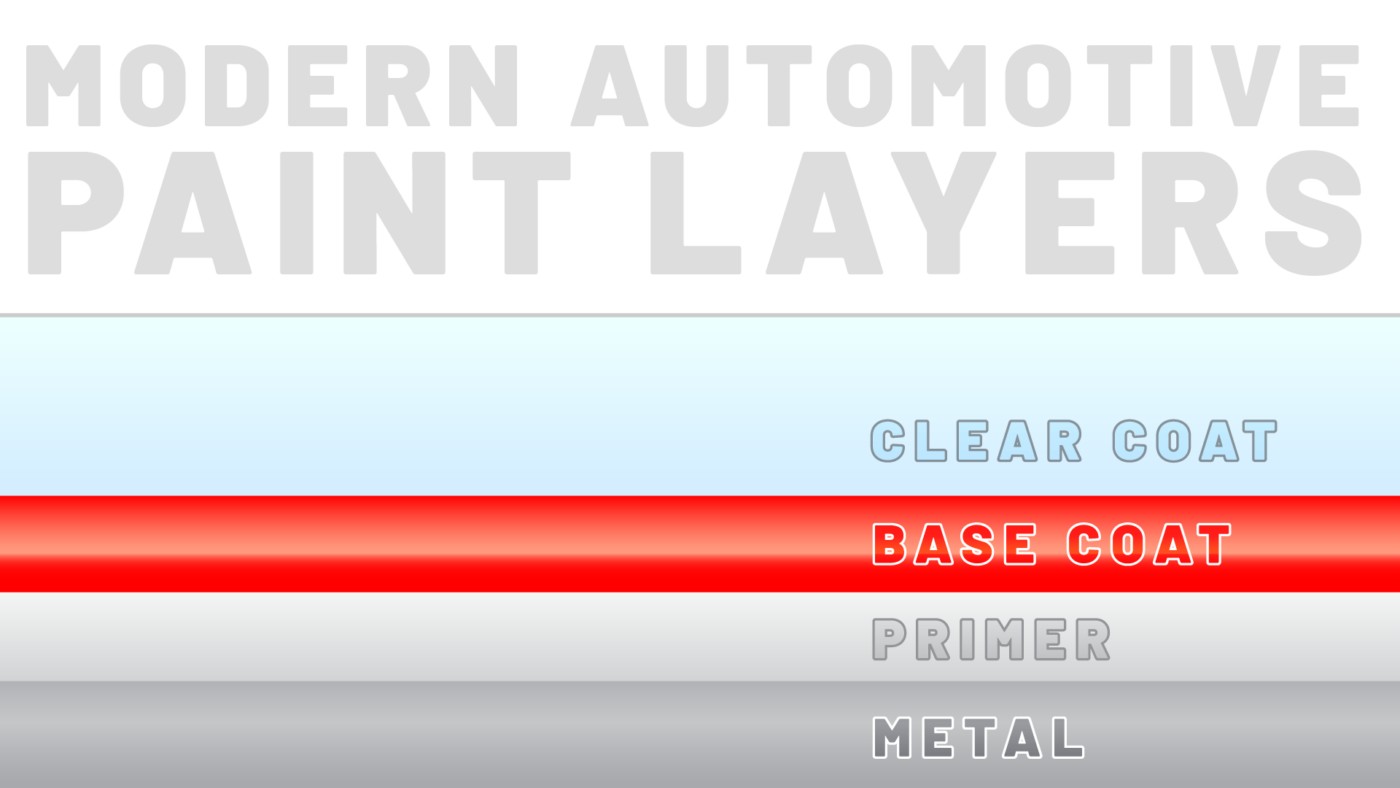
1. Body Metal/Chassis
The vehicle’s metal body forms the foundation of the paint system. Most car bodies are made from steel or aluminum that is dipped in Electro-Coat Paint Operation (ELPO/E-Coat) to promote adhesion and prevent corrosion.
A vehicle’s paint helps protect the body metal. Without proper protection, the bare metal is susceptible to oxidation (rust), especially in humid or coastal environments, making the following layers essential for durability. If a scratch were to penetrate into the body metal, the metal could become corroded more easily — more on that later.
2. Primer Layer
The primer is the first layer applied directly to the prepared metal surface. Its primary role is to protect the metal from rust and corrosion while also providing a good surface for the paint to adhere to. The primer layer plays a crucial part in preventing paint failure over time.
- Types of Primers: Modern cars often use epoxy-based or urethane primers for their excellent adhesion and rust-prevention properties.
- Function: It fills in small imperfections and provides a uniform surface, ensuring the paint coat will go on smoothly and evenly.
If the primer layer becomes visible due to deep scratches, it will appear dull gray or white. When exposed, repairs are necessary to prevent rust.
3. Base Coat (Color Layer)
The base coat (or color coat) is the layer that gives the car its color and visual appeal. Because the clear coat is, well, clear, this is really the only part of the paint you actually see with your eye. As such, it plays the most important part in the overall aesthetic.
However, it offers little protection on its own and relies on other layers, such as the primer and clear coat, to maintain durability.
- Solvent-Based or Water-Based Paint: Many modern vehicles now use water-based paints for environmental reasons, though solvent-based paints are still used in certain applications.
- Pearlescent or Metallic Paints: Some base coats contain metallic flakes or mica particles to create unique effects that reflect light differently, giving the car a more striking appearance.
If scratches penetrate this layer, they reveal the primer or metal underneath, making them highly visible and harder to repair.
4. Clear Coat
The clear coat is the final and topmost layer applied in modern automotive paint systems. It is a transparent layer that serves multiple purposes:
- Protection: It shields the underlying base coat from environmental damage, such as UV rays, dirt, and chemicals.
- Gloss and Shine: It provides the glossy finish that makes the car look polished and new.
- Minor Scratch Resistance: While not immune to scratches, the clear coat offers some protection against light abrasions. Lighter scratches such as swirl marks that only affect this layer can be polished or buffed out.
The clear coat is also often the thickest layer in the paint system and plays the most important part in the longevity and appearance of the paint job. That being said, it’s still incredibly thin (less than a sticky note) and can be compromised easily if a scratch penetrates too deeply.
How to Tell How Deep a Scratch is On Car
Now that we’ve explained the different layers in modern automotive paint, we can know how deep a scratch is on a car by what layer it has penetrated to. And once you know how deep a scratch is on a car, you’ll know how to remove it.
Below is a breakdown of the different levels of scratches and recommended solutions for each type.

Level 1A & 1B: Clear Coat Scratches
Layer Affected: Clear Coat
Clear coat scratches are surface-level and the most common. These do not penetrate the paint layer, making them relatively easy to repair.
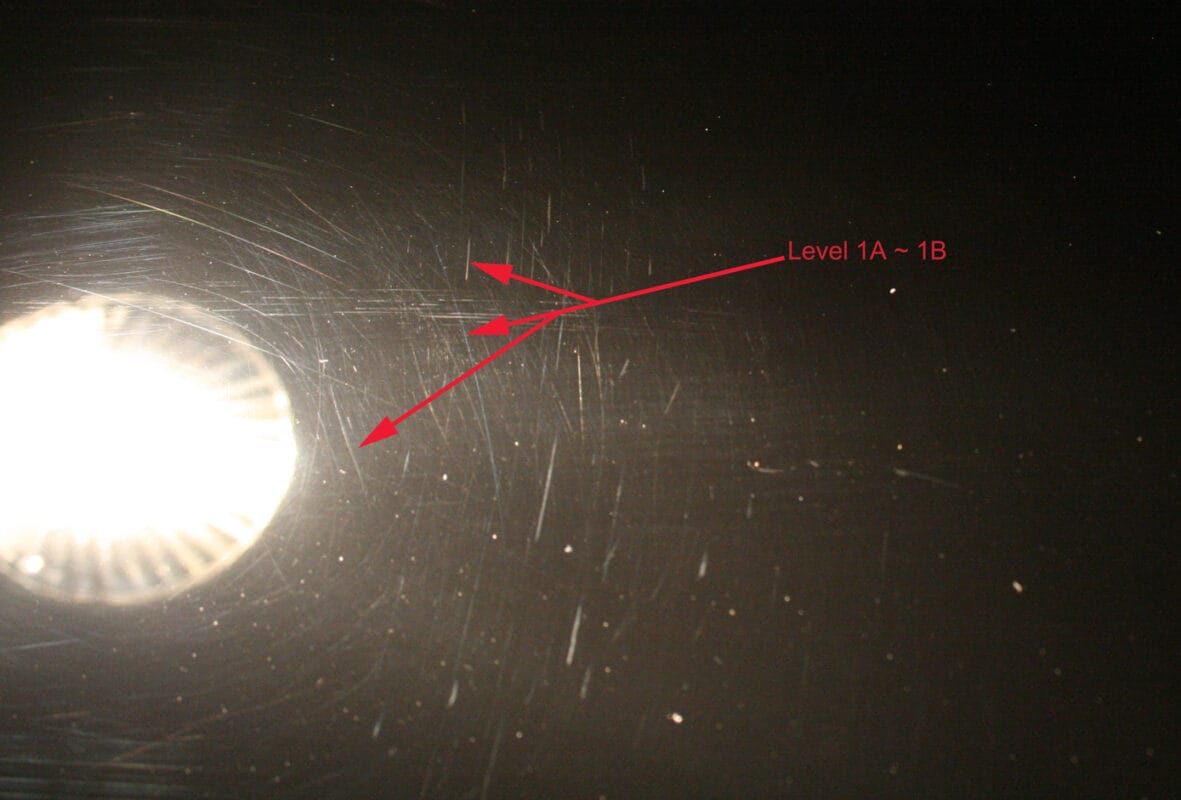
- Level 1A — Top Clear Coat Layer:
- Description: Very light scratches, such as those caused by dust, dirt, or improper washing (e.g., using a dirty towel).
- Appearance: Barely visible and only noticeable under direct light.
- How to Identify: Gently glide your fingernail over the scratch. If fingernail does not catch on the surface it is likely a surface level clear coat scratch.
- Repair Method:
- Hand polishing or light buffing with polish or swirl remover.
- No major damage is done to the clear coat.
- Level 1B — Bottom Clear Coat Layer:
- Description: Slightly deeper scratches that are more noticeable and can include swirl marks caused by automatic car washes or improper washing techniques.
- Appearance: Still within the clear coat, but more visible than 1A scratches.
- How to Identify: Gently glide your fingernail over the scratch. If fingernail catches but only slightly, it’s likely a deeper clear coat scratch.
- Repair Method:
- Requires machine polishing to effectively smooth and round the edges of the scratch.
- Deeper scratches may require sanding to remove, but this can burn through the clear coat.
Level 2: Base Coat Scratches
Layer Affected: Base Coat/Paint (Color)
These scratches go deeper than the clear coat but do not reach the primer layer. Since the color is still intact, the damage is mostly cosmetic but cannot be fully polished out.

- Description: You can tell it’s a Level 2 scratch if you don’t see another color (like white or gray) beneath the paint.
- Appearance: The surface looks scuffed, with some of the paint removed, but no primer or metal is exposed. The color of the paint is still visible.
- How to Identify: Gently glide your fingernail over the scratch. Your fingernail will catch more easily and you’ll feel a noticeable edge along the scratch.
- Repair Method:
- Machine polishing can make the scratch much less noticeable, but a perfect restoration isn’t possible.
- Since touch-up paint isn’t required, polish the area to smooth it out and apply ceramic coating for protection.
Level 3: Primer Scratches
Layer Affected: Primer
Level 3 scratches are more severe, exposing the primer layer beneath the paint. These typically appear as white-ish scratches, as the primer is typically light grey or white in color.

With Level 3 scratches, while the metal is still protected, the color layer has been lost and must be repainted to restore visual consistency.
- Description: If the scratch reveals a white or gray color beneath the paint, it has gone through both the clear coat and paint layers into the primer.
- Appearance: White or gray lines are visible where the scratch occurred.
- How to Identify: You’ll see white or gray inside the scratch.
- Repair Method:
- Touch-up paint is required to cover the exposed primer.
- Polishing alone will not fix the scratch.
- While rust is not a concern yet, leaving the area exposed could worsen the damage, so act quickly with touch-up paint or a repair kit.
Level 4: Metal Scratches
Layer Affected: Metal
These are the most severe scratches, penetrating through the clear coat, paint, and primer layers down to the metal. If left untreated, the exposed metal will rust over time, worsening the damage.

- Description: These scratches expose the bare metal, appearing silver in color.
- Appearance: You’ll see a bright metallic silver where the scratch is located.
- How to Identify: Like we mentioned above, you’ll be able to see a gray metallic silver-ish color. The scratch will feel jagged and rough to the touch, and your fingernails should catch easily.
- Repair Method:
- Immediate action is needed to prevent rust.
- Clean the area thoroughly, then apply touch-up paint or use a paint repair kit to protect the metal.
- For larger scratches, professional repainting may be necessary.
- Polishing will not repair these scratches; covering them with paint is the only way to protect the surface.
Summary: Scratch Repair at a Glance
| Scratch Level | Layer Affected | Appearance | Repair Method |
| 1A | Clear coat (top layer) | Light scuff, hard to notice | Hand polish or light buffing |
| 1B | Clear coat (bottom layer) | Swirl marks, visible under light | Machine polishing |
| 2 | Paint | No other color beneath paint | Machine polish, wax, sealant |
| 3 | Primer | White or gray color visible | Touch-up paint required |
| 4 | Metal | Bare silver metal exposed | Touch-up paint or full-on repainting |
Understanding the level of a scratch helps you plan the appropriate repair strategy. More minor clear coat scratches (Levels 1A and 1B) can be easy to fix, while deeper ones (Levels 2, 3, and 4) may require more effort or professional assistance. Addressing scratches promptly not only maintains your car’s aesthetic appeal but also protects it from further damage.
Hi Dr, How do I get a light scratch out from my Veloster Matte paint. Only have had for 2 weeks and left next to 2 other good cars for 20 mins only to come back to find a scratch on rear. Please tell me how i would get this out. Thx
Hi Steve,
I saw your email just as I was reading your comment. Because this is a growing question often asked by matte car owners, I thought I’d answer here to hopefully help out others with a similar concern.
First off, congrats on your new Veloster! I’m happy you found us at Car Care Products Australia.
As for the scratch in your matte paint, the short answer is purchasing matte touchup paint directly from Hyundai. Often times this can be found at a dealership, but for the Young Gun finish this may require special connection to the factory or even PPG (the paint manufacturer)… your dealer should be able to assist you.
A longer explanation is required for why you cannot polish to remove scratches in matte paint, but I’ll simplify. In short, polishing matte paint wold smooth imperfections in the clear coat that make matte paint non-reflective, and begin to gradually increase the paint’s gloss. This irreversible damage to the factory matte finish, caused by polishing, can only be fixed by repainting the panel. This may sound a little harsh, but that doesn’t mean you can’t make your car’s scratch less visible…
We have found some success making minor scratches less visible by using Matte Paint Cleanser followed by an application of Matte Paint Sealant. While this wont “fix” the scratch, it may make it less apparent depending on the depth of the scratch and how it was caused. We are constantly testing alternatives to this theory, so it’s in your best interest to stay tuned on our blog in the event that we announce a new product to solve this growing problem.
In the meantime, please keep in touch and let me know if there’s anything I can help with. I’d love to see a photo or two of your car—especially the problem area—as this may help me better address your question.
Best,
James
Big Thanks for getting back to me & the Info. I’ve ordered the Dr Beasley products so I’ll give it a go. I’m sure it will help to make it a little less visible. Cheers, Steve
Do scratches from bushes leave rust scratches in one day?
They should not. Could be some minor oxidation. Do you have a photograph?
Hello! I am sure this thread is not active but i came across this when i was researching my problem, i have a glossy finish on my side mirror, however i bumped it against another car’s side mirror now there seem to be a coin sized portion that became matte, i have never experienced this before, so was wondering if that portion can be buffed out?
How can i touch up or fix a surface scratch on a plastic bumper its not deep.
Hi, thanks for the article! I’m trying to determine what level of scratch my car got, and it’s clearly explained here
Know thread is old, but wanted to compliment the author for the information. A detailer wanted to sand then use a power buffer to remove some scratches and swirling and I luckily declined. I used some “scratch repair” liquid with a microfiber towel and worked it lightly as directed. It took out all the light scratches and most of the swirls, which aren’t even noticeable.
Thank you for the kind words! Sounds like you dodged a bullet.
Great article except the resolution on your graphic showing various scratches was low and hard to read. Is there any way you might be able to post a more legible version. Thank you.
Hi Brian, thank you for bringing that to our attention. We have replaced the graphics with higher resolution versions. Hope that helps.
For scratch type 1A and possibly 1B, do you need to only a Smoothing Polish or to first use Cutting Polish prior and followed up in the end by a Finishing Glaze ? Are all (3) necessary for light surface scratches ? I have a brand new 2018 Mustang with Orange Fury paint but apparently a bird of sorts must have perched or sat on the hood while at the lot and there are minor non-fingernail scratches in the Clear only on one 6″ portion of the center hood region. They are straight and angled scratches, not circular, so I don’t think they did this detailing the car, but who knows. Thanks in Advance !
Hi there, David. Since these scratches seem relatively minor, a light abrasive polish like our Heritage Series Fine Polish (bit.do/fine-polish) would likely be all you need. And if you’re looking to restore the area to an even gloss following the correction, Finishing Glaze would be a great product to use. Your Mustang sounds amazing by the way, feel free to send some pictures of it and the products you’re using for our social media accounts to [email protected]!
I have a new honda crv 2018 awd touring brought 4 months back. i am able to see Level 1A scratches on the car. Once in a month i go for a hand wash, few days back when i am looking from the side of the bonnet i am able to see scratches and i checked them with 120 lumens light. what is the best approach to get rid of those.
hi doc, i have a lot of swirl marks (i believe they are 1A, 1 B fine scratches). i used dish soap and a dish pad ( my mistake) resulted in hair line scratches all over. it is a leased vehicle and i will return the car in 12 months. do you recommend i leave it until i am about to return the car and bring it to a detailer to polish with compound and if so what product do you recommend. thanks Brian
Hi-Tech Driver Education is a reputed CAR DRIVING SCHOOL serving these areas: Toronto, North York, Etobicoke, Scarborough, Vaughan and Brampton. We are equipped with the best in-class facilities to turn you into a professional driver. There is no match to our experience, we always put sincere efforts to help you master driving arts.
https://www.hitechdriver.com/