


Last Updated October 3, 2025

Transcript
So, in this video, we’re going to cover how to properly install a ceramic coating. This is part two of a three-part series. The first part was how to prep the car for the ceramic coating. And that included washing, clay, and machine polishing to get that paint perfected so the coating can make a proper bond.
And real quickly, I just want to kind of recap this. For the polishing step, I did use the Dr. Beasley’s NSP 95. And here’s why that’s important. The carrying agent is Nano Gel. Okay, it’s this goopy-looking water-based ceramic stuff right here. And it is just so different than anything on the market. And what this means is after I’m done polishing, I can come down and wipe that residue off and go right to the application of the coating. I don’t have to come back with a harsh solvent and do a panel wipe to get the oils off because there are no oils in our polishes. So, that’s how the Nano Gel works and something you might want to check out, too.
Setting Up the Panel
Okay. So now for this particular Tesla here, all I’ve done is I’ve just machine polished the rest of the hood. After the first video, I went ahead and clayed it, machine polished it. I still have to do the rest of the car, and I’ll do that off camera.
But the reason I wanted to polish out the rest of the hood instead of just doing this one spot like I showed in the first video, because I want to show the proper way to install a coating. In every video I’ve ever seen where the instructor is showing you how to do it, they stand right here and put the coating on right here. That’s the wrong way. You always start in the middle of the panel that you have to reach out to and work your way out.
About Dr. Beasley’s Nano-Resin 2.0
So, let me go ahead and let’s just go over how to use the Dr. Beasley’s Nano-Resin 2.0. This is a 5-year coating. It offers great slickness, gloss, shine, and protection. It creates a hydrophobic surface.
The benefit to a hydrophobic surface is it self-cleans anytime you have a hard rain. So, if you haven’t washed your car in a week or two and you got, you know, airborne dust, dirt, and pollen, and it rains hard, a lot of that will just flush off because of the hydrophobic surface. But when you go to wash it personally, dirt is going to release easier. That makes washing safer. When you go to dry it, the water wants to get away from the surface; that makes drying faster and safer. And of course, you get the great gloss and shine out of it.
Why Coatings Last Longer Than Wax
So, all kinds of great reasons to use a ceramic coating, but probably to me one of the most important reasons why is just because how long they last. A true ceramic coating is going to make what’s called a semi-permanent bond to the paint. Okay? And by semi-permanent, it is permanent, but it can wear off just like you can wear the paint off. If you were to sand it, you’d wear the paint off. So, it’s not permanent, but it is a semi-permanent bond.
And compared to a carnauba wax or a synthetic paint sealant which wears off just by microabrasion—so every microabrasion when you wash the car, the mitt goes over it, it micro-abrasively removes carnauba wax or synthetic paint sealant—coatings don’t. They resist that. Coatings are much more abrasion resistant, so they last longer.
So, if you think about how long it would take to wash and clay and polish your car and put a carnauba wax on, that’s a substantial investment in time and energy. But if you did the same process and only instead of using a wax, use a ceramic coating, the results are going to look better. They’re going to last longer. So it’s going to be years before you need to re-coat the car versus with a car wax, it’ll be months before you have to go back and re-wax it. So, that’s one of the primary benefits I think to a coating—how long they last. And when they last a long time, that means they protect a long time.
What Comes in the Kit
Okay. So, this is an incredibly easy coating to use. If you’ve never used a ceramic coating, this is the Dr. Beasley’s Nano-Resin 2.0 and it comes in a complete kit that includes the Paint Coating Builder. It includes the coating itself and it includes what’s called a coating saver applicator.
And I’m going to show you how these work so it’ll kind of make sense in your brain. Here is one that’s used. In fact, I used this with the same product. Now, this is all crusty and hard. If I were to rub this over the paint, it would probably scratch it because the coating is completely dried on here. So, in my opinion, this one is really not good for anything.
How the Coating Saver Applicator Works
So, I’m going to go ahead and cut it in half to show you what I mean. So, here’s a pair of scissors. Cut this in half. Now, I’m going to pull out the foam. There’s just a chunk of foam in there. And then, this is why it’s called a coating saver. If I flip this inside out, see that plastic membrane? And what that means is every time I put my coating on the outside, so I’m putting coating on it, instead of it soaking all the way through and then start loading up my foam block with my coating, which is not where I want it, it saves the coating. It keeps it on the outside of the applicator pad. So, that’s what they mean by a coating saver. And the kit comes with one of these.
Step 1: Apply Paint Coating Builder
Okay, so let’s get down to the application process. So, Dr. Beasley’s—our products are just a little bit different in the fact that this is kind of a two-step process. We didn’t have to do the panel wipe, but we’re going to do something that is going to kind of take the place of it, but in a different way. This is our Paint Coating Builder. And this does a number of things. The most important thing it does is it lays down anchor points for the coating to make a stronger bond to. And you can actually use this with any brand of coating on the market.
But the other thing it does is it maximizes gloss and clarity. And when you put the coating on, that’s what you’re trying to do—trying to preserve that high gloss, very crystal clear finish you created into that clear coat when you clayed it and machine polished it.
Applicator Sides and Wetting Technique
So, the way you do this is I look at these. These are usually color coded. So, you got the gray side and the red side. For me, red is like a stop sign. Danger, danger, danger. This is the side I’m going to put the coating on. So, that means the gray side is the side I’m going to put the Paint Coating Builder on.
And I give this a shake. And I’m just going to kind of bury the nozzle in there and coat the front of this, the face of this, with some of the Paint Coating Builder. You can also put a little mist onto the paint itself. And then you basically just apply this the same way you would apply a coating. You just use a crosshatch pattern.
And you’re just trying to spread this out and cover every square inch or every square centimeter. You just want this on everything. And then you let this sit for 2 to 3 minutes before you wipe it off so it can do its magic at the paint surface level.
Working Section Size
Okay. So then what you can do is just keep working around the car. I don’t have a clock out here to tell me how long that’s sitting there, but what I’m just going to do is the whole hood here. By the time I get to the other side, I’ll come back and we’ll wipe off.
So just a crosshatch pattern. Usually want to go over it a couple of times. And again, the idea is to fully saturate this paint with the Paint Coating Builder.
Now, with the Paint Coating Builder, you can actually, as you see here, you can see I’m tackling a pretty good section. Okay? So, this is not the actual coating. It’s something that just preps the paint for the coating for a stronger bond. So you get maximum performance of the coating and better longevity because it creates these anchor points at the microscopic level.
Wipe-Off Window and Real-World Flow
Okay. So after I’ve applied that, I’d wait 2 to 3 minutes. But in the real world, what I would be doing is in the real world, I would have started at the roof and worked my way down. And as I worked around the car, I would come back and just wipe the whole mess off.
This has a long play time. I’ve never experienced waiting too long, but at some point you realize you need to kind of get the car done so you can move on with your life. So, two to three minutes, then come back, clean microfiber towel, and go ahead and wipe it off.
Pro Tip: Inspect Microfiber Towels
And real quickly, let me just share something that’s really something I share a lot in my classes. Where’d my tweezers go? Okay. So, anytime you’re using microfiber towels, one of the reasons we like these compared to, you know, in the old days—and I’ve been detailing since the ’70s, so I know about the old days. In the old days, we used T-shirts, we used bath towels, we’d cut up a bath towel, cheesecloth, and diapers of all things—because back then, that’s the softest thing we had. And then sometime, I think in the ’80s, this thing called microfiber was invented.
And the reason we’ve all switched over to microfiber is because it excels at two things. It excels at adsorbing and absorbing. To adsorb means to wick onto itself. To absorb means to wick into itself. So it excels compared to cotton—diapers, T-shirts, cheesecloth, and bath towels—because it adsorbs and it absorbs.
But because it likes to grab onto things and pull it off, for that same reason it grabs on to contaminants. So, anytime you’re going to use a towel, what I recommend is the first thing you do—and I don’t want to put this down there, so I’ll put it down up here—is you just want to take and inspect your towel. You want to look at it with your eyes, and you want to feel it with your hands. And do this to both sides. Okay?
And then if you find something and you can pick it out with your finger, then pick it out. If you can’t, then it’s handy to have a pair of tweezers around and you can pick out whatever the stray contaminants are out of the towel.
Why Inspection Matters
And here’s why this is so important. If you were to machine polish—this is a Tesla for me, and I’m pretty fast at this. This will probably take me four to five hours, okay? If after polishing I come back and there’s one scratchy pokey thing in my towel that I didn’t catch and I start wiping the paint, I’m going to put scratches back in. So, you want to always make sure that you inspect anything that’s going to touch the paint. That includes your wash mitts, your drying towels, and your wiping towels.
How to Fold and Hold a Microfiber
Now, when you go to use a microfiber towel, I actually wrote an article about this. It’s one of the funniest articles I’ve ever written because everybody thinks it’s absolutely ridiculous what I wrote. I wrote how to fold and use a microfiber towel. And there’s a reason why I did that.
The reason why is because I just got done buffing out a 1954 Corvette with the owner. We’re going to wipe the coating off. I handed him a towel, folded up, ready to go. And he took it, he kind of shook it, he scrunched it up, and started wiping. That’s the wrong way. That’s not how you use a towel.
So, I wrote this article and everybody makes fun of me because it’s just so simple. But you fold your towel four ways. Here’s the open edges. You look at your finger and your thumb like a clamp. You clamp those open edges there. You lay the towel down flat. Spread your fingers out. Kind of scrunch them together. Now, you’ve got an incredible grip on this towel.
Not a big deal for the horizontal surfaces, but when you go to the vertical surfaces, you don’t want to drop these because that’s how they get contaminated. Okay. So, then you just want to come down and gently wipe off the Paint Coating Builder. And one of the things you’ll notice as you wipe this off is how the paint becomes very slippery, very clear.
Extra Use: Clarifying Plastic Windows
I also use this product. I do a lot of plastic polishing. So, what do I mean by that? Well, I work on a lot of classic cars and people bring me classic cars with convertible tops that have flexible plastic windows or, in some cases, cars like classic Corvettes which have a plexiglass back window on the removable hard top. And these plastic windows, both flexible and rigid, they become full of swirls and scratches just like the paint over time.
So, I machine polish them clear again. And what I found out was this Paint Coating Builder just really clarifies that plastic. So, I always use that as a last step after polishing to really make that window clear to make it easy to see through and also prevent things like haze if you’re driving early in the morning, that sun’s coming up, or late at night, the haze going through the window there.
Okay, so that’s how you apply the Paint Coating Builder. I see a little bit I didn’t get off. If you didn’t get it 100% off, it’s not going to hurt anything, but you do want to get down to a nice clean surface. And at this point, I would say this towel is done.
Step 2: Apply the Coating
Okay. So, the next thing is, and of course, you would do this to the rest of the car. The next thing we want to do is we actually want to apply the coating. So, this is the coating. I already kind of explained how I cut this in half and how that works. And if you can’t remember all this, there’s a PDF checklist in the description. You can click on it, download it, and then you know everything you’re going to need and step-by-step directions on what to do.
I also have a blog article that’ll show the same car and all the steps from start to finish. And that’ll be on the Dr. Beasley’s website.
Priming the Applicator and Where to Start
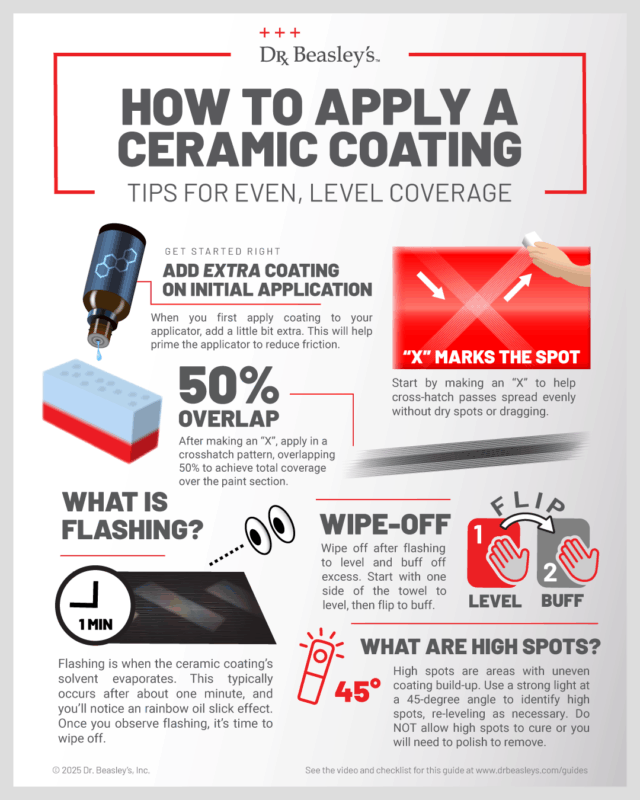
So, this is the Nano-Resin 2.0. Remember, we used the gray side to apply the Paint Coating Builder. So, now I’m going to take and put the coating on the red side. And this has a little stopper. Basically, you just kind of want to prime the face of this. And the first time you do this, you want to use a little bit extra because you want the whole thing wet. If you come down and you’re trying to spread a coating out with something that’s dry, it’s going to try to wipe it off as you’re trying to spread it out. So, you want to kind of dampen it.
Okay. Then remember I talked about when you’re working on—when you’re detailing cars, it doesn’t matter what kind of cars—I always see people showing people how to start here and work in. That will work, but it’s just not what’s called a good best practice. What’s better is to start in the middle and work your way out.
Working Time and Pattern
Now, this is a fairly forgiving coating. It has a flash time of about a minute or so. So, you don’t have to rush too much because what happens with some coatings is they flash or they dry so quickly, you have to work a small area. Otherwise, you come back, it’ll start to harden and it’ll get sticky. You won’t be able to get it off. But this has a fairly long flash time. So, it’s great for a first-timer, a beginner, or a do-it-yourselfer.
And then the normal way most people like to do this, including me, is you make an X pattern. Okay. Why would I want to make an X pattern, Mike? Well, because there’s ample product going down because I just put some on here. And now, as I come back making a crosshatch pattern, every time I go across that section I made the X pattern, I pick up some of that extra coating, and it just makes it easier to spread out and cover one section of the panel at a time.
So then the question is, well, what about overlapping circular motions? Yeah, you could do that, too. The thing I always kind of think about is you want to make a crosshatch pattern overlapping by 50% and go over each section usually about four times. And the entire reason for that is just to make sure you’ve pushed that coating completely over the paint. So you have 100% coverage, 100% protection.
Section Size and Leveling
Okay. So that’s how I started. Notice I started in the middle. I tackled about a two-foot by two-foot area. I want to take larger panels, divide them into smaller sections.
And then you want to wait for about a minute. And usually if you use your overhead lights and kind of look, you’ll see this kind of rainbow effect. It looks like if you’ve ever seen, like, oil on water—like a puddle out in the road or in the parking lot, someone’s dripped some oil—it makes that kind of rainbow effect, and that’ll tell you that the solvents are evaporating. It’s leaving the solids behind. And now you’re ready to come in and your first wipe is called leveling. Okay? So, you’re leveling that coating, making sure that it’s 100% even over the surface.
And then normally you want to flip to a clean, dry side of the towel and then buff off any excess.
Inspect With a Handheld Light
And then at this point I’d want to grab my swirl finder light. And I’m going to have to lean on this car just a little bit to get out here. But that’s why I always wear a clean shirt with no belt buckle. Notice I have no watches, rings, or jewelry on. Okay. So I want to be safe to the paint.
Okay. Then I’m going to just hold this up about a foot and a half off the finish at a 45-degree angle. And then I just kind of move it along and I inspect the area I applied the coating to. And I just want to make sure 100% I’ve removed all the coating. And again, if you don’t—if you come back, in fact, I just saw a little bit right there—if you don’t get it off, you come back the next day and it’s cured and hardened, pretty much the only way to get that off is to machine polish it like you saw me do in the first video.
So it’s important to have a good handheld light.
Curing Time, Weather, and Best Practices
Then after that, you want to wait for about an hour before you put this car back into service. That’s a minimum. It takes anywhere from 24 to 48 hours for that coating to completely solidify, to harden up and cure and bond to the paint.
But you know, in the real world, sometimes you have to get in your car and drive it. So, if you do, you want to try to wait at least an hour before it gets wet. So, you don’t want to be driving in wet, rainy weather. And of course, you wouldn’t want to wash your car, but you shouldn’t need to if you just detailed it. There’s no reason to wash it. So, you’re not going to get it wet. But you want to let that sit and dry.
And kind of the difference between the 24 and 48 hours is this: coatings like this, believe it or not, they tend to cure and harden faster in a humid climate as they interact with the moisture in the air versus a low-humid climate. So here in Florida where I’m at, we have high humidity. This coating will probably completely set up and dry within 24 hours. Now, if you live someplace that’s hotter and has less moisture, you might want to go ahead and wait for 48 hours or two days if you can. Leave it in your garage, leave it in your shop, let that coating completely set up, because that way you’re going to get the longest-lasting protection out of the coating if it fully sets up versus if anything comes in and hinders it. And by hinders, I mean it gets wet with water or some kind of chemical gets on there.
So, you want to keep it clean. You want to keep it dry for as long as you can.
First-Timer Advice
And that’s all there really is to applying a coating. Of course, you would finish up by doing the whole rest of the car. But here’s some advice I would give somebody if this is their first time. If it’s your first time doing machine paint correction, maybe it’s your first time you’ve clayed a car and it’s going to be the first time you’ve installed a coating, here’s my strong advice: start out with just doing one panel or, say, the front clip. The front clip would be the hood and the fenders, the front fascia up here, or just the hood.
And here’s why. Because if you’ve never done this before, you’re going to get a lot of experience working on a small portion of the car and you’re going to be done in 3 or 4 hours. So, you’re not going to take up the whole day. And just as important, when you decide to finish the whole car, you’re going to know what you’re getting into. You’re going to understand washing, claying, machine polishing, putting the coating on. It’s probably going to take you most of a day to do that. So, you want to go into that ahead of time knowing what it’s going to take.
And then if you want to leave that car in the garage while that coating is setting, you want to maybe find an alternative way to get back and forth to work or to go to the store—things like that—if you have another car, you have someone that can give you a ride.
Checklist, Blog, and Video Resources
Anyway, that is how you install a ceramic coating. This was the second part of a three-part series video. In the description is a PDF checklist you can download to find out all the tools, the products I use, the supplies, and also step-by-step directions on what to do.
And of course, there will be a full how-to article for this particular exact car up on the Dr. Beasley’s blog on the Dr. Beasley’s website. And of course, the videos will be embedded in those articles, too. So, you can go to one place, read the articles, look at the pictures, get the directions, and watch the video.
Subscribe, Share, and Contact
If you like this video, then subscribe to our channel and like it because that helps the algorithms to help other people find us. And also share with a friend if you think maybe they would be interested in learning how to put a coating on their car and do it themselves.
I always like to make myself available. If you have any questions—maybe in the middle of working on your car—you get stuck, here’s my cell phone: 7605150444. Shoot me a text or give me a call. I never mind helping other people through to success in their garage.
And of course, remember this was the second part of a three-part video series, and you can find this on the Dr. Beasley’s YouTube channel. And there’ll be a corresponding matching blog article that has all three videos embedded in the article. And I’ll show step by step how I went from start to finish to clean, prep, and ceramic coat this car.
Questions? Comments?
Email Us