


Last Updated November 7, 2025

Part 1 Transcript
Mike Phillips here and I am the CEO, or Chief Education Officer, for Dr. Beasley’s and we’re here in our Stuart facility where we teach all of our intensely hands-on classes. We recently shot a video called Beginner’s Guide to Car Polishing. And that video, out of all the videos on the Dr. Beasley’s YouTube channel, has become the most popular and the comments are out of this world. And basically all we did is Yancy, my film guy, and me, we came out here and I just tried to do what I call a brain dump on how to tackle a car if you’re a beginner.
I also included a lot of topics and techniques if you’re an advanced detailer, a professional, because I’ve been doing this a long time. And I always feel like I got something to share. And me myself, I try to be a perpetual perpetual student. When someone’s talking, I shut up. I listen ‘cuz maybe I’ll learn something.
What We’ll Cover
In this video, we’re going to be doing a deeper dive over process and technique. The different processes you use to take something from neglected to respected and the techniques and the tools and the products to go with it. Things like comparing rotary versus free-spinning random orbital versus gear-driven orbital, pad stalling, how to overcome pad stalling when you get into these concave curves.
Paint thickness gauges, how to understand the thickness of the paint you’re working on, edge work—you know, edge work is really important. I’ve got some cool micro tools to show you how to do that. I’m also going to show you how to do that by hand and using a full-size rotary. You can do it either way.
Dialing in the Details
And then we’re going to be covering things like speed, amount of pressure to put on the tool, the number of passes to make to get the job done in a timely manner, how to correctly do a test spot. I messed up in the last video, so I’m going to make up for it in this video.
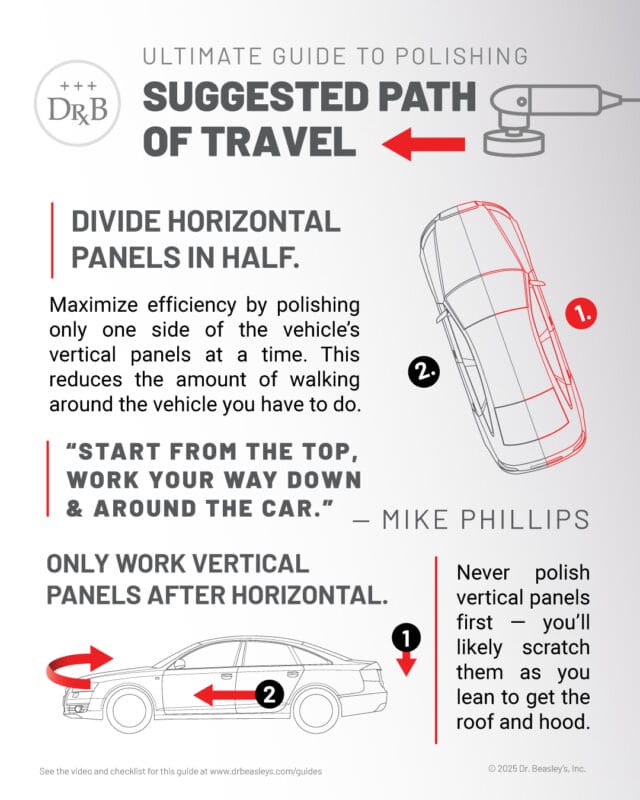
We’ll also cover topics like paint temperature. How hot is too hot? You know, when you’re buffing, you know, you start to warm up that paint. And other topics like the path of travel. So, I kind of touched on this in the other video. How do you start once you dial in your test spot? How do you go about detailing the entire car?
From Hood Panels to Whole Cars
And where most videos, including a lot of videos I’ve made, you just see the instructor standing next to the car, working on the hood. We’re going to show you how to do this entire car in this video. So, there’ll be any doubt or guesses how you should approach your car when you take what you learn here into your garage.
And of course, we’ll cover things like how many pads does it take, you know, how to use a pad washer towards the end of the video. But really, it’s just going to be a very in-depth brain dump covering process and technique. Enough of me talking. Let’s get into it.
Prep Work: Wash Before You Polish
So, the first thing you want to do before you detail a car is very obvious. You want to wash the car and get it clean. And I’ve already done that. I was down here Monday morning washing this car. First thing I did was clean the wheels and tires. Start at the top, work my way down. And this thing was filthy.
And I took a video before and some pictures to show you just how bad it was. But I think the video that we got right now after the wash shows you really how bad this car is. And this could make a great demo car just because of the paint condition.
Two Schools of Thought on Claying
Now, there’s two schools of thought on claying a car. So, I’ve clayed the entire car except I left this portion up here undone because in the last video I showed you how to use a clay bar. So, here’s kind of an example of some clay bars. This is a Mothers clay bar. This is a Dr. Beasley’s fine grade. They come in what looks like a bar of soap, an old school bar of soap.
And what you do is you take these out. And again, as I showed in that video—Beginners Guide to Car Polishing—and uh I showed you how to take a knead it and use clay the correct way. Well, this time I’m going to show you how to use a clay towel.
Clay Substitutes: Mitts, Towels, and Discs
But here’s a tip I came up with when these things were first invented. Um, when they were first invented, basically, just let me explain what this is. Clay is polybutane plastic with a pulverized abrasive in it. So the way clay works is when you rub over the surface, even though it is sticky, it doesn’t work by pulling things off. It works by abrading anything that’s sticking above the surface off and then, because it’s sticky, it holds it onto itself. So that’s how clay works.
And it’s actually a really good process. I’m a big fan of using fine grade clays on show cars ‘cuz I don’t want to put extra marring in. But after clay was invented, a couple other tools came out. We call them clay substitutes. So there’s the clay towel, the clay mitt, and the clay disc. Okay?
When to Use Each Substitute
So the clay mitt would be if you’re washing the car, after you fully rinsed it, you could actually just dip that clay mitt into your soapy water or foam the car and then rub that over the paint and clay it during what I call the wet work, during the wash process. You could also grab a clay towel and do it.
And even if you wanted to, there’s a thing called a clay disc. I don’t have one here, but that attaches to a random orbital polisher or a gear-driven orbital polisher—not a rotary—but you want an orbital polisher of some sort. And you could actually do that in the wet work process, too, as long as you’re using a cordless so you don’t get shocked.
Why I Prefer the Clay Towel
Um, out of the three, my favorite, though, besides clay, is the towel. And the reason I like the towel is because sometimes when I’m working on a car, I may need to take and fold this in a way to get into a tight area. And the clay disc and the clay mitt are just a little bit more awkward. So, they all do the same things. Personal preference. I dislike this.
But when these things first came out—and this is the Nanoskin brand, I think this is like 60 bucks. They’re not cheap. You get a lot of cars out of them, so it’s a good value for your money, especially since you understand I’m not going to drop this. But if you were to drop it on the ground, if it was detailing clay, you’d have to throw it away. With this, you could take it over the sink, wash it off, make sure it’s clean, go back to using it.
Stretching Your Investment
But when they first came out, I thought, for 60 bucks, you know, I want to know how I can get the best bang for my buck with this thing. So, I came up with a really simple idea. But first, let me just show you the way you use this. You don’t spread it out flat and then, you know, move it around the paint like that. You take and you fold it into four corner or four sections like this.
And then the idea being to get the most use out of your towel is you have to know which side of the towel you started out using. And then once it kind of wears out, go to another side. So here’s what I came up with. This is real simple. I just took a Sharpie marker and I drew a grid pattern on here and I put a one, two, and a three and a four.
Numbering the Towel for Rotation
So, when I fold this thing four ways, I’m going to start out using section one. And at some point in my detailing world, if I feel this just is no longer removing any contaminants, I want to switch over to number two. And I will tell you, as you use this—and guess what—this will kind of wear off. Just grab your Sharpie marker when it’s dry and re-put the numbers and the plus sign on there.
So, anyway, so let me go ahead and show you how to use this. So, if I fold it like this and like this and pull this up and we’ve got the number one right there. So, that’s this side. So, that’s a technique that may help you, it may not, but that’s what I do.
Lubrication and Application
Okay. So, this is actually Dr. Beasley’s Prep Wash. We do make a clay lube. You could use a spray detailer. One of the things I like about this product is not only can you use it—it is technically a waterless wash—it’s also a great interior cleaner. Uh, thank you, Russell. Um, but it also works as a clay lube.
Okay, so now let me see if you can kind of hear this. I don’t know if you can pick up on that, but this thing’s pretty rough. But the way you use this is just like I showed you. I fold it. I use—I always teach people, you know, to use this like a clamp. So, I’m going to clamp this with my thumb on one corner. The corner, not the rubber side or the rubber corner.
Technique Tips While Claying
And then it doesn’t really matter which way you move your hand, but you just want to get that thing moving. Let inertia kind of work for you. Make sure you use plenty of lube. And of course, you want to do this to the entire car.
And I will tell you, as bad as this car is, the sides weren’t as contaminated as the horizontal surfaces. And the reason for that is because when there’s contamination in the air, it lands on the horizontal surfaces.
Overspray and Contamination Patterns
Now, if it’s something sticky like overspray paint—couple weeks ago, I’m driving down the road, saw some people painting a house with a big old air sprayer. Overspray everywhere. But if it’s sticky, it will hit the sides of the car if there’s any kind of wind out there. And of course, you can have contaminants on the vertical panels. But the only way to really know that is to do the baggie test, which I forgot to show, but I will in a second.
Okay. So, once I got this side clean, again, I’ve already clayed the rest of the car just to speed this video up. Okay.
Cleaning and Reinvigorating the Towel
And then at some point, I would take this over to my slop sink. You could do this at your house in your kitchen sink. And sometimes these things stick together, but just pull them apart like that. It kind of reinvigorates the abrasive mix in the polymerized rubber. I would just lay this thing down flat. I would grab a brush of some sort like this. Actually, a little less aggressive brush, but I would just run water and even just use some hand soap and just give it a good wash. Hang it someplace to dry and you’re good to go the next time you want to use it, though.
Okay, let me show you this for some other things, too. Okay, let me grab my baggie. Hopefully, we won’t film anything after this.
Wiping Residue as You Go
And of course, as you work around the car, you want to remove that clay lube. I don’t get too bent out of shape about trying to make this look pretty because I’m just going to come up and buff it, but I do want to get any residue I loosened, any contamination I loosened off. And of course, get most of the residue off also.
Okay. And technically, I should have done this before, but this is the baggie test. Although it seems like every—Okay, that is smooth. So, the clay towel works really well.
The Baggie Test: Why and How
Um, the baggie test. Someone asked me—I had a class this last weekend. One of the students says, “Why use a baggie?” Well, the reason you use a baggie is because it’s pretty easy. Most households have it. So, you have a baggie around your house and you go out and wash your car and feel your paint.
Um, but what it does is it increases your own natural sensitivity. So, by putting that baggie in your hand, it’s easier to feel what’s going on at the surface level of your paint versus just trying to use your human skin. And so that’s what the baggie test is for.
What Not to Use
Back in the old days, a lot of guys would use cigarette wrappers. To me, cigarette wrappers, they’re kind of crispy, kind of stiff plastic. I don’t want to be scratching the paint when I’m feeling it. And when you do do the baggie test, you do want to use a light touch. You could take, if you had a flawless black finish, and rub that baggie and scratch the heck out of it.
Clay Marring Is Real
And also, let’s just talk about clay marring or clay towel marring. The act of rubbing a clay bar or any of the polymerized substitutes—the clay mitt, the clay towel, the clay disc—it’s it’s going to mar the surface. It doesn’t matter if you use a lot of lube.
Now, here’s the deal. If you’re working on a black car, probably show up. If you’re working on a light color car, probably won’t show up, but it’s still happening.
Planning for a Polish Step
So, my own general rule and what I teach in our classes here is if a car comes to the class or comes to me and I, after washing it, do the baggie test and discover it’s contaminated, I’ve already factored in at least one machine polishing step for the entire car to remove any of the marring put in by the mechanical decontamination process, whether you’re using detailing clay or a clay towel. Anyway, that’s the thing.
Clay During Wet Work: Pros and Cons
And then there’s a little bit of a controversy, but I will go ahead and go down that rabbit hole. Um, there’s two options you can—and I I prefer claying a car during the wet work. So, I got the car out there. I’ve washed it. I’ve done a thorough rinse. And that’s the key to clay a car in the wash process is after you’ve loosened up all the dirt, you really got to flush it off good.
So, at some point, if there’s—you don’t—what you don’t want to happen is a piece of abrasive particle that you loosened in the wash process, but you didn’t rinse off, and then you trap it between the rubber surface—you know, the rubber surface of the clay towel, the mitt, or the clay disc—or a clay bar and then push that across the paint to scratch the paint.
Key to Safe Wet-Work Claying
So, the key with doing the mechanical decontamination process during the wet wash is to make sure you wash it and thoroughly rinse it and then you could either foam the car or just dip your whatever you’re going to use into your soapy water. You could spray some soapy water on there or some clay lube, just something to lubricate it as you rub it.
But the problem with doing the clay process during the wash process is you don’t know if the paint is hard or soft until you do the test spot. When do you do the test spot? You do the test spot after you wash and dry the car.
Adjusting for Soft Paint
So, if you—if you—if you wash the car, rinse it, and clay it while it’s wet, and then you bring it back into your shop under the lights and go, “Wow, look, I I I’m”—The word mar is like the kind fluffy way of saying scratch. Okay? So, you scratched the car at the claying process.
The difference being is if you would have stopped and done the test spot first and found out it was soft paint, then I would try to—to the best of my ability—get what’s called an ultra-fine clay bar. So, it’s not aggressive and I would use that to clay soft paint versus any of the other options, a medium grade, a coarse grade, or any of the polymerized rubber substitutes.
Experience With Soft Paints
So, I just want to point that out because in my life, I’ve worked on a lot of cars with very soft paint and um you can see the marring left by whatever you use. So, there you go. So, there’s clay.
Okay. So, we’ve got that clay. That means this entire car is now clayed. So, the next thing we want to talk about is doing a test spot.
Test Spot: Learn From My Mistake
Now, in the last video—or that video that we shot that I referenced earlier called Beginner’s Guide to Car Polishing—um, I made a huge mistake and it was actually quite embarrassing because a bunch of people pointed it out in the comments. But one of the things I shared was back in 1988, I wrote my first how-to book. And when people in the industry, uh, around the world now use the term test spot, if you go to the index under getting started, it says right here, performing a test spot by hand. Performing a test spot by machine. The published date of this is 1998.
So, as I said in the other video, I may not be the guy that invented the term test spot, although I think I am. I am the guy that can document it back further than anybody else. And all I wanted to really kind of point out about that is I feel very qualified in teaching other people how and why to do a test spot.
Where “Test Spot” Came From
And um—and the short behind-the-scenes story of that is a lot of you younger guys won’t remember this, but in the early days of the internet, we didn’t have Facebook, Instagram, Periscope, TikTok, uh any of the stuff. Uh, but there was this thing called the Usenet newsgroups. And there was a section in there called rec.autos.misc.
And I was always up there posting how-to information. And this would be back in the 1990s, 90, ’91, ’92, ’93. I was posting how-to articles on the Usenet newsgroup and I came across a guy and this is where the test spot came from. I came across this guy and he says, you know, “Hey Mike, I I just uh compounded my entire car and after washing the compound off, I looked at it. It’s just completely filled full of scratches,” and I was kind of taken back. I was kind of aghast and I just kind of says, “Well, you know, here’s a good practice.
What you should have done is after you washed and dried the car was take that product you bought, whatever it was, and just apply it according to how you were going to apply—per the directions—and then looked at the results. And then if you found out it was scratching the heck out of your paint, ‘cuz a lot of old school compounds did that, you could have stopped right there and only had to fix that spot.”
What you did is you did the entire car. You messed up the entire car. Now you got to fix the entire car and you can’t use what you’re using because obviously it wasn’t working. So that’s where I really started putting a lot of emphasis on test spot—was trying to teach people to test whatever it is they’re buying because you know I’m dealing with people around the world. I don’t know what products they’re buying but make sure it works.
And in the detailing world let me just go down this rabbit hole. The most—the most difficult thing to make is the compounds, the polishes, and the all-in-ones, the cleaner waxes. Okay? Because they all use abrasives. And—and I—I always tell people this that when it comes to polishing paint, the most important factor is the abrasive technology. Okay?
Abrasive Tech vs. Ego
I meet a lot of detailers that are alpha males, kind of ego-driven, and they take a jacked up car like this and make it look beautiful. Then they’re kind of like, “Oh yeah, I am so good.” And you are good if you fixed it, but you were not touching the paint. The abrasive technology was touching the paint, followed by the pad, followed by the tool, followed by the tool running the tool—the guy or the girl. Okay.
So—so the most important thing is the abrasive technology because if you’re using a compound or a polish that just doesn’t use very good abrasive technology, it doesn’t matter how much technique you throw at it. If it’s—what bad abrasive technology does is it’ll remove a defect, but it leaves its own defect behind. We usually call that micro-marring or holograms, but that’s what bad abrasive technology does. Good abrasive technology removes a defect and doesn’t leave anything behind. You can go to the next step.
Start Right: Do the Test Spot First
So, if you start out using something with bad abrasive technology, it doesn’t matter how much technique or if you change tools or pads you throw at it, if it’s removing a defect and leaving its own defect, you’re really going backwards in the process. You’re—you’re not going to get the results you want. And it all started with what was touching the paint.
So, back to the test spot. The reason you do the test spot after you’ve washed and clayed the car is first to make sure you can fix the paint. I’ve come across cars with paint that’s—nobody can fix. They need to be repainted. And that’s why you don’t see this car taped off. I don’t tape off the car till I dial in my test spot. I want to make sure I can fix it.
Don’t Waste Time (or Tape)
If I—if I wash the car and clay it and I think, well, I know I’ll get it all taped off, then I’ll start working on it. And then I do the test spot and find out I can’t fix it. I just wasted time, steps, and all my masking tape. So, do the test spot first. Then if you find you can fix the car, then you want to go ahead and tape off any plastic.
And this we’re going to show you. This car has a lot of what’s called pebble textured black plastic trim. And pebble texture means if you feel it, it’s almost as though it came out of a sand mold. It has little hills and valleys. It’s very textured. And if you—if you accidentally run a compound or a polisher, say an AIO, into that, chances are really good you’re going to permanently stain it.
Old Trim vs. New Trim
Now, if the car is brand new and the trim is brand new, our products are very trim friendly. I still tape off every car just from experience. Um, but what happens when you get older plastic—like this is a 2018, so it’s 20. So that means what? 7 years old. It’s 7 years old and it’s neglected. The trim is faded and dried out. So now if you run your polisher over old trim, chances are you’ll permanently stain it. Brand new car, new trim, probably be able to get it off no problem. But once you stain old plastic trim, it’s game over. So that’s why you wait and tape off until after you’ve done the test spot.
How to Choose Your First Combo
Now, a part of that test spot that I showed in the first video where I made my mistake was if you do a test spot, and when you do a test spot, you usually use, um, you don’t want to use pads or products at the extreme. So, at one extreme, say if you got a fine cut polish, and at the other extreme, you got a heavy cut compound. Well, for your test spot, you want to kind of use something in the middle, just kind of a normal polish or a medium cut polish. Same thing with pads. You don’t want to start with a finishing pad. You don’t want to start with a super aggressive pad. You want to go right in the center. Use a polishing pad and do—and then do your test spot and then look at the results.
And if they do not look good, and here’s where I made the mistake. You don’t do the test spot in the same place, you’ve already abraded that section. Your results will be skewed. So, you need to move over and do a new test spot in virgin territory. And if that test spot doesn’t look good, then you would go to a new section.
Always Retest on Fresh Paint
So, every time you do a test spot, you want to retest in new territory. You don’t want to go back to where you’ve already been testing because your results will be skewed. And just to kind of reiterate in that last video, that previous video, Beginner’s Guide to Car Polishing, the reason I didn’t cover the importance of moving to a new section every time you do a test spot, isn’t because I don’t know to do that. It’s just a lot of times I get so my brain gets so busy trying to make sure I cover everything that I forget something and that was the thing I forgot.
Okay. So—so let’s go ahead and let’s go ahead and we’ll do our first test spot. And as we’re doing this, let me go ahead and just try to again do a brain dump.
Paint Thickness Gauges: Big-Picture Indicator
So, one of the things people are always asking about are paint thickness gauges. This is the Rhopoint coating thickness gauge. So, coating thickness, paint thickness, same kind of thing. So, the first thing I’m do is I’m just—And I have a full tutorial on this tool on the Dr. Beasley’s blog. Probably if you search Rhopoint Mike Phillips probably pull that article right up. So, let’s go ahead and turn this on.
And I’ve already done some measurements. This paint is actually—we—we believe it to be the factory paint and it’s very thin, 4.17 mils. So, let me just share what does that mean? Okay.
Mils vs. Microns (And Why It Matters)
And I know a lot of you guys measure microns and let me be the first to admit microns is more accurate because it’s just a more, uh, smaller size of measuring. So, everything’s more accurate. The problem is is I grew up in America where we didn’t use the metric system and I grew up using mils. So, one of the things that I’ve always taught people, I have an article that dates back about 20 years. If you take your average Post-it Note and pull off just a single Post-it Note and hold it between your thumb and your finger, okay, it’s pretty easy for you to wrap your brain around and go, “Wow, that’s really thin.”
Okay, the clear coat layer, not the black, not the primer, but just the clear layer of paint on a factory finish tends nowadays to be thinner than a Post-it Note. Post-it Notes are around 3 mils. Factory clear’s 2 mils or less. So, the reason I do this is so someone does that and goes, “Oh, wow. That’s really thin.” Okay. And let that sink in. Maybe you don’t want to be compounding really hard on your car because you just don’t have that much paint there.
The Dollar Bill Trick
But let me show you another way to do this because maybe you don’t have a Post-it Note handy. Here’s just a basic dollar bill. And I can’t do math in my head, but the rest of you can. But let’s go ahead. I’m going to try to measure in exactly the same place. 4.17. I’m just going to lift it up. Slide this in. 6.92. And, uh, again, I can’t do math in my head, but that’s right around 3 mils, give or take a few increments. And most people have a dollar bill. So again, you can hold the dollar bill between your thumb and the finger. Wow, that’s really thin. Okay, well that’s how thin your clear coat is.
Custom Paint Jobs vs. Factory Paint
And that’s why I like cars like this one over here. There’s a 1970 Satellite. It’s from the class we had just last week and I had eight cars here. This was one of them. We did a full paint correction and ceramic coating on it. It has a custom paint job. And when you measure the paint on it, it measures a lot thicker because a lot of times when they restore cars and they finally get to the point where they’re going to paint it and it’s in the paint booth, that painter knows it’s going to get sanded ‘cuz it’s a cool car. They’re going to try to get a show car finish on it. So they put extra paint on. So that’s one of the reasons I like.
By the way, thanks Nancy. I’m gonna keep that book. That’s our video guy in case you didn’t know. Okay. So—so that’s something to understand as a paint thickness gauge.
Don’t Get Lost in the Gadget
Now, you can buy these on Amazon for I think as cheap as like 30 bucks. The one I’m using is right around 150. They go up to the thousands. And the only thing I’d like to say about a paint thickness gauge is what I use it for is a what I call a big picture indicator that helps me to make the go or no go. So it’s going to help me to go, “Oh, that’s really thin. I’m not going to compound.” I’m not going to go. I’m not going to go that way. Or I go, “Wow, I got plenty of paint on here. I’m going to make the big picture indicator, the decision to go. I’m going to go ahead and compound it to get the swirls or scratches out.” So that’s what I use it for.
Measure a Few Panels, Then Get to Work
And this would go a little bit deeper because I covered this in my last class. You know, people do tend to get all caught up in the gadgets. I do. But here’s the thing. Um, if you’re going to use one, go around and just measure a—a few places on each of the major body panels to get an idea for what the paint thickness is. If you want to go elaborate, a lot of these paint thickness gauges will create a database you can download on your computer and you can, you know, you can really get a good idea how much paint is on every square inch of every body panel. But the thing is is you’re not getting the car buffed out, you know. So, use it as a big picture indicator. Make your decision about how aggressive or not aggressive you’re going to go and then get working on the car.
Um, anyway, that’s—that’s my take on it. And you got to keep in mind, I started detailing cars, uh, professionally in the 80s. Yeah. So, a long time now. And almost the majority of all my work, I never had a paint thickness gauge. Heck, I didn’t even know what they were. And here’s what I did instead. I use good abrasive technology. I use the right tool for the job and good technique. And all my stuff comes out without a problem. So, don’t get too caught up in a paint thickness gauge.
Pads First, Then Tools
Okay, so we’re going to do a test spot. So, the first thing I do want to talk about is pads. Now, in this video, we’re going to be covering primarily foam pads. Uh, in a future video, we’ll be covering microfiber pads and wool pads, but this one we’re going to stick with foam. And I have the Buff and Shine line here, but it is—there’s a lot of quality brands of foam pads on the market. So, just pick a brand and go with it. I do particularly like this brand and I’ll tell you why in a second.
But you can see there’s a color code here. We got a light blue, a maroon, a medium blue, yellow, white, and black. There, I’m sad to say there is no universal color code system in the industry worldwide. Every pad manufacturer just comes up with their own color scheme.
How to Tell What Pad You’re Holding
So the—the question I get all the time is how can—how do I know what the pads are? Well, first of all, you could go to the website and look at the—what the—the manufacturer shares. I mean, for this pad here, it’s probably going to say soft foam finishing pad. There, I know what it is ‘cuz I went to the website, you know, do your research.
But if for some reason you have some pads, you have no idea what they are. Here’s how you can tell what they are. Just take your clean hand and feel the surface. A foam finishing pad will be very soft. And then let me go to the extreme opposite. Here’s a very aggressive foam cutting pad. And when I feel it, it’s sharp. It’s got a sharpness to it. It’s also denser. Okay, it’s harder to squish.
Not All Foam Is the Same
So, there’s two ways besides even looking at the back where it says blue heavy cut. So, there’s all different ways to find out what the pad is. And it’s kind of up to you to figure that out. But, I just wanted to share that when you feel it, you can feel the sharpness or no sharpness. And as—as I went through these, like this has—this has no real cut. This is a white polishing finishing pad. This is a yellow polishing pad. I can feel a little bit of cut there, not a lot. And then as I get to the blueberry, little bit more, the maroon all sudden it starts getting sharp. So there are varying grades.
And just to kind of throw this out there, you know, a lot of people think foam is foam. But what you don’t know is the people that make the foam add chemicals to it to make it do things. It’s not just foam like you get in your camera case. There’s chemicals in there for the polishing world to make it do different types of things. So there is a science to making foam pads.
Entry-Level Tools and Backing Plates
Now, so we’ve covered the pads. Now we’re going to cover tools. Now, in the last video, I shared with you a tool, and this was because we’re targeting this video at beginners, people that have maybe never polished out a car in their life. And so, if you’ve never done this, I mean, there’s a lot of great tools. I got $50,000 of the tools back there. Some are as high as 8, 900 bucks. But if you’re new to it, you might want to start out with just an entry-level tool. See if you even like this. You might buff out the hood and go, I’ll just let it go, or I’ll take it to a detailer, or I don’t care. And if you do like it, then after watching this video, I’m going to show you some tools that cost more but work better.
But let’s go ahead and we’ll start out with this entry level tool and we’ll do our test spot. Now, the first thing I also want to cover is look at the backing plate size on this. Let me put this in order. You read left to right. So, this is a 6-in backing plate. This is what this tool comes with. It’s a 6-in backing plate. I have put a 5-in on a similar tool. It’s the same exact tool that they change body styles and logos, but this is a Bauer 8 mm free spinning random orbital polisher.
Swap to a Smaller Backing Plate
And in a previous video we made on this tool, I highly recommended to go ahead and after you buy this tool, take that backing plate off and go to Amazon. This is a CASOMAN—can you get in there and see that? I’m sharing this because people send me messages. Mike, what’s that backing plate? So go to Amazon, type in CASOMAN. You can find two of these for 10 bucks. And yeah, they’re not high quality. They’re cheap, but you get what you pay for. But it’s really probably one of the least important ones that comes with this tool.
But let me show you why I recommend going to the smaller backing plate. Here is a 5-in pad, and here’s a 6-in pad. Look how much more surface area there is for that tiny little tool to try to rotate and oscillate. So, by putting a smaller backing plate on there, you’ll get better performance out of the tool, especially if you’re experiencing pad stalling just because you got less surface area that you have to try to rotate and oscillate.
Picking the Right Polish From the Line
Okay. Now, this tool in that video, we ran into some stalling problems. So, I got some other tools here and I’m going to show you how to overcome pad stalling in multiple different ways, but let’s just go ahead and we’ll start out with this. And if you remember what I said, I said you want to start right in the middle for your test spot. So, this is a foam polishing. It’s not cutting. It’s not finishing. It’s right in that sweet spot we talked about.
And in the Dr. Beasley’s line, we have the Core Cut Plus, which most people should never be using. It cuts so fast. We got the Core Cut. This is like our compound. Cuts really fast. Then we got the NSP 150, the NSP 95, 45, and the Z1. What these numbers mean is the diameter of the abrasive particle.
What “Abrasive Technology” Looks Like
So, we use a—a part abrasive technology that is exclusive to Dr. Beasley’s in the United States. It’s called microspheres. Here I have some back here. A lot of people don’t know what I say when I say abrasive technology. So let me help you to understand. Here’s the Core Cut 1.5 microns. And I’ll take some out of here and just kind of show it to you. That is what we talk about when we say use abrasive technology. In the industry a chemist would refer to it as powders or grains. Okay, I just call it abrasive technology. But that’s what it looks like before it’s turned into a product.
Why the Nano Gel Matters
And then because someone in the last video says, “What makes your products different from everybody else?” Well, our products are 100% inorganic. That means they’re not made of anything that grows out of the ground or grew out of the ground at one time. This is our nano gel. It’s 100% inorganic. So, this is what you put the abrasives in and you create one of these products that you would see over here.
Primer Without the Wipe-Down
And then the benefit to the nano gel is because it’s 100% inorganic that after you use it, you can go right to the ceramic coating. With pretty much, I think every other product on the market, including the ones that say primer—‘cuz that’s how we describe ours as a primer because it primes the paint for the coating—they’re made with mineral oils, um, petroleum distillates, things like that that are organic, and you need to use a panel—like panel wipe like isopropyl alcohol or mineral spirits—to wipe those oils off so the coating can actually bond to the paint.
So, I’m not a big sales guy on product, but I did want to cover that up because there was quite a few questions about that in the last video.
Setting Up the Test Spot
Okay, so we talked about our tool, we talked about pad choice, and for this I’m going to go with the NSP 150. In, uh, my estimation, this would be the closest thing to the average polish on the market today. Here’s another technique. Here’s a Sharpie marker, and let me show you a real important thing you can do, no matter what brand of polisher you’re using.
Uh, as you can see, I’ve already taken and put a black mark on the backing plate. And I’m going to put one on the pad. But here’s why. If—if that black mark wasn’t there, when I turn this thing on, um, the yellow backing plate, the yellow pad are just a blur of yellow. It’s really hard for me to tell if the pad’s rotating and oscillating or if it’s just vibrating or stalling out. So, this is a real way to make a quick visual indicator. Mark the backing plate and the pad or just mark one or the other. Um, so just like this. And then I think you’ll be able to see when I start polishing what I mean by that.
Where to Place the Test Spot
Okay. So, we marked that and we’re going to do our test spot, uh, with NSP 150. I put it up here already. So, when you’re doing your test spot, you want to pick a panel. The—the best panel is a panel you can look down on. I see some guys doing on the side of a fender. I’ve done that too. That works too. But in most cases, it’s the horizontal panels, so the trunk, the roof, and the hood that tend to take the most damage from Mother Nature. They take the brunt of the damage and even from us when we’re washing it, you know, and things like that.
Um, so that means it’ll have the worst defects. So, if you dial in a process that fixes one of the horizontal panels, chances are good it’s also going to fix the vertical panels. If you do a test spot that fixes the vertical panels and they’re not as bad shape, then you do the horizontal panels, you might go, “Oh, this isn’t working. It worked good on the door. It’s not working on the hood.” So, always do your test spot on a horizontal panel that you can look down on. That’s why I’m not doing it up here on the roof. I can’t really look down on that.
Best Practice: Work From the Center Out
And then, normally when you detail a car, and, uh, I teach this in all my classes, you need to have what’s called a best practice. You need to have a method to the madness. And when you’re buffing out these larger panels, you don’t start buffing here and then work your way out to the center at some point. You start in the center and work your way out. Then I’d move down and start in the center and work my way out. I might come to the front, start here and work my way down. But you don’t start on the outside of the car and go to the inside. You start on the inside of the car or the panel and work to the outer edges.
Uh, but for the test spot, I’m just going to do my first one right here. Oh, see here it is. I—I forgot I put it on the windshield wiper. So this is the NSP 150.
Priming, Drops, and Pad Choice
And to start out, whether you’re using a microfiber pad, a micro wool pad, or in this case, a foam pad, because the pad’s dry, I kind of like to—A lot of guys talk about pea-size drops. I like to add dime-size drops. Okay? And you know, there is—there is the topic of pad priming, pushing this all over the place, and you can do that. The idea being is once you put the abrasive technology over the entire face of the pad, when you turn the tool on, 100% of the pad goes to work for you.
But in my older age, I’m getting lazy. So, I just let the product migrate around on its own. But, however you want to do, I will say if you’re going to get into microfiber pads, it is important to go ahead and prime your pad. And the idea being is to coat each individual fiber or most of them with the abrasive technology just so you have uniform cutting. Uh, better pad rotation, better pad oscillation. So, priming a pad for microfiber very important—with foam just less important. Look, all my cars come out looking good and I don’t prime pads. So, figure that one out.
Section Passes and Arm Speed
Okay. Cord over shoulder. And this is an important technique just so you don’t sit here and drag this up and down the side of some dude’s car or your own car. Okay. And then what I’m going to do is I’m going to make a series of section passes. Let’s talk about section passes. You know, um, you’ve got thin panels. Where’s the, uh, the fender there? The top of the fender. There’s a thin panel there. You’re not going to do a crosshatch pattern on a thin panel. You’re going to run the polisher the direction of the length of the panel. This just makes common sense.
But anytime you can cross-hatch, you should cross-hatch. And that’s for what’s called UMR, uniform material removal. You’ll remove just as many swirls here as you do there as you do there, because you did a very consistent and equal polishing process.
Underdo Your First Test
Now, real key when you’re doing a test spot, and you can kind of determine how you want to do this, but—but you want to—you want to either count how many seconds you’re polishing or count how many passes you’re polishing and use what’s called a slow arm speed. Arm speed is how fast you move the tool over the surface. You want to use a slow arm speed.
So, some people like to count seconds, but for me, I—I just can’t do it. I can’t sit here and go one Mississippi, two Mississippi, you know, 80 Mississippi, 90 Mississippi. So, I just like to count my section passes. But whether you do time it by seconds or minutes or count your section passes, the really big picture point idea when you’re starting your first test spot is underdo the amount of section passes you—you would think you would do.
Map the Section, Then Go to Speed
Because if you—if say if I did eight section passes and I wipe off and the scratches are gone, I never knew at what point they were gone. They might have been gone after the first section pass ‘cuz the paint’s soft. But if you overdo your section passes, there’s no way to know. So underdo it for your test spot. So in this case, I’ll just go. This paint’s really bad. And I have no idea if the paint is hard or soft. But I’m just going to do four textbook example section passes. Then we’ll wipe off and inspect. And then we’ll go from there.
And the other thing I just want to point out, and I teach this to people all the time, you can blame me or not, but when you’re by yourself, if you dial in a process that say you’re going to do eight section passes to every section to get the defects out to your satisfaction, I count them out loud. Otherwise, I forget where I’m at. And then I do more passes to make up for the ones I don’t know that I didn’t do, and I spend another hour buffing out the car. You save an hour easy by doing this technique.
Spread at Medium, Polish at Max
So, here we go. And speed settings. So, someone asked me about speed setting. This has a dial. Most of these tools go from 1 to 6. This is on the 1. You know, I would never use the 1 for anything. If I was going to do some machine damp sanding with this, I’d probably be on at least a 3 or 4. But to spread your product out, if you’re new to this, here’s a good idea is put on a medium speed. Set something like 4. Turn the polisher on. Spread your product out. Spread your product out. And this kind of maps out in your mind’s eye the size of the section you’re going to do.
And for, you know, this is what I would call a wimpy tool. For a wimpy tool, you’re going to do a section about the size of a microfiber towel. And that means when you buff out the car, you would start in the center and go here. Then you might go here. Then you might come to here, then go to here. But each time you’re going to do that size, the size of a towel. And you’re going to overlap a little bit into the previous section for UMR, uniform material removal.
Monitor Rotation and Keep the Pad Flat
Okay. Now, as you look on here, what you see—can you bring this camera down and show that? This is what I call a uniform layer of two things. So you have abrasive technology and lubrication. Okay, the lubrication in our case is the nano gel. It’s the thing the abrasives are embodied in. And it takes both to create beauty. Okay, if I threw a handful of sand on here with some water, it’d probably remove the swirls and scratches, but it wouldn’t look very good ‘cuz that’s not a very good abrasive and is a horrible lubrication.
Okay, so then once you do that, I’m going to take and I’m going to turn the speed all the way up to 6 on this tool. I’m going to monitor for good pad rotation. And if I don’t see the pad rotating, I will check to see if I’m holding the pad flat to the surface. A lot of times I see people buffing like this. They push down on the back of the tool. There’s an air gap in here. Only the back of the pad’s working. It ain’t going to rotate very well.
So, you want to keep that pad flat. And that means you put all the pressure up here. You could actually put your hand under the tool, which would keep you from pushing down on it. You could pull down on it, but it’s just a technique to teach yourself to keep all the pressure up here and keep that pad flat to the surface.
And then, of course, I will use a slow speed, arm speed. So, here we go. One, two, three. Okay, there was four textbook examples of a four section pass. Textbook example of four section passes. Slow arm speed. I did a crosshatch pattern and I overlap by 50%.
Clear Coat Check and Towel Setup
Okay. And first of all, just real quickly, there’s just white product on here, which tells me we are in fact working on a clear coat. Had this been a single-stage paint job, which it could happen, someone could repaint this Mustang and use single-stage urethane or lacquer enamel, I would have pulled pigment off. It would—the pad would have turned black.
So, real quickly, all my towels are already pre-inspected. I use tweezers for that. When they come out of the dryer, I feel them. I look at them. I make sure there’s nothing on them that could put a scratch in paint.
Why I Like These Towels
And then I—I love these towels. I get these at Auto Fiber. Uh, they’re sold as a glass towel. Uh, but they have a loop kind of like a bath towel. A la a bath towel when you go to get out of the shower and dry off. Um, they have a—a loop. It’s called the nap. And how that works with this towel versus a towel with just open fingers—they’re split open-ended fingers—is when you push this against the product, that—that loop—uh, how can I make a loop? That loop tends to slice into the film, breaking it up, making it easier for me, you—me—to wipe off.
But then some people will say, “Well, Mike, that has an edge that you weren’t—you going to scratch the paint because it’s got this silk edge.” Well, I don’t do stupid stuff. I don’t rub the paint with the edge. So, look at your hand. Here’s your index finger. This is your clamp. After you fold it four ways, clamp the edges. Lay your towel down flat. Spread your fingers out. Kind of scrunch it up. Now you’ve got really good towel control.
Wiping Technique and First Results
Doesn’t really matter on the horizontal surface, but on the verticals it does ‘cuz you don’t want to get your towels on the floor. They get contaminated, put scratches in paint. Then just come down and use an overlapping circular motion and wipe off the residue.
Okay. Now, camera guy, can you see the difference between that stuff or do you need the light? Okay, so let’s bring a light in here. So, we’ll start out. By the way, this car has a lot of rock chips, so we’re planning to bring it back. Am I getting it for you? We’ll go forward. We’re planning to bring it back and do a video on how to do rock chip repair.
Evaluating the Test Spot
Okay, so let me tell you what I see compared to over here. A billion times better. And it’s a very nice dark finish. I don’t see—I do see some micro-marring. Okay. So, what that tells me is this paint’s probably pretty soft because I’m using a polish and a polishing pad. And even the pad can leave its own scratch pattern. So, to finish a black car out or any color car out perfectly, if you are seeing micro-mar, that means you need to switch to a less aggressive product and a less aggressive pad for the final step.
Um, anyway, so when I look at this, you know why—it does—it does look good. There’s still some deeper scratches here and there. I mean, this thing again was used as a hockey puck. So, I’m going to go ahead and do a second test spot. And I’m going to—I’m going to increase the level of cut.
Heavier Cut Second Test Spot
So, I’m going to go with the blueberry and in the Buff and Shine line. This is called heavy polishing. So, it’s a little more aggressive than just polishing, which is what I had on the polisher. Okay. So, we’ll pull this off.
Now, at this point, I could just stick with the NSP 150. Uh, but the guy that let us borrow this car, I also did commit to him to do a really good job. So, I’m going to cut this thing hard and really try to put a—the best finish that this paint can take back on it. But here’s our Core Cut. And this is a very sharp abrasive technology.
Product Amounts and Splatter Control
So, back to our dime size ‘cuz it’s a brand new pad. Once the pad kind of breaks in, then I would start using pea-size drops. Now, instead of doing the test by here, I’m going to move over. In fact, I think—can you capture if I do it up here? So, I’m going to go up here and just kind of get out in the middle here.
Okay. And again, uh, couple—couple techniques I didn’t cover a second ago. Before you turn a polisher on, make sure it’s in contact with the paint. Otherwise, you’re going to throw splatter everywhere.
Spread, Then Two Section Passes
Okay. I’m—I’m going to turn it down to the four just to spread my product out. Okay. That’s not included in section passes. That’s just getting it spread out so I have a uniform layer of abrasive technology and lubrication. Now, I’m going to do—I think I’ll just do two section passes and we’ll lift off and see how that looks.
Okay, two textbook examples of a section pass. I didn’t count those ones out loud. I usually do. Let’s check out what two passes will do.
Inspecting After a Heavier Pass
Oh, yeah. And when you’re—when you’re wiping off, you want to take just little bites at a time using an overlapping circular pattern. And in most cases, when you use that technique, everything will wipe off nice and easy.
Okay. So, now let’s—uh, when I look at it, you know what? It’s—a lot of the deeper scratches are gone, but let’s go ahead and throw this finder light. I still see a few deeper scratches in there. Am I—am I good? Okay. Here’s the second test spot. Better defect removal just by changing the pad to something more aggressive and also changing the abrasive technology to something more aggressive.
How Perfect Is “Perfect Enough”?
Now, when we talk about is that good enough? Well, that’s a great question. And one of the things you got to do, you got to take into context what the car is, how it’s going to be treated when you’re done detailing it, whether it’s yours or you’re a professional doing it for someone else. And that will kind of let you know just how far am I going to chase these scratches.
Okay, this thing has a lot of deep scratches in random places. And because we measured the paint and the—the paint’s measuring anywhere between a low of 3.8 mils to a—a high of 4.8 mils, you know, with a mil in there, that’s—to me that’s thin paint. I don’t want to get too aggressive with this because, um, I—I haven’t checked with the owner, but to my knowledge, this thing sits outside all the time.
Managing Expectations and Protection Choices
So, trying to get every single scratch out of this car would mean removing a lot of the already precious thin clear coat that’s on it. And it’s already, uh, 2025. This is a 2018, so—7 years old. You know, it’s getting close to 8 years old. So, I want to take that all into context and go, you know what? I want to get pretty good, but I’m not going to look for perfect.
And here’s how I would normally do that for a car like this. You just saw me do two section passes with Core Cut and a, um, heavy polishing foam pad on a simple DA and I removed, you know, easily 90–95% of the defects. I would call that good. I—I would say, “Hey, that’s—that’s what we’re going to get.”
Talk to the Owner About Washing
You know, if the owner says, “Well, I want it perfect.” I would—I would try to educate him and I’d say, “Look, you know, the guy’s name is Brian. Look, Brian, you know, um, when you brought it to me, it’s pretty jacked up. So, I don’t know if you bought this new or used, but whoever’s owned this car, they have not been taking care of it very well, you know. So—so for me to go in and make it perfect, just to go back into the world it came from and get scratched up would just be a waste of time.”
So, keep those kinds of thing in context when you determine just how perfect you want to chase. Another thing is—is anytime I detail a car for somebody else, the first question I ask them and the first question you should ask them is, “How do you wash the car?” That will tell you everything they know about take care of the paint on their car.
Using Inspection Lights Correctly
If they say, “Well, you know, right down the road for me is a swirl-atic car wash, automatic car wash. That’s where I take it ‘cuz it’s convenient.” I wouldn’t even try to get it this good because soon as he takes it to the car—wash one time—is going to start putting scratches in. Now, if Brian says, “Well, you know what? After you get it done, I love this car. I’m going to wash it carefully like that video you show on how to wash a black car and try to keep it as nice as I can and hopefully never have to see you again.”
So, knowing how somebody washes the car will help me to determine how far I want to go as far as the paint correction and also whether I’m going to use a wax or a ceramic coating or a synthetic paint sealant. So, I always ask my customer, how do you wash the car? It’s always fun to actually hear them describe what they do.
Distance and Angle Matter
So, you saw me inspecting the after results using what’s called an inspection light or some people call it a swirl finder light. This is the Scangrip brand. I think they’re one of the early, um, innovators in the marketplace. I think most people would agree they have the best inspection lights. They’re also the most inexpensive. So, whatever works for you. I just like my Scangrip.
But let me give you a couple tips and techniques on how to correctly use it. Now, I had a class this last weekend. Had 16 people here. 13 people flew here from out of state, including three from California. And we detailed eight cars, including sanding two of them. So, we’re talking about an intense class. And, of course, I showed them how to use an inspection light.
Common Mistake With Lights
And even after showing them, I had people doing this. Can anybody say what’s—tell me what’s wrong with this? Pull that light up. You want to put it about a foot and a half off the paint. And you want to angle it at a 45° angle to your eyes so you can correctly see what’s going on with the paint.
When you put it down really low like this, all it really does is blow out the paint. You don’t really see what’s going on, especially in any of the surrounding areas. So, you want to hold it about a foot and a half off the paint. Hold it so it’s at a—it bounces the light to your eyes at a 45° angle. And that’s how you use one of these inspection lights. Real handy.
Gadgets Build Trust
And another thing you can do is, you know, this—this video is kind of just targeted for people that are brand new to polishing, whether you’re an enthusiast or professional. But I always teach people that when you’re—if you’re doing this for money and you’re talking to a customer, it just kind of helps if you can show them cool gadgetry things like the swirl finder lights because they probably never seen one and it just helps them to trust that you actually know what you’re doing. Uh, because you know about the things they don’t know about. They probably never seen one.
Dialing In More Cut (Then Finishing)
Okay, so we dialed in our test spot and we found out that with just two section passes with our Core Cut, we left this paint looking pretty flawless. So, what I want to do is two—for me, two section passes. Eh, I think I could probably pull out more by doing four. So, I’m going to go ahead and do two more and then we’re going to start talking about pad stalling.
Well, actually, I’m going to do the second step ‘cuz remember I said this paint is soft. In fact, uh, let’s talk about hard and soft paint. The fact that I was able to pull 95% of the defects out using two passes with a polishing pad and a—and a compound tells me that the paint’s pretty soft. If it was hard, I’d had to make eight, nine, 10 or get a more powerful pad—tool, more powerful pad.
Plan a Two-Step on Soft Paint
So that tells me it’s—this paint on this thing is soft. But also, I saw some micro-marring. Okay? And a lot of times that can be left by the sharpness of the pad. And that tells me that in order to get this thing perfect, I can’t just do one step with a heavy paint correction step to remove the majority of the defects and stop. I need to do that step and then come back with something less aggressive to make sure the paint’s perfect in the sun.
So, uh, to do the—set, let me do two more steps with this. So, that would be a total of four section passes. And when I’m doing that, I want to talk about how much hand pressure to put down.
How Much Pressure and Speed
Okay. So, now you can see the pad’s kind of broken in. You can see the—the NSP has migrated around the pad. It’s—now it’s—it’s actually—it’s not wet, but it’s damp with product, and that’s kind of what you want. And now I’ve put on three pea-size drops. Okay.
So, let me do two more section—solid section passes. I’ll count these out loud. But before I start, let me talk about how much pressure to put down.
Gauging 5 Pounds of Pressure
Okay, so, um, you don’t want to just use the weight of the tool. Uh, what happens when you do that is the pad kind of flutters. It’s not very smooth. You’re not going to do anything. So we know we need to add at least some pressure, but you don’t want to add so much pressure that you’re denting the sheet metal or, uh, bogging the tool down.
So a good way to use this tool is to just add about 5 lbs of pressure. Now, this tool weighs about, I think, six pounds. So, lift it up and feel it and then try to duplicate that with your hand. Uh, about 20 years ago, I wrote an article showing how to gauge pressure. And what I did is I took a bathroom scale. I put a piece of clear plastic over it—so I wouldn’t get polish on it. And then I actually put polish on the pad and put my hand on it. It was a Porter Cable. And I pressed down to show 5, 10, 15, and 20 lbs.
Practice Pressure on a Scale
And then I just encouraged everybody else, if you really want to learn how much pressure to put on the head of a tool, do that same thing. Get a bathroom scale, put your pad and your tool on there, and then apply pressure till you see that scale move in the direction you want to see it move and—and get a feel for what about 5 lb feels like. It’s not super rocket science. The point is you want to add some pressure, some light pressure.
And then my arm speed was slow. And what was the other thing I wanted to cover? Oh, the tool speed. Um, a lot of people are worried if this your first time about burning through the paint.
What “Burning Through” Really Means
And when you talk about burning through the paint, what that means is in the—in the case of this car, this has got a base coat/clear coat finish. So, when this car was built, they put on what’s a e-coat, or I think it’s called an electric coat. I forget what that’s for. Then they put the primer on. And then they—the e-coat may have to do something with rust proofing it. Then they put the primer on. Then they put the base coat. That’s the color you see. Then they put a layer of clear paint.
And a lot of people think clear coats aren’t paint. They’re paint without pigment. So you’re—if you’re working on clear coat, you’re still working on paint. It’s just clear paint. Just keep that in mind. You know, whether it’s base coat/clear coat or single stage, it’s all paint.
Avoid Edges and Raised Body Lines
Okay. So now when we talk about burn through the paint in the context of this car, what that means is you would take off so much clear layer that you would turn your pad over and see the black coming off. That’s a really bad sign. You don’t want to see that. And a lot of times when I’m doing custom work—like I actually sand down and cut and buff a lot of cool cars like this every year, like four or five a year. And one of the things I always show when I’m shooting a video or pictures is the—whatever the color of the car is—you don’t see it on my wool pad or my foam pad when I’m done. That’s the goal. Do the whole thing without ever striking through or burning through the paint.
Uh, but here’s the thing. These tools are really safe. I showed this in the last video. I’m going to pump this down to the four setting. And, you know, I understand you’re scared, but here’s a couple things. One is don’t ever buff on top of raised body lines or edges. So there’s this inset here where there’s a fresh air intake. And right here where this plane meets this plane, there’s a raised body line.
Why Edges Are Thinner
With the raised body line, a lot of times the paint may be thinner for a couple reasons. First, when they painted it, because it’s a high point, gravity causes the paint to flow downward. So the high points can be thinner just naturally from the painting process. But the other reason it could be thinner is through normal wear and tear. Maybe this car is washed a thousand times. There’s some kind of wear taken place there.
But another reason why is because if this car has ever been buffed out for somebody before me, and I don’t know what they used, maybe they used what they call a—I call a caveman compound. That means crap for abrasive technology. Call it rocks in the bottles.
Maybe they used a wool pad like this. So nothing wrong with this. I’m going to show how to use this on this car. But here’s a wool pad on a rotary. But they use that in conjunction with a real junky compound. And the effect is—is they remove the swirls and scratches, but all the raised body lines and all the edges, they left the paint thinner.
You come along using all good stuff with good technique. Make one pass and you go through because the other guy left it, as I like to say, whisper thin, very thin. So, was it your fault? It’s his fault. But guess who’s going to take the hit? You are.
Buff Next to the Edge (Not On It)
So that’s why I tell people when it comes to an edge, buff next to it, but don’t put that polisher right on top and buff on it, okay? You know, it’s just ridiculous. Just get close to it. No one’s going to come around your car and go, “Well, you know, Mike, you really did a good job, but right here by the edge, I still see a few swirls.” You know, let him buff out the car next time. Uh, so just try to bring some common sense to it.
Speed, Pressure, and Dual-Action Motion
Okay, so downward pressure about five pounds. Uh, for these wimpy kinds of tools. Seriously, you really want to be on the six speed. What you want to do is when you turn it on is you want to see good pad rotation and good pad oscillation. You want to see both, not just one. I see a lot of people always talking about, I don’t see no rotation. Well, I want rotation, but I also want oscillation. That’s the function of this tool. DA polisher, dual-action polisher, two actions.
So now I’ve marked this. Now I’m just going to put down 5 lbs of pressure. I bumped this all the way up to the six. And when you’re first starting out, it’s completely fine if you want to put it on three. There’s three. I still got some pad rotation. Okay. And—and just get a feel for the tool. Get a feel for the sound. Get a feel for the vibration. Get a feel for it. But as your comfort level comes up, you’re just going to find you’re going to be faster overall and more efficient if you bring it up to a higher speed.
Brand-Specific Speed Guidance
I will, out of respect to my friends at Rupes, they design all their tools to be run on the four-speed setting and then if you run into a concave curve or an issue with pad stalling because you’re on a thin panel or something intricate, then bump it up to five or six to power through that difficult area, but then back down to the four.
But when I’m using tools like this from Harbor Freight, I just put it on the six and just kind of set it and forget it. In fact, some tools I’ll even tape the speed setting on at the highest speed setting so I don’t accidentally bump it and bump it down ‘cuz I want to get done at some point.
Finishing the First Step (Four Passes)
Okay, let’s go ahead and do our other two section passes. That would be three. Okay, that’s a total of four section passes. No black paint. Remember, that’s a good sign. Sit there and we’ll wipe off. And then we’re going to dial in the next step.
This was just because I know I could get more defects out because I only did two in the first place. And that was just to teach you a lesson that when you’re doing your test spot to under—underdo the amount of passes you do. So you know at one point this paint’s also kind of sticky. At what point the defects come out.
So that is absolutely much better. So let’s go to the next step. Now, I need a—a process to come back and polish that to make sure all the micro-marring’s removed because this is soft paint.
Soft Pad + Finishing Polish
So, for that because it’s soft, I think I’m going to be able to get away with this really soft foam finishing pad. In fact, it’s so soft this morning before showing up to work, I put my makeup on with it. Yes, it’s that soft. My wife uses one, too.
Okay, center it up. Here’s a little tip for putting pads on. The Edge Guard is kind of different because it’s got this, uh, plastic liner that runs around the diameter of the pad. Then you got the Velcro. And for this backing plate, it pretty much self-centers. But if you don’t have a pad like this and it’s just flat on the back, what I will usually do is I will—as I get them closer—I will touch the back of my thumb to the backing plate. Okay. So now if I am ‘cuz I’m old and shaky. So if I am shaking, at least I’m shaking in unison. And then I will slowly bring it down. And I’m going to look and look and look on both sides until I bring it down. And once I’m happy with it, I will go ahead and press it on. And hope that Velcro just holds on for dear life.
NSP 45 Setup and Passes
Okay, so the next thing I’m going to do is I’m going to go ahead and I want to test something fairly unaggressive. This is—this is Z1—wrong product. This is our NSP 45. Okay, what that means is the diameter of the microsphere is 0.45 microns. A human hair—a human hair is about 90 microns. So, it’s half the diameter of a human hair.
Okay. Remember, since I’m first starting out, I’m going to go ahead and put three dime-size drops on here. And then after I break this pad in, I’ll switch over to pea-size drops. Just like that.
Five Solid Section Passes
Okay. And then for this, I will go ahead and make four to five solid section passes just to make sure I remove any micro-marring. Okay. Um, when you get your comfort level up, like I showed turning the speed down to spread your product out, but when you get really good at this, you just turn it on, spread your product out, and go. And that’s what I’m going to do here.
That’s spread out. Five lbs of pressure. Slow arm speed. With the polisher off, I just want to say that again. I’m going to put down five lbs of downward pressure on the head of the tool. I’m going to use a slow arm speed. I’m going to do a crosshatch pattern. I’m going to hit this about four or five times.
That was one. Three, four, five. There’s five solid textbook examples of what a section pass should look like. I counted them out loud so I didn’t get lost.
Avoid Skimming and Buffer Creep
And two things I just want to comment. Sometimes if you’re new to this and you turn this up to the high speed—this or any tool—and you hear that high speed, you’ll tend to want to match that sound with your arm speed and you’ll start doing this. Great. That’s called skimming. It’s not doing anything. So always be conscious of that. If you find yourself going faster to try to match your arm speed with the tool speed, uh, don’t do that.
And then the other thing is called buffer creep. Okay. Uh, even I do buffer creep. But what buffer creep is is you start out doing—I mean if you look at this, it’s pretty much like I said, it’s the size of a microfiber towel. And then of course I would do this one and then this one and then this one and this one. But buffer creep is when you start out with this nice little neat pattern, but every time you make a pass, you go a little further. In producing, you’re doing half the hood and none of the swirls are going to be gone because you just tackled too big of an area for this type of tool.
Pressure Taper for the Final Passes
So, avoid buffer creep and avoid, um, too fast of arm speed trying to match your arm speed to the sound of the tool. And then one more thing, and I have guys that dis—I have gurus, like famous personalities in the detailing world, that will 100% disagree with me, and that’s okay. As long as they get the shiny, I don’t care. But here’s what they’ll say. Keep the same amount of pressure all the way through the buffing cycle.
And here’s what I say. No, polishing paint is an art form. We bring the human elements of care and passion to what we’re doing. And for that last pass or two, I’m going to bring my pressure up. I’m not—this is not a grinding process. It’s a beautifying process. So for the last step, I could even turn my speed down to five. Little quicker arm speed, light pressure, couple of passes, and I can already tell you this paint’s going to look flawless.
Assessing the Finish and Real-World Detailing
Okay. Wow, that looks good. Brian’s going to like the new paint job on his car. Uh, I don’t know if it’ll help to show us real far. There’s nothing there to see, but let’s go ahead. And we’ll start back here where—what I call—the ugly. Am I into the ugly, Yansancy? Yeah. And I’ll move back and show the beautiful. Keep going. Keep going. Keep going. There you go. You’re good. That looks good.
So, to get this to where I’d want it to be, I’d be wanting to do at least two steps plus some way of ceramic coating it. And just to let you know, what—what if you had a car like this? I mean, this thing’s—can you come down here and capture when I talk about—look at the scarring on here over here. This isn’t smudges. This is scarring on the paint. Look at this scratch running this way. Here’s one running this way. Get the light. And there’s water spots everywhere. This paint is abused. That’s why it makes such a great demo vehicle. This is what I call real-world detailing.
Packages vs. Approaches
But let me just touch on the topic. What if—and what if you’re doing this for money and your customer didn’t want to pay for a two-step paint correction process? Because see, if you’re doing this for money, the—one of the first things you got to learn is me and Renny Doyle, we taught a class last year at Mobile Tech Expo—having a hard time, uh, thinking of what I— it was my class. He was my guest instructor with it. It did a great job, by the way. But we talked about if you’re starting out a detailing business, a lot of young guys, or not even young guys, because I got a lot of guys that are quitting their—retire—their career job, they take my class because they want to start a detailing business and they want to just nail it at the very beginning. They want to go through all the trial and error.
So—so not just young guys, but even older guys. When you’re first starting out, a lot of times in a business, you—you’ll just—you’ll do show car detailing to every car that’s brought to you, and you end up making a buck an hour. So, if you’re going to do this for business, you actually want to have at least three packages.
Three Tiers (or DIY Approaches)
You want to have a show car package for a car like that over there. Someone wants the best for their black Porsche. You want a mid-range package. That’s someone that wants it fixed up pretty good, but they don’t need that extra step of whatever the heavy paint correction step is to get a paint job perfect. Or you should have a budget package.
Now, a budget package is where you’re going to wash it and clay it. And then you’re going to use what’s called an AIO or an all-in-one. In the old days, we called it a cleaner wax. You can go find a product from Mothers or Meguiar’s called Mother’s Cleaner Wax. Okay. Uh, but I think when the phone was invented, people don’t want to type out cleaner/wax. So they just type out AIO. AIO. So it’s all-in-one. We have an amazing AIO. It’s called Z1.
Daily Drivers vs. Garage Queens
And here’s my point. If you—if this is your car, so there’s also—just let me touch on this. If you’re doing this for money, you have different packages. You have your entry level, your mid-range, your—your high-end or your show car package. If you’re doing this as an enthusiast, you know, uh, owner-detailed car, you—you don’t have packages, you charge for money, but substitute the word approach for the word package.
So, say you’re an average person, you got two or three cars, maybe your truck, which drives every day, sits outside, you just want to do one step. You’re taking care of the paint. It’s going to last longer with—you service the side of the car—but you don’t really want to do three steps to it. So, that’s a good place for a Z1. A big van, even like a Sprinter van, um, a large SUV.
But, if you got that thing that’s in the garage that’s kind of cool—or the wife’s car—maybe you want to do two or three steps. So, just always consider that—that if as a pro, you want to have different packages. As a do-it-yourselfer, you want to have different approaches. You’re not going to take—I’m not going to take every car I own and do a three-step multiple process paint correction step to it because they’re just daily drivers. Make sense? Okay. So, Z1.
Temperature Checks: Hand or IR
Okay. So, now that I’ve dialed in my test spot and we talked about inspection lights, um, we talked about how fast to move a polisher, how much pressure to put down, we marked the pad so you can tell if the pad is rotating or—oscillating or if it’s stalling out. And then we—we—we didn’t cover this. We want to talk about paint temperature.
So, um, I am sorry to say I forgot my, um, my thermometer. It’s an infrared thermometer. Get them down—it’ll get you down anywhere. Get one at Harbor Freight. And you just kind of point it at the paint. It’ll give you a temperature reading.
The Fight-or-Flight Hand Test
So—so a lot of times I don’t have it with me. Here’s what I use. Wherever I go, I take the human version. It’s right there. It’s my hand. Okay. So, after buffing a section, if I want to know if it’s too hot, I put my hand down on the surface and feel it. Um, and—and a couple things.
One. If I can put my hand down here and hold a conversation with you, it’s not too hot. If I put my hand down and instantly my knee-jerk reaction—it’s called the fight or flight reaction—I go—and I want to move my hand away quickly ‘cuz I might get burnt—that’s too hot. Quit buffing in that area. Let it cool down a little bit. Okay.
Uh, but anyway, that’s something—I mean most of us—most of us have a couple hands or at least one hand and, uh, it’s called the fight or flight—it’s called the—I have an article on this. It’s called the fight or flight method of gauging surface temperature.
So, either go down and spend 30 bucks and buy an infrared paint—uh—measuring tool or the heat measuring tool, temperature measuring tool, or just use your hand and use common sense. You know, if it’s getting too hot because maybe you’re trying to really work some scratches as you’re buffing and buffing and buffing, but you might want to just go, you know what, I think I’m going to go buff right here for a few seconds and let that cool down.
Pad Stalling: Setup Before Technique
Okay, so we covered, uh, correct technique, test spot. Now, let’s talk about pad rotation, pad stalling, pad oscillation. So, this Mustang has a fairly sharp concave curve here. And what I’m going to do is—in the last video, we talked a lot about pad stalling, but I didn’t really show how to overcome pad stalling. So, I’m going to do a deep dive on how to overcome pad stalling.
So, the first thing is—is look at your tool. At the beginning of this video, we talked about how this is just an entry-level tool. There’s nothing right with it. There’s nothing wrong with it. It’s 65 bucks brand new. It’s nothing I would ever use to buff out a car. Uh, but if I was just testing the waters and I wasn’t sure if I really wanted to become a detailer or detail my own cars, I might spend 65 bucks on this, you know, and see how I liked it. And if I did like it, then I could always get a better tool and give this to my son or give this to a friend.
Reinstall the Blue Pad for This Paint
Okay. So, what we’re going to do is I’m going to put the blue pad back on because that’s the one we—we dialed in for this paint, for this softness of paint. And this level of defects—and defects not only can be myriads—that means thousands, millions of swirls and scratches—but those defects could be deep or shallow.
So, if they’re really deep, it might be soft paint, but you still got to work at it because they’re so deep. You got to take a lot of paint off to level that surface. And it could be very hard with very shallow scratches that would clean up very easy. So, that’s why you really need to do that test spot.
But, we determined on this particular car, the Blueberry—they call this the Blueberry heavy polishing pad. It’s called a 5-in pad. It’s actually 6 in diameter, but Buff and Shine, they sell their pads by the diameter of the back. Something a little different, as most pads go by the diameter of the front.
So, this is called a 5-in pad. It fits a 5-in backing plate, which does kind of make sense.
Now, let me show you what’s going to happen. I—I don’t know what’s going, but I think what’s going to happen is I come from this plane up to here, up to this angle, which creates a concave curve. What’s going to happen, and maybe the camera could come down here and check this out—you’re going to have unequal pressure on this side of the pad and on this side of the pad and an air gap down here where there’s no pressure. And it’s that uneven pressure on the outer edges of the pad that causes the pad to stall.
So then let me show you it stalling. Then let me show you how to overcome that so you can buff out the whole car no matter what the shape of the panel.
Setting Up With Core Cut and Pad Prep
Okay. So back over here. I think we were using—uh, let me get rid of these. We dialed in Core Cut, didn’t we? Z1 Core Cut. Okay. And this pad is broken in. You can see the product’s migrated around.
And at some point I’m going to talk about how many pads does it take to buff out a car. And I’m going to tie that in with pad washers ‘cuz there’s a lot of confusion over to use a wet pad or a dry pad to buff out a car. And I’ll give you my take and you can figure it out on your own.
Okay. So, notice I put that down. I didn’t turn it on in the air and throw splatter everywhere, especially up here in this stupid honeycomb-looking air intake. Now, I’m going to go ahead and turn this on just kind of slow. Turn my product along. And we’ve actually got a concave curve here.
Why Crosshatching Stalls on Curves
Okay, there’s a plane here and a plane here. Then we got the same plane here. Then it goes to a plane up here. So there’s two concave curves here. Now, if I just try to run this polisher back and forth, it’s pretty easy to maintain pad rotation. If I try to crosshatch this, watch what’s going to happen, though.
Pass—solid. Pass—solid. Pass—off. Good pad rotation. Pass—solid. Pass.
That’s the problem people run into anytime they use what’s called a free-spinning random orbital polisher. When you have uneven pressure, usually caused by concave curves, thin panels, or intricate areas, you run into pad stalling. And basically the pad’s just kind of jiggling.
There are some that say, “Well, even though it’s just—it’s jiggling, it’s still taking the swirls out.” Well, maybe, but probably very slowly. What I want to do is I want to start and get done so I can go into the house, take a shower, and have dinner with my wife. You know, I spend a week doing a thing I could do in a day. So, I want to see good pad oscillation and good pad rotation.
Treat Each Plane as Its Own Section
But if this is the only tool you have and you’re dealing with any kind of car that has this kind of curves, let me show you how you can overcome pad stalling.
So, instead of trying to do this crosshatch, here’s what I’m going to do. I’m going to tackle this plane. So, this curvature here, this raised up all by itself—I’ll cover this. I’ll cover—I’ll—I’ll polish out this section. I’ll polish out this section. This flat pan—this flat plane becomes a section. This flat plane is a section. This is its own section.
And that would kind of look like this. So, the big section is easy. Just hold the pad flat. That’s good. Pad rotation. Now, good pad rotation over here. Good pad rotation.
Light Touch to Maintain Rotation
And notice how I’m holding the tool. I’m holding the tool in a way that I can’t put too much pressure down on this because if I do, I’m going to lose pad rotation, pad oscillation. So, I use a lighter touch. I get it so I can kind—I can kind of feel when I’m flat on that panel, but I can also visually see when that pad is flat on this plane, this section of this panel, it’s also going to rotate very, very efficiently also.
Anyway, so that’s one way to tackle pad stalling using the tool that’s already in your hand.
Griot’s Garage G9 (9 mm): A Better Free-Spinning Option
Let me show you a couple other ways though, but it does mean buying a different tool. First of all, I showed this in the last video. This is the Griot’s Garage 9 mm. So, it’s the same basic tool as this. This is an 8 mm. This is a 9. So, 1 mm bigger in orbit stroke. So, the pad’s going to spin in a circle. It’s going to make a circle inside that circle. It’s the diameter of the oscillating circle that they’re measuring. And, uh, sometimes you can see that when I turn a polisher on.
So, let me just go to this. This has a 6-in backing plate. So, this is a 6-in Edge Guard. You want to just come up here and capture that where it says Blueberry and it actually says 6 in. And again, that’s because most pad companies sell this by the diameter of the face of the pad, not the back of the pad. So, I just want to make sure there’s no confusion there ‘cuz if you go buy some pads, you go, “Oh crap, these don’t fit.” It’s not my fault.
G9 Holds Rotation Better on Curves
Okay. Couple weeks ago, I made a dedicated video just on pad stalling. I showed 14 different tools on a curved hood. Um, and one of the things I noticed—because I kind of revisited all those tools—was it jogged my memory as to how well this tool, for a free-spinning tool, actually maintains pad rotation. It wasn’t too bad at all.
Um, I still would never buff out a whole car with it. I would use a gear-driven orbital or a rotary and just be done with it. But again, if you’re new and you’re just starting out, I looked up the price of this. It’s around 150–160 bucks. So, it’s a hundred more dollars than that, but it is a very well-built tool and it is better at pad rotation.
So, let me see if I can drag a cord over here without unplugging it. Okay, just for fun, I’m going to go ahead and turn it on. I threw product because it’s uneven. Okay, so this one I want to break that in a little bit. You can see the product’s migrated around. I’ll bring my speed all the way up to the six.
Okay, so here we are in that one plane and—maintains pad rotation fairly well. Now, let’s start going up the plane. Look at that. Really good. That is really good pad rotation considering I’m on a plane at this angle and a plane at this angle, which means I got high pressure here, no pressure down in this curvature part. And still—watch it again.
Hold on. Let’s—let’s, uh, let’s do this, right? Apologies for a long video, but when I do a brain dump like this, you’re going to get a lot of information in a single sitting.
Mark the Plate to Monitor Rotation
Okay, this will make it—this will also kind of drive the point home as to what I was saying. And of course, if you buy a polisher that has a, um, that has a black backing plate, you can always grab like a silver or a gold Sharpie marker and mark the backing plate that way, you know? Or—and if you got some white touch-up paint, heck, I’ve even used White-Out for like fixing typing—typing errors, you know, anything. A sticker—put a sticker on there—something to make it easy for your eyes to monitor, to see and monitor pad rotation, pad oscillation.
Okay, now let’s go in here and with those black marks, I think you can see this tool does a better job of maintaining pad rotation even with a bigger pad. Okay, pretty easy right there. Let’s go into the curve. Boom. No problem. No problem at all. Now, let’s hit this one. No problem.
When to Step Up from Entry Level
Okay. So, the point of that is—is I kind of forgot what a nice tool this is ‘cuz I primarily use gear-driven orbitals and rotary polishers. But if you’re new to the market and you buy this and you’re buffing along and you’re just going, gosh, that pad just keeps stalling out. I can’t get my car buffed out. Maybe that’s when you go, you know, I’m going to take Mike’s advice. So, I’m going to spend an extra hundred bucks and go get the Griot’s Garage G9. They got a great warranty, too. Great tool.
And if you really wanted to, even though this tool was meant to run with this backing plate, you actually can get a smaller backing plate and turn—and turn, as I like to say, a smaller pad, which usually always helps when buffing out cars with that type of tool.
Forced-Rotation Gear-Driven Orbital (Hercules)
Okay, so that’s one way—just one way. That’s two ways. First, I showed you how to hold the tool that you already own in a different way with no pressure on the head and then just buff out the different planes as an individual section to buff out.
Let me show you another way to do that and that’s using a gear-driven orbital polisher. So, this is the Harbor Freight—everybody calls it the Hercules. This—Hercules is like a brand like Pepsi is a brand. Ford is a brand. The Hercules is a division inside Harbor Freight like Bower. So, you got the Bower—here’s the Bower. That’s a brand or a line. And then you got the Hercules.
But what the true name of this is—it’s a forced-rotation orbital polisher. Okay. It’s a gear-driven forced-rotation orbital polisher. And what that means—let me go ahead and throw a pad on here. I need a bigger workbench. Good attachment strength of that Velcro. Between Buff and Shine and Griot’s Garage hook and loop, it’s all kind of different.
Gear-Driven Means It Won’t Stall
Okay. So, um, I’m going to throw on the 6 in here. And these come with a 5-in backing plate. So, they don’t perfectly center inside the centering ring. So, I just have to eye it up. Okay, there we go. Let me push on it. Make sure it’s on there good.
Okay, so let me show you the difference in case you didn’t see the other video. This is called a free-spinning random orbital polisher. It’s really easy to tell. I can take my hand and just spin the pad freely. Free-spinning random orbital polisher. If you hold it crooked, you’re buffing curves—the pad will quit working. Let me just demonstrate that. Well, I didn’t demonstrate. Let me show you. Free-spinning. Very safe. You can do this. Okay. A very safe tool. Hard to burn paint with something you can hold in the air by the pad itself.
Now, this tool in comparison—let me show you this one. Oh, look. The pad doesn’t freely spin. That’s because—listen—it’s gear driven. It’s going to orbit like a free-spinning tool, but there’s nothing I can do that’ll stop this from rotating and oscillating. I can go up on edge. I can buff a curved panel, anything. And it’s going to—as I like to say—it’s going to plow through the car as fast as humanly possible while keeping your quality high.
Safety Features vs Price: Flex vs Hercules
So, let me show you. Instead of buying the $150 Griot’s Garage—and sorry to all my friends at Griot’s Garage, I’m not trying to take a sale from you—you can pick these up for about 100 bucks. It is basically a copy of the original—the Flex Beast. Okay, so it’s a knockoff of this tool. The price on this retails about 520. The price on this retails about 100 bucks.
The difference is you go, “Oh, the same thing. I’ll just spend less money.” You know that has a seven-function microprocessor—much higher quality innards than something that costs 100 bucks. It’s just common sense.
One of the things that tool will do—and I’ll demonstrate this—is if power is interrupted and you have it in the lock position, it won’t come back on until you release it from the lock position. That’s a safety feature. This tool—power goes off in the lock position and the power goes back on—is going to go back to buffing. It’s gonna be dancing across the hood on you.
Abrasive + Lube, Then Push Hard
Okay, so let me, uh—I need to add just a little bit of lubrication here. I think we got enough cut down there. But again, there’s two things you need when you’re machine polishing paint: abrasive technology and lubrication.
Okay. Now, let’s do the same thing here. Let me break this in a little bit. Okay. When I come into this angle, there’s—it’s just going to rotate and oscillate no matter what. So, I can knock this panel out fast. Look at—I’ll push on. Okay. Nothing’s going to stop that pad from rotating and oscillating.
It’s also kind of nice if you’re working a thin panel with a free-spinning tool. If I just try to use a small section of the pad for, like, this A-pillar here, probably quit rotating and oscillating. If I bring this tool up here, though—perfect oscillation, perfect rotation.
Rotary with a 2-Inch Backing Plate for Concave Areas
So, what I teach people in my classes is, you know, instead of coming to a difficult area to buff with a free-spinning tool, get a gear-driven polisher. And that way, you can tackle any shape, design, or size of body panel with the tool already in your hand. That means you’re not putting this one down, getting the tool, which is just taking more time. That’s why I like the gear-driven polisher. I can tackle any panel.
And I’m going to show you some tips, some techniques. So, I had some guy the other day call me the gear-driven guru. Well, I—I did write a book for the gear-driven tools, and I’ve been teaching people how to use them since they were invented, and I’m pretty good with one. So, let me share a couple tips and techniques with gear-driven orbital polishers.
Uh, but first—I’ll get back to that. First, I was trying to show you different ways to tackle concave curves to avoid pad stalling. So, one was to use the tool in your hand, but change your hand position and then just run the pad down the plane that you’re trying to do the paint correction to. Uh, the other was to switch to a gear-driven orbital. The other was to switch to a better-design tool. So that means something in here about the counterweight, the spindle, the motor—whatever it is. They did their homework and they created a free-spinning polisher that’s pretty good at handling concave curves.
Using a Small Rotary Setup
Here’s another way to do that. This, my friends, is a rotary polisher. Okay? And instead of putting a big old wool pad like this on here, what I could do is just take and put—I’ll start out with this. Here’s a 2-in backing plate. We’ll put a 2-in backing plate. I’ll start out with just a 2-in backing plate.
Now, technically, anytime you use a rotary polisher, you’re putting in a hologram scratch. There’s some guys that don’t believe it, but they probably don’t got the kind of, uh, microscopes to go down and look at the surface level to see that having a pad spin in a circle—aggress paint—is scratch pattern even if you can’t see it. That’s why I finish all my cars out with the DA. It removes the holograms.
So, here’s a 2-in backing plate with a 2-in pad. I’ll just take and put a—just one drop right in the center here. Just like that. And now I’ve got this concave curve. So, I’ll come down and because this gear-driven tool—rotary’s gear-driven—it doesn’t care what the shape of the panel is, it’s going to get in there and knock it out no matter what.
Price, Reliability, and Finishing Out Holograms
Okay, so that’s another way to knock out concave panels. And you know what? You can pick up a used rotary for 20 or 30 bucks in your local Nickel Trader or Auto Trader or nickel ads on eBay. Uh, this one here costs around, I guess, between 6 and 800 bucks. So, man, this is my favorite rotary. I do, by the way. I have—you can buy the cordless set.
Oops. Extension cords everywhere. You can buy the, uh, cordless version of the Flex. I’ve had this one. I’ve used it three or four times and it’s already quit working. So, I have no idea. I’ve checked the battery. I’ve tried different batteries. The battery is fully charged. Tried to jump-start it—maybe just help it a little bit to get it going. Nothing keeps this thing going. So, get what you pay for.
Remove Rotary Holograms with a DA
Uh, so that’s another way to tackle concave curve is just switch the type of drive or—or, uh, motion the tool has and go to a gear-driven rotary. So then if you’re thinking at all right now, you’re probably saying, “Well, Mike, didn’t you just say that a rotary can leave holograms?” It does.
After you’ve done the major paint correction, the swirls and scratches are gone. All that’s left is the hologram, which is going to be very shallow. Now you can come back—oops—with your wimpy tool and just do a little finesse work to pull the hologram back. Just like that.
So that solves that problem. Removes—remove the holograms with the other polisher that you have. You just want to switch over to something that has two actions, not one. Oscillating and rotating action.
Recap and Next Steps
Okay. So, let’s recap. I showed you how to use the tool that you already own. I showed you how to use a more expensive tool that does a better job. I showed you how to use a rotary polisher. Gear, always remember, rotary’s gear driven. No pad stalling—knocks out any shape or panel. And I showed you how to use a gear driven orbital.
There is actually a couple other ways you can skin this cat. Where is my micro tools? Right here. Okay, these are two of my favorites. There are copies of these up on Amazon that you can get fairly cheap ‘cuz these are fairly expensive. This is the Rupes Nano. I like these in long neck with the extension. This is the Flex PXE 80 is actually what it’s called. And it’s got the 3-in extension.
Micro Tools for Concave Areas
And with these types of tools, you can get smaller pads, obviously, and you can come down and do the same thing I just showed you, but now you just have less bulk where your eyes are trying to see. Here, I—I will put a little product down here. That’s a lot for this pad, but there we go.
So, now look, I can—I can knock out—I can knock out that concave area right there. And again, come back with my orbital and pull the holograms out. But that’s a way I could get the first step, that heavy paint correction step, done using a micro tool like this.
Store. Uh, just to be fair, ‘cuz I got friends that work for both, uh, Rupes and Flex. Here’s the Flex Nano. I always put an angry face on mine.
Angry Birds and Rotary Mode
Okay. The angry bird. Angry Bird. Isn’t that a game you can play? Angry Birds. I’m not a game with that. No. Same thing. See, I can knock out that concave area. No problem. I didn’t just come back and pull my holograms out with an orbital.
Now, these two tools do come with other drive units. Let me just talk about those really quickly. Where did I put them? Right back here. Um, I didn’t pull the Rupes out, but they have the same thing. So, when you buy one of these micro tools, they come with what’s called a rotary drive unit and they come with a 12 mm drive unit and they come with a 3 mm drive unit.
Small DA Drive Units (3 mm/12 mm)
Okay, so these are these two units here. These are free spinning random orbital drive units. Okay? Just like the big tool with the big backing plate. Same idea. They’re free spinning. And the problem with these small drive units on either brand of these types of tools, and my guess is any brand of this type of tool, is going to be pad stalling and pad rotation. They really struggle to maintain good pad oscillation and good pad sling. And it frustrates all of us. It frustrates me and when I saw this one go, “Oh, that’s so great.” I have a small DA, but they just barely maintain pad rotation.
So, for the most part, I take mine, I put them into rotary mode, and for the most part, they don’t go back unless I’m machine sanding. Let me show you that. Oh, what did I do with that? Oh, right here.
6 mm Drive for Machine Sanding (Flex)
Um, Rupes doesn’t do this yet, but Flex offers a 6 millimeter drive unit, which is perfect for machine sanding, whether you’re doing headlights or leveling orange peel on a custom paint job. But you got to buy that separately. It’s 45 bucks.
By the way, the whole reason we have that is because I wrote a letter to the president Flex when this tool first came out and said, I don’t care if you give me a five, six, seven, or eight. But three is too anemic. That means weak. It doesn’t maintain pad rotation. And 12, the orbit stroke for a 12 mm tool that big means that when I use it to sand and I want to sand next to this edge, I—I either have to stay very far away or as I get closer, I will sand on the edge.
And what I teach in our sanding classes is you always got to remember sanding removes paint. Compounding removes paint. Polishing removes a little paint. And if you sand the edges or the raised body lines and you go to compound it and polish it, at some point you’re probably going to turn your pad over and see the base coat ‘cuz you’re going to go through. So you don’t want to sand on edges. So that’s why I asked them to make a 6 mm. And now you can get one, too.
Old-School Option: Hand Applicators
Anyway, so there’s another way to handle concave curves. And there’s actually one more way. It’s the old school way. Let’s see. It’s very old school. I have it right here in my pocket. I’m not a very good comedian. Oh, here it is. A hand applicator.
Okay. If you really had to get into a tight area, you could take your compound and, you know, you have two options. You have microfiber. Let me grab the other option. Actually, you got three. You got cotton. Cotton’s pretty scratchy, though. But here’s a microfiber applicator. I think this is from Auto Fiber. And here’s a foam applicator.
Foam vs Microfiber by Hand
So the difference is if I want to be really gentle, I want to use foam. It has a uniform surface texture. Soon as we jump over to fiber, I have individual fibers that are going to be cutting the paint and possibly leaving mari—most likely by hand leaving marring. But I could always start with this and come back with foam and pull the maring out left by the fibers.
And that would just look like this. So, if no—if you had no other way to work a concave curve, here’s a way you could do it. And whenever you’re doing this, you just want to make sure you’re using plenty of lubrication because, you know, you’re rubbing a cloth over scratch-sensitive paint.
Finishing by Hand and Pad Types
And then when you’re done, you know, if you wanted to finish out nicer, get a less aggressive product, wipe off the old residue. That’s Z1. Let’s go with a 150. I want 95. 95. This is like a fine cut polish. You could come back and then repolish that area by hand using something that has a uniform surface texture.
Same idea, same principle applies, uh, to buffing pads for polishers. You have pads with a uniform surface texture and you have pads with fibers. Let me just show you that real quick. This is a foam buffing pad, uniform surface texture. Here’s a traditional 8-in wool pad. It’s made up of millions and millions of little fibers. Each one of those fibers cuts the paint.
That’s why a fiber pad, be it this style or a microfiber pad for a DA, that’s why a fiber pad will cut faster than a foam pad is because the fibers are a form of abrasive. And the problem with that is because they’re a form of abrasive, you always risk leaving holograms behind with a wool pad and microarring if you use orbital.
Micro-marring vs Holograms (Know the Difference)
And since I’m on that topic, let’s just talk about microaring versus, uh, holograms. Um, I see some people that will buff with an orbital polisher and they’re seeing a pad haze pattern, the way they move the polisher, and they’ll call that holograms. That is not holograms.
What we in the industry—we need to have specific definitions for words so we know what we’re talking about. So if someone calls me up on the phone or sends me a text or an email says, “Mike, I’m trying to get the holograms out of my 1970 Satellite.” I know exactly what he’s talking about. He’s talking about somebody that took a wool pad on a rotary, maybe even a foam pad, and they’re buffing out the car—lift holograms. And chances are those holograms could be fairly deep.
If someone says, “Mike, I’m—I’m pulling out holograms.” And I say, “What’s your polisher?” And they go, “It’s a Porter Cable.” I go, “Well, those aren’t holograms.” That—you could call that tick marks, DA haze, microarring, or pad haze. Okay. So, but it’s not holograms. It’s a haze. It’s a scratch pattern, but it’s very distinct because of the action of the tool oscillating and rotating versus rotary, which is just rotating.
Free-Spinning vs Gear-Driven Finishing
And then if you really want to go deep, the difference between pad haze and—and microarring with a gear driven versus a free spinning is here’s something I always type. Generally speaking, a free spinning random orbital polisher will finish out nicer, more consistently over a wider spectrum of paints. That’s a whole lot of words to say. If you’re working on soft paint, probably ought to be finishing out with something like a Porter Cable, Rupes BigFoot 15, Griot’s Garage G9—something that’s a free spinning because they’re less aggressive. They’ll finish out nicer on soft paints.
Conversely, the gear driven orbitals like the Rupes Mille, Renny Doyle’s DB8, uh, the Flex 3401, the Super Beast, the CBeast, and now the Hercules forced-rotation orbital polisher—because they’re gear driven, they have so much power, they will tend to leave pad haze or pad trails in the paint when finishing out on soft paint.
If I Could Only Choose Three Tools
So that’s why, you know, sometimes people say to me, Mike, if you could only choose one tool, what would you choose? And I say, I don’t live in that fantasy world. I live in a world where I can buy all the tools I want. Um, and I wouldn’t have one tool, but here’s what I could do. If I could only have three tools, I’d pick a cordless rotary. I’d pick a gear driven orbital, and I’d pick a short-stroke free spinning random orbital. So, like a Flex rotary, cordless rotary, uh, the Super Beast for a gear driven 8 mm, and something like the Porter Cable for a free spinning.
And I could tackle any car detailing project with one of those tools, including machine scrubbing vinyl tops, tires, machine sanding, pulling out sanding marks, you name it, I could do it all with those three tools. Um, I couldn’t do it with just two and definitely couldn’t do it with just one.
Test Spots, Second Steps, and Confidence
Okay, so we talked about how to do a test spot. Do it in, um, if you got to do a second test bite, you got to move to different paint, you got to do it until you dial in a process that meets your expectations and your expectations for some cars might not be 100% defect removal, might be just like 50%. Uh, but—but that’s a variable that you can control.
And then we talked about how to do the second step because in this case, this paint was soft and the first step was leaving a little bit of micro marking. So the second step eliminated 100%. So now I have a process I can dial—I can use over the rest of the car and I’ve got the confidence when I’m done it’s going to look good when I pull it out in the sun.
Work Area Size and Power: Free-Spinning vs Gear-Driven
So the next thing let’s talk about is I covered, uh, overcoming, uh, pad stalling with the different tools. Let’s—let’s talk about now that we’ve dialed in our test spot. Uh, oh let me just show you one more thing. So this is a reason I like a gear driven polisher. I will grab the Harbor Freight to show you this.
In the first demonstration I showed you there, I talked about doing a spot about the size of a microfiber towel. Okay? Can’t tackle too big of an area ‘cuz it’s kind of a weak tool. Uh, Rupes by—in converse they would say, uh, let me grab some and this is a good rule of thumb. So that’s why I like to share it. I got a lot of friends at Rupes. They say if you’re using say their BigFoot 21, you would tackle a size six times the size of the pad. Well, the BigFoot 21 takes a seven inch pad. So, here’s one 2 3 4 5 six.
So, this is what they mean when they say six times the size of the pad for the tool that you’re using. Not—I wouldn’t use this for a tool with a pad this big. That is a little bit bigger than a microfiber towel. So, however you want to divide your panels up.
Use Body Lines and Trim to Divide Sections
Plus, when you divide up panels, not only divide bigger panels into smaller sections, but you also want to use the natural body lines and things like trim pieces. They’re going to help guide you as to how big of an area or how small of an area that you tackle at one time. Okay.
Okay. So, let me get these pads out of the way. Let me go just a little deeper on dividing larger panels into smaller panels and then I’ll show you what I mean why I like a gear driven orbital.
Okay, so every car is different. Okay, so the people that make the design of a car try to give it some sex appeal or some airflow, whatever it might be to make it unique or otherwise all our cars would look the same. So when I look at a car, here’s what I look at. I want to look for raised body lines. I know where my edges are at. Trim and difficult areas.
Mapping Sections on the Hood and Fender
So, the first thing when I look at this is—is we’ll cover this later. There’s pebble texture plastic trim up here. It’s called plastic cladding by the wiper arms. I’m going to cover that up because I don’t want to stain it and clean it at the end of the day when I’m tired. But here is a raised body line, which is normal going right down in the center of the hood. So, that tells me where my center is. If you didn’t have a raised body line, you can always look at the rear view mirror. There’s center. Okay.
And then this one panel here is fairly flat and runs all the way to the end of the hood. That’s one big flat panel. So, with a free spinning random orbital polisher, I’d probably divide that. Here’s a section. Here’s a section. I’d probably squeeze a third section, at least three sections. And then the same thing on this side. Here’s a section. Here’s a section. Here’s a section. Okay? So, I divide that in at least six different sections. If I’m using a gear driven orbital, I might tackle this all at one time. That’s how much more power—correction power—it has.
Taping, Edges, and Thin Planes
But, let me continue. So, we come down here. This is like a mockup. I—I popped the hood to see how hard it would be to take this off. Taking this—this piece of trim and any trim off. A lot of times it’s easy, but there’s a insulation mat covering it. And if I try to take that on, I’ll destroy it. Then I got to buy him an insulation mat. If I could remove it, I would remove it. I can’t, so I shan. So I need to cover this up.
But as looking at this panel, here’s one big section. Here’s a section if you just wanted to do this section. So here’s raised body line to raise body line to edge to trim piece. So right here is a section. This is a section by itself. No matter which tool you’re using and this is some pretty critical edge work which I’ll show you later.
Then when we come to the side of the fender as already discussed it’s got this concave curve because of the way the body line was formed into the hood here. So if I’m using a free spinning tool I might have to spend a lot of time just doing just this plane. Okay. And I would probably tackle about a third at a time. And usually when I do that, I usually make, um, a few extra section passes.
Linear Passes on Thin Planes
So, let me just show you how I would do that. If you’re working a thin plane like this, here’s how I would tackle that with this tool. I’m going to get my pad rotation going. Then, I’m going to make a series. Instead of cross-hatch, I’m just going to go linear, but I would increase the number of passes I made because functionally I’m not getting as much paint correction by not doing a cross-hatch pattern as I am a linear. So it look like this—one two—what time—eight?
There’s eight solid section passes. Light pressure. I was able to maintain pad rotation and just a cursory look. It looks pretty good. I’d call that good. And then I tackle another section. Now, when I tackle this new section, I want to overlap a little bit, like an inch or two into the previous section. So, that would look like this.
Hand Position to Avoid Stalling
And just so no one calls me out for not using product, let me go ahead and put a little product on here. This is just kind of a demonstration, but I get—everybody on social media is an expert nowadays. Okay. I guess that will take—one 2 3 4—down 5. eight.
Notice my hand position. I’m not putting pressure down here because it’s just going to cause pad sawing because that’s a concave curve. I’m just working one side of the curve. But part of maintaining that pad rotation is just being conscious of how much you’re pressing down on it.
And actually when we get up to this right here, so this panel curves like that, you actually got a plane here and a plane here. And right there you have a secondary concave curve. You have one this way and you have one this way. So I was getting more pad sawing going into here. Then all you really got to do is just use some finesse. Just get in there, let the tool do its work, or use one of the other techniques I shared with you.
Smaller Backing Plate and 3-Inch Pads
And that there actually is another technique. Since I talked about it, let me just go and, uh, mention it. This is a 3-in backing pad. You can buy these for—this is a Lake Country. You can buy these from, uh, Buff and Shine, Lake Country. Go up to Amazon, probably find a no-name. You can pull this backing plate off and put this 3-in pad. And now you can turn and churn a smaller pad, which tends to be less affected by a pad rotation.
In fact, let me just show you that real quick ‘cuz I’ll show you the wrenches. When you buy your Harbor Freight tool, it’s going to come with a wrench like this. This is actually 14 mm or 9/16. But look how thin it is. And that’s important because you got to be able to get it back here through and this is where this wrench is going.
Moving the Counterweight and Spindle
But you got to be careful ‘cuz there’s a counterwe in there. So you want to look first and make sure it’s out of the way. If it’s not, you can do something as simple as taking a pencil eraser on the back of a pencil and just kind of rub it and push it. When I pull this off, you’ll see what I’m talking about.
I’ve got the counterwe out of the way. So this will just slide in. Grab the spindle. And now you’ll see exactly—come up there—what I’m talking about. Here’s the slot. Here’s the wrench. There’s the spindle. That’s how you hold it. But if the counterwe is in the way, you can’t get this between the counterwe and the backing plate. And if you do, you’ll probably wedge it in there. It’ll be hard to get it out. So look back there. Move the counterwe out of the way.
Free-Floating Spindle Bearing Assembly
And while this is apart, this is what’s called the free floating spindle bearing assembly. And that’s why these tools are free spinning random polishers ‘cuz that’s not connected to a gear system. Okay.
So then you can take—reverse that. And a lot of times these things come with a rubber nut and a compression washer. And don’t lose the rubber nut and put it back on the one you’re taking off so you don’t lose the compression washer. ‘Cuz a lot of times the pressure—the compression washer will fall off. Okay? Tip it over. It falls off. You don’t see it. You put this on this tool and these rivets here are going to hit that counterwe. And not only are you going to put metal particles all over the paint you’re polishing, it’s going to create a huge loud noise and it’s going to create a lot of heat and destroy your backing plate.
So, don’t lose the compression washer. What I usually do is kind of hold it there with my thumb, bring it down, line it up, and of course with my other hand, that’s the wrong wrench. This is a Porter Cable wrench. And it—it may actually fit in there ‘cuz if you lose this wrench, it’s kind of—I haven’t seen one for sale. And most your 9/116 at your house, they’re too thick. They won’t get in there. I know some of you guys got a thin 9/16. I do, too.
3-Inch EdgeGuard Pad on the 3-Inch Plate
There. Now, let’s go back. Remember, we dialed in the blue pad for our first correction step. So, here’s a 3-in Edge Guard. Let’s see how it fits. Look at it. Fits perfectly into that 3-in backing plate with that plastic liner. So, it centers it up for you.
Core Cut. I—to be honest—I haven’t tried this on a concave curve. That’s because I don’t use these kinds of tools. But let’s just see what we can do here. Okay. So, let me just kind of warm this up a little bit ‘cuz pad’s dry. Just move it around. You can see the lubrication and the braces have kind of migrated around—all the way to the six. Hot stone.
Not a lot, but a little, but definitely a better option. So, there’s yet another way to overcome pad sawing. Switch back plate, switch tool size.
Backing Plates for Long-Throw and Gear-Driven
While I’m at it, I get about an email a week since that last video. We’ll walk back here for a second. I get about an email a week or a comment in the comments section. And what someone will do is they will say, “Mike, I bought the Bauer 20.”
This is kind of a mess because we just had a class, but look at all these tools in here. This is the Bauer 20 mm. So, this is a copy of the BigFoot 21. Here’s the email. Hey, Mike, I saw your video putting a 3-in backing plate on the little Bauer. Where can I buy one for this tool? And the answer is you can’t. Got to buy another tool.
You can get a 5-in backing plate for this. Buy it from Rupes. It’ll fit on there ‘cuz this is a copy of Rupes. So, the way the backing plate is designed and attaches to the—to the spindle is the same as Rupes ‘cuz it’s a copy of Rupes. Uh, same thing with Griot’s Garage. You got the Shine Mate, the MaxShine, you got the Zen, uh, you got the, um, Chemical Guys. I mean, everybody has a polisher out there nowadays, but for the most part, they’re a copy of something that already exists. And if they’re a true copy, some of the other accessory items for the real one will fit on the copy.
Flex Plates on Hercules Gear-Driven
And to that point, this is the Bauer—or not the Bauer, this is the Hercules gear driven orbital. You can actually take and you can buy this 4-in backing plate from Flex. And because this is a copy of the Flex Beast, that means the full-size backing plate and the little guy backing plate are interchangeable. This will bolt right on. And then this would allow you instead of using the big pad like I like to use, if you’re new to this, you might like a smaller pad. It will be easier to control, but this will hold the smaller pad. So, there’s another option for you. And if I remember we have time, I’ll show you how all this works.
Okay, but let me just share with you. So, that was another way to do that. Let me just go ahead and share with you now one of the reasons I like a gear driven polisher like—like this Beast. And I don’t recommend this to everybody. And I know some of the experts out there, you know, the leaders in the detailing world, they’ll say, “Mike, you’re doing that wrong.” All I know is my cars come out shiny.
Large Section Demo with a Gear-Driven Orbital
So, okay, there’s three P-siz drops. Now, what I’m going to do is look, I’m going to brace my legs. And another reason you always do the horizontal surfaces is because for big hoods like this, you got to lean on the car. And if you really want to be a pro, you could do all the horizontal surfaces all the way through the process and then tackle the vertical panels.
Because if I compound this and compound the car, then I polish this and I’m leaning on this when I compounded, I could be putting scratches in. And then when I go to coat it or put a wax on it and I’ve already polished this, I could be scratches and putting scratches into the polish section. So, if you really want to go nuts, you know, do things in a way that it won’t matter if you lean on this or not because this part’s done. You’re not going to have to lean on it again as you tackle the vertical panels.
Spread, Crosshatch, and Light-Pressure Finishing
But here’s what I do. I don’t do that. I do it for some cars, but not every car. It has to be a real show car, usually black. So, watch this. I’ll turn the speed down a little bit. I’ve done this at a whole bunch of my classes in my life.
Okay. So, first, if you paid attention at all, all I’m really doing is putting a layer of two things, lubrication and abrasive technology. Now, watch what you can do. What? Hello. Three, four, and then remember how I said for the last few passes, bring your pressure up. And that’s especially true for a gear—gear driven polisher. Light pressure.
I always like to finish out my major body panels like the hood, the roof, trunk lid with a linear passion versus a side to side passion. That’s a—I think most detailers agree that’s a fairly large section to tackle and most of you probably shouldn’t be doing that. I’m just saying with a gear driven polisher you can.
Before/After Check and Deeper Scratches
Okay, so you just saw how large of a section I tackled using a gear driven orbital. And, um, just for fun, let’s just check out the before and after difference. You know, that’s a—I would say that’s a pretty big section. So let’s see. Here’s—here’s before. I always like to show the ugly first. You see that? Uh-huh.
And then we’ll come over here. Look at—okay. And of course, there’s still some deeper scratches in here, but—but that’s normal because this thing, remember, was used like a hockey puck. And I’m going to come back and show you how I would tackle if I really wanted to tackle some of the deeper scratches. I’ll show you a couple different ways to do that, but we’ll do that later on. Just remind me, camera guy.
Smaller vs Larger Work Areas (Free-Spinning vs Gear-Driven)
Okay. So, the next thing is, let’s see. We want to talk about—I just kind of want to reiterate if you’re using a tool like this—any brand but free spinning random orbital polisher as compared to gear driven—okay, not free spinning—generally speaking, you’re going to tackle a smaller area. You may not tackle an area this big. That’s a big area. But my point was to kind of exaggerate a little bit to show you the difference between gear driven and free spinning. Smaller work area, bigger work area.
And at the end of the day, at least for me, I can go a lot faster and tackle an entire car with a gear driven orbital than I can with a free spinning.
Marking the Plate vs Brain Drain
And there’s one more aspect. Before I forget, let me just kind of bring this up. Um, remember how I talked about taking a Sharpie marker? What you guys can’t see is all these extension cords back here? Remember I talked about taking a Sharpie marker and marking the side of the pad or the side of the backing plate. And that’s to make it easier for your eyes to monitor—to see and to monitor pad rotation.
And what that means is as you’re buffing, if you’re looking down and you just see that pad’s jiggling, then you know, hey, I—I need to do something. I’m not getting the defects out in a time efficient manner here. Um, and then you can adjust the way you hold it. Go to a different tool. You know, I showed you seven different ways, I think, to tackle concave curves where you run into pad stalling.
But let’s go deeper than that. If you mark the side of your backing plate, and now theoretically, say it’s going to take me, let’s just pick six. Say it’s going to take me 6 hours to do the first paint correction step to this body style. Doesn’t that mean for 6 hours, I got to look and see, is the pad rotating, is the pad rotating, is the pad rotating, is the pad oscillating, is the pad oscillating the entire time. It’s—I call that brain drain. It just drains my brain.
Focus on Passes with Gear-Driven
I got other things I want to think about like how many section passes I did. And conversely, if you’re using a gear driven orbital, you don’t need to mark your backing plate. You don’t need to mark your pad. And you don’t need to look and see if you got good pad oscillation and good pad rotation for the entire time you’re buffing out the car. You can just focus on counting your section passes. Or if you want to count seconds, count how many seconds you polish the paint.
Okay, so that’s kind of the huge big difference between gear driven random orbital sections to buff.
Oh, and by the way, when I was tackling that big section with this, I was probably pushing down 10 lbs of pressure. And here’s why. When I’ve got paint in really bad shape and I need to remove a lot of paint quickly, you know, the heavy paint correction step—with a free spinning random orbital, it’s really just about 5 lbs, light pressure. But with this one, because it’s gear driven, so the pad’s going to oscillate and rotate no matter what. I can actually push on it harder.
Faster Leveling with Pressure (Two-Step Plan)
And here’s what that does. It engages the abrasives with the paint to take little bites out of it. Think of an ice cream scoop. You scoop out the ice cream. That’s what the abrasives are. They’re scooping. They’re taking little bites out. You’re leveling that surface faster because you can because nothing’s going to stop this thing from rotating or oscillating so you can push harder so you can go faster.
And you—some—well Mike, won’t that leave some pad marking? It might, but I’m doing two steps. It doesn’t matter. I’ll take it out on the next step. I just want to get through the first step as fast as I can.
Edge Work with Micro Tools
Okay, let’s talk about edge work. Okay. So, I think my longtime friend Jason Rose is really the guy that made the term edge work popular and he puts a lot of emphasis on it as he should. It’s a—it’s a difficult portion of the car to buff out is getting all the edges.
So, I’ve got—I’ve got the—got the Rupes Nano Long Neck and I do—the long neck, believe it or not, is only an inch longer, but I like it because it gives me some reach when I’m doing some meticulous type of intricate work. And this is the Flex PXE 80. Um, here’s the actual rotary drive unit right here. And then I bought this extension from, um, oh gosh, I’ll have to think of the name. A guy I think up north that sells these. This is—this is kind of cool. Spring-loaded collar. Makes it easy to, um, change your, uh, drive units around. Lock it into place.
Cleaning Oxidation Next to Trim
Okay. So edge work. Here’s what I’m talking about. Edge work. Let’s—let’s—let’s, uh, what I want you to do is if you come down here and you look next to this piece of trim, see how all that paint is gray in there. See that? It’s kind of got a whiteness to it. So, there’s no way I can safely get in there with a big pad. But with this, this is a Rupes yellow foam polishing pad. Let me show you what I can do with this.
We’ll take a little 150. Here’s a little technique for you. I’m putting some product out there. I’m—I’m not going to buff there. That’s for me to draw from. This is called finger painting. So, I’m going to take some of this and I’m going to paint it along that edge that I want to polish out. Now, I have two things there. Lubrication and abrasive technology.
Remember, this is a rotary, so it tends to want to throw splatter. Let me turn the speed down. This is kind of cool. It’s got a little digital speed controller. I’ll start out at the one ‘cuz this pad’s dry. Going to break my pad in. Okay. And I’m just going to lean on myself.
Rotary Precision in Tight Gaps
So, but here’s what I can do. Look at—this is—my Rupes did a good job. See how they’ve got this recessed? So, this will bend back. But I’ve got a nice little thin section of paint. So, what that means is I can get in here like this and just light pressure. Just run it into that little 1/4 in section of paint between that piece of plastic accent trim and the actual hood. And my guess is I’m going to be able to get rid of that oxidation that’s taking place down there.
Might have went faster if I got a more aggressive pad. I don’t know why I grabbed that. Sometimes they just start doing things. Okay. Okay. Now, bring that camera down here. And boom. All that oxidation is gone. Right next to that edge. I didn’t hurt the edge. I didn’t hurt the paint. And of course, I need to come back with my big polisher and pull out any holograms in that area.
Tape Off Honeycomb Grilles to Avoid Cleanup
Okay. Here’s another idea or example of edge work. First, I’m going to go ahead and—this has this like honeycomb, uh, fake grill. And so, what I want to do is I—what I don’t want to do is I don’t want to come back with a toothbrush and try to get all the splatter out of there. So, I’m just going to take some tape and tape this off. I am a huge fan of taping.
And—and it’s not because I’m not good at what I do. That’s not the reason. The reason I’m a huge fan of taping is because I’ve been doing this for so long. I know. I know myself. And here’s what I know about myself—at the—when I’m done with this. I don’t want to be cleaning up splatter and residue and stains on everything. I want to go home and I’m tired.
Tape Now, Save Time Later
It’s one thing to try to do meticulous work like that if you’re fresh. But at the end of the day, I want to be tired. So, here’s what I know. If I tape this off, I can just come back and rip the tape off and go home. I don’t got to come back with a toothbrush and scrape everything.
So, it takes a few minutes to go around and tape off a car. We’re going to show you that this thing has pebble textured black—black plastic trim everywhere. And, um, it just makes it a real pain to polish ‘cuz you got to tape that stuff off or you’ll be staying late and trying to get the stain out of the plastic trim. And because it’s textured, you know, the—your polish splatter will go deep into it and it’s just a real pain.
Chrome vs Plastic Trim on Older Cars
And can you pan over and look at that 70 Satellite? A lot of people think I like to work on old cars ‘cuz they’re old cars. Well, that’s kind of true. I think the body style of things that came out of the—out of Detroit from the 19, you know, 30s to the 1970s, even all the way up to 79, the 79 Trans Am, the 79 Corvette. A lot of those cars are very iconic in their body styles. They’re very beautiful.
But if you notice, that one’s got a lot of chrome trim on it. It’s got no plastic trim. So, in our—the class we had last weekend, I didn’t teach the class to tape that off. I taught them to run the buffer over it ‘cuz that trim oxidizes just like a set of mag wheels will oxidize. And instead of taping off, run your polisher with a foam pad and a quality, uh, paint polish and usually remove the oxidation and brighten it right up.
Teal Pad on Intricate Planes
Okay, so look at this. I’ve got this all covered up. Now, I’m going to come back. I’m actually going to go ahead and go to a little more aggressive pad here. Um, these are all Rupes pads. I also have a bunch from, uh, uh, Buff and Shine and SPTA. So, this is their teal—their teal pad. It’s kind of in between a cutting pad and a polishing pad.
Remember, I put some product here pure to draw from. So, let me just kind of spread some around. And I’ve got a lot of complicated planes on this to buff out. Let me just show you there. I just polished out this section, but there’s actually a plane that runs in front of it. Then there’s a plane that runs here. Here’s a plane. The side as a plane. This is a plane. One big plane. There’s just a little bit of a plane there. Then there’s the side plane.
Address Every Little Plane
So, all this has little planes everywhere that you need to address or otherwise the—the hood and the car will look so freaking good. Then you look at these trim pieces and they’ll look horrible. Like this. And because this tool is lightweight and compact in size, it’s really easy for me to control and guide it. And that’s two things, not just one, is control it. And part of guiding it is being able to control it.
Okay, got that pretty good. I’m going to come down and get this side here. I think that’s painted. It could be piano plastic, but I think it’s painted with the same paint the car is. The reason I want to bring that up is because a lot of new cars have piano plastic on it. It’s black piano plastic, and that plastic material is very soft.
Be Gentle on Piano Black
Okay, let me get this inside sling here. Very soft. And if you buff in one place for too long, like an edge, you will burn through and you will expose white plastic. There’s really no way to fix that outside of just replacing it. So, most of the time that black panel plastic is very soft. That means it scratches easy. It also means it corrects very easy. And, um, just keep that in mind if you’re working on it.
Okay. So, and then while I’m here, there’s a—a tight, intricate area there. And actually, all around here is just kind of intricate. So, you might as well just nail it all at once. And that’s one of the things I do when I get going with the tool. If I see areas I can knock out while I still have that tool in my hand, I just go ahead and knock them out. There’s another application for that. I—I will try to find a way to show you that.
Taking Time on Neglected Edges
Yeah, this really has a lot of, um, white paint right next to the edge. And I’m going to take a guess why. It’s really easy to clean and polish or do anything to a big flat area. Takes more time to do all the intricate stuff. So, most people don’t. And that’s why you see this has turned white with oxidation. No one’s ever given it any attention like they’re getting with a 1 in pad on a Rupes Nano right now.
Just a matter of taking your time though. Hold on. I need some more product to draw from. We will—We did take a before video of this car and sometime next week. We won’t get the whole car done today. I’ll probably finish it up tomorrow. Tomorrow’s Friday at the time we’re shooting this. And then I’ll have Yansy come back, uh, you know, over the weekend or sometime next week and just do a walk around and show you the final results.
Finishing the Intricate Sections
There we go. And this little—this white paint down here that you saw on the camera, it’s not buffing out easy. I actually thought it come off pretty quick. But so what I did was if you watch—so I just took my time. I let the braces—I let the, uh, pad do their thing. And now that section is done.
So there’s some intricate edgework technique for you. But of course it all starts with buying the tool. I didn’t get this flat spot right here. And you’re a waste product. Okay. And this is actually just as swirled out and filled with water spots just like the rest of the car. So again, um, if you don’t fix something like this and fix everything around it, it’s going to stand out like a sore thumb.
Remove Rotary Holograms (Polish Step)
Okay, let me give this a final wipe just to get that off there. Then—then of course the question is, well Mike, you said that a hologram—a rotary use a hologram. How would you fix that? Well, with something like this, um, I would switch back over. So we cut that. Now we need to come back and polish it. So I think I dialed in using the black pad and NSP 45 Z1. Note to self, put the name of the product on the back of the bottle next time you shoot a video so I can see what it is.
Okay. Just kind of warming it up. Then I just come back and light touch it along the edge there. Anyway, that’s how you would get rid of the holograms.
Pulling Holograms with a Gear-Driven Orbital
The other—the way I would do it in the real world is I wouldn’t be messing around with the free spinning random orbital. I would—I would grab my Beast, the original Beast. By the way, they’ve discontinued this. I talked to Flex yesterday. It is 100% guaranteed. The original Beast is discontinued. If you want one, you better get one. Um, while the getting’s good.
Okay. So, if you’re watching me do that, you notice I had to really work at maintaining pad rotation to get these tight areas. And here’s a place where there’s two concave curves right in there. So, instead, I would do this.
Loading Abrasive on the Edge
In fact, let me share a technique while I’m here. Um, because this is a gear driven orbital, I can go up on edge. Okay? And that makes it real easy to pull the holograms out of here or just oxidation of swirls if you didn’t have rotary because the pad will maintain good rotation and good oscillation no matter what. It’s gear—gear driven.
But when I want to knock out these edges, I want to get some lubrication and some abrasive technology just on the edge. So, there’s a couple ways you could do that. Here’s the slow way. Put some product out here to draw from and take your finger and do this. You could also do this. I mean, either way. And I could slowly just kind of coat the outer edge because I’m going to go up on edge big time with this thing.
But here’s how I do it and how I teach my class is I put a strip of product down. Not a lot, but a little bit. And then just slowly walk the edge into it at low speed. Just slowly. And I’m getting the abrasives and I’m getting the lubrication on the edge of that pad. I can come back, grab some more layer. There—it’s completely lubricated and full abrasive.
Quick Show-Car Results in Tight Areas
Now come down here. And when I get into this concave curve here, there’s a curve this way and a curve that way. I can nail that with no problem. Same thing on that little lip. Because I’m using good abrasive technology, it doesn’t really take long to pull the holograms out. The paint’s off.
But that’s how I would do that. Got to get this edge. See how I’m up on edge? It’s in the air. And you know, in seconds, I’ve just done show car work to a tight, intricate area using a couple different tools. Oh, it looks good. Brian, yummy dinner. It’s the guy that owns it.
Okay, that towel’s wasted. New towel. New towel right here. I just want to get into the edges here before I move on. Okay. And at this point, because I’ve actually knocked this section out, I could pull the tape off. I’ll leave it on there till I’m done with the whole car, though.
Crosshatch vs Linear on Thin Panels
Anyway, that’s how you do, uh, edge work to intricate areas. I talked about this earlier, but let’s just talk about when you would do crosshatch and when you would do a linear, uh, motion with your polisher. And this panel here is a good example. This is just a long, narrow, thin panel with a—a rolled edge here and a sharp edge right here.
And this sharp edge is actually higher than this side. You can feel that with your hand. So the edge you would burn through first would be this front portion on that edge, not the hood because the hood’s down a little bit further. But just to kind of demonstrate what I mean, let me go back to our wimpy tool, the beginner’s tool, the Harbor Freight, and I get some product. That’s the wrong product. A little bit of Core Cut. 95—150. There we go. Core Cut.
Tilting to Avoid Edge Pressure
Okay. Couple. Okay. And now this gets kind of tricky because this pad is wider than this panel. So that means I’m going to be buffing on this edge or this edge either way. And that’s where you can get into problems. You can keep your pressure really light and just spend more time on it. But it’s just a good habit to not buff on edges. Let’s see if I can do this panel safely.
Okay, once I got my product spread out, here’s what I’m going to do. I’m going to try to follow my pad edge against this raised edge, but tilt it a little bit so there’s no pressure down here. Heat. Heat.
So, I went over that two solid section passes and see this little bit of product that’s right there. I never buffed that off ‘cuz I never hit it with a spinning pad because I tilted it and I was able to maintain pad rotation. So, let me do the same thing here on this side.
Shrinking the Effective Pad Diameter
Okay. Two solid section passes. I did pick up most of it. There’s still a little bit here. But the point is, you could probably see I was tilting it just a little bit. So, most of the pad is flat to that panel, but there’s no pressure on those edges. That’s one way you can knock out a thinner panel with a larger pad if you don’t have the other backing plate or smaller tools.
And then some people, including myself, might say, “Well, Mike, if you’re putting excess pressure on the pad crooked, won’t you get some micro mark in there?” You might. So, that’s why I come back and I use the word shmoo. I’m going to shove this over.
By tilting the polisher. So, right now, this is 6 in in diameter. If I tilt it, I get the diameter down to about 3 or 4 in. Don’t have 100% pad—pad contact, but I’m not putting any pressure on the edges. Let me see if I can show you that one.
Gear-Driven Shortcut on Thin Strips
And that’s what I mean. I kind of tied in the heavy correction I did here, the heavy correction I did here by doing some dedicated correction down the middle. I’m going to come back this way so I think you can see the, uh, pad’s in the air.
Anyway, let—let me show you how I would do that in the real world. In the real world, I wouldn’t mess around with that tool. I would grab the Harbor Freight version of the Beast.
Product. Just a little bit of product. I’m going to put that right in the center of the pad just to spread this out. Same idea, but because it’s gear driven, I don’t got to worry about pad rotation—oscillation. It’s going to rotate and oscillate no matter what. And that would look like blood.
So you see this in the air. Now come back and hit this side. Now I’m gonna tilt it. So, I shrink a 7 in pad diameter down to about 3 or 4 in and knock out the center.
Safer, More Uniform Results
And not only does that keep you safe by keeping the pressure off the thin portions of the paint, it gives it a more uniform look when you shoo over the centerpiece after tackling the outer cider edges. So there’s—there’s how you—and again in this particular case, just ‘cuz I kind of skipped over the topic, uh, even with the small—even with a smaller pad, I wouldn’t try to go this direction and then this direction. It’s just not going to work.
So on thin linear panels, you just move the polisher in the direction of the length. 10 minutes. Don’t try to do that. You try to do that. You’re buffing on the edge. One of these days you’re going to have a problem. So don’t do that.
And to tell you the truth, even if I had a 2-in pad on an orbital, I still wouldn’t do this. I would just run it the length of the direction of the panel. I wrote an article years ago called Let the Panel Be Your Guide. And in it, it has a picture of Yoda from Star Wars, and it says, “In your best Yoda voice, look at the panel and then say, “Let the panel be your guide.” Or, “Let the panel be your guide.” See, I’m not much of a impersonator either.
Wrapping Up Part One
Okay. Okay. That is a ton of technique. We covered free spinning. We covered gear driven. We car—covered rotary. We carried fulls size tools, medium-siz tools, micro tools. Um, I taught you how to do your test spots in the various orders. And then when you finally get—and this was doing the test spot, but also showing you some techniques to overcome pad stalling and different things.
But in the real world, say I had just done my test spot and says, “Yep, that process works good.” This is where I would jump up here and start working from the top down. And we’re going to show you that next.
Tape After the Test Spot, Then Plan the Path
But now that I’ve proven to myself that I can in fact fix this paint, now is the time I would go ahead and start taping off plastic trim. Um, I don’t do it till after I find out because in my life, I’ve come across two or three cars that just no matter what you did, the paint was never going to get better. So, why put tape on the plastic parts? Make sense?
That was a lot of information on how to polish a car, and I hope it’ll help you out. Uh, next what we’re going to do is we’re going to go over some basics like how to correctly tape off plastic trim so you don’t have to worry about staining it. We’re going to talk about the path of travel, where to start first and then how to actually tackle the whole car and then things like how to tackle the complex curves like concave curves.
So stay tuned and watch part two. Mike Phillips here. I am the CEO which stands for chief operating officer. No, it doesn’t.
Part 2 – Tackling The Entire Vehicle
Okay, so in that last video we talked about how to do a proper test spot. We talked about different types of polishers and pads. And in this next video, what we’re going to do is actually now that we’re ready to detail the car, I’m going to explain where to start and then the path of travel to follow to actually get the whole thing done.
We’re also going to cover things like taping off plastic trim. A lot of new cars have plastic trim. If you hit it, you could stain it, so it’s faster to tape it off. We’re also going to go over how to deal with intricate panels and curved panels like concave panels, how to maintain pad rotation. Then we’re going to talk about simple things at the end of the day when you’re all done. And that’s like how to clean your pads. So next time when it detail the car, you’ll be ready to go. Enough said. Let’s jump into it.
Taping Pebble-Textured Plastic Quickly
So a lot of cars have this pebble texture plastic on the lower portions of the car like this front air dam. Now, when I put this tape on, you can see I kind of went onto the paint just like a 32nd of an inch. To be honest, I just don’t care about that. You know what I want to do is I don’t want to stain this. And I’m willing to sacrifice even just a little bit of paint. If you want to get it perfect, get it perfect. But I usually don’t get too bent out of shape because at the end of the day, most people are going to come and go, “Wow, the car looks amazing.” They go, “You know, it looks really good, but you know, Mike, right here, I still see a couple swirls on that tip there.” So, don’t—don’t be that guy.
Now, the thing I wanted to share about this is instead of taping this off and trying to hug it next to the body line, a lot of times this will actually fit in between that piece of plastic trim and the body panel. So, attach it, press it down, and 100% guaranteed for sure all that plastic is taped off, protected, and covered up. Anyway, so I’m just going to keep moving around the car. Uh, when I get the lower panels done, I’m going to come up and show you a technique on how to actually pull and apply tape. So stay tuned.
Tape After the Test Spot
So after you’ve dialed in your test spot, you know, I showed a lot of different things up here, but technically after you dialed in your test spot, that’s when you would tape off your car. I—and I shared this. I’ve come across maybe two or three cars in my life that no amount of polishing was going to fix. So it wouldn’t make any sense to tape off the plastic if you’re not going to do the car. But you don’t find that out till the test spot.
As you can see, I’ve already taped off the pebble texture trim under the front air dam there. Shared a little technique with that and across the sides of the car here. And this is really common on cars. It’s called pebble-textured black plastic trim. And there’s a bunch of cladding up here in front of the wiper arms. And I’m going to show you a technique using a beach towel to cover up not only the cladding, but also the wiper arms. ‘Cuz the last thing you want to do at the end of the day is throw splatter on here and have to come back with a toothbrush and clean it off here. And it happens. Been there, done that.
Choosing the Right Tape (Adhesion Matters)
But first, let me talk about tape. There’s a lot of different types of tape on the market. And I got three different styles here. This is just your basic ScotchBlue masking tape. Um, this is primarily sold at places like Lowe’s, uh, Home Depot. Even I get this off Amazon ‘cuz I buy big packages of it. Uh, this has really good—really good adhesion. So, it’s really good for things like the pebble-textured and the door areas.
But sometimes you might have really sensitive areas that you just do not want to put something really sticky onto it. Like say you’re taping off, say you’ve got a hood that’s matte in the middle, but there’s glossy paint next to it and you don’t want to run your polisher into that matte paint. You’ll make it shiny. So, you want a low-tack tape.
Low-Tack and “Burning” Tape
So, just to help you out here, this is some Scotch—it’s called delicate surface. And it’s very, very low adhesive strength and so it’s not very tacky. So if I had to tape off something really sensitive and I was worried about pulling whatever that is I’m taping off when I pull the tape off, that’s when I’m going to use a low-tack or a low-adhesive tape.
And there’s another technique called burning tape. I’m probably the only guy in the world with an article. You can type into Google “burning tape” and add Mike Phillips. You probably pull it right up. But burning tape just means if you got a cotton T-shirt or cotton pants, you put the tape on there, you pull it off and it kind of pulls some lint off and it—it—it takes the tackiness down a couple levels. So now it’s even less likely to stick to what it is you’re trying to protect.
Sizes and Options You Can Source
So that’s—that’s called the delicate surface tape. It’s purple. I only know of the one size they make here. By the way, sometimes if I need something thin, I just take a pair of scissors or I put this on something straight like the top here and take a razor blade, run it down it, and make my own thin tape. I don’t let the fact that a manufacturer doesn’t make it keep me from making my own.
So, there’s sensitive surface. This is FrogTape. Uh, again, Lowe’s, Home Depot, Amazon. And this is another low-tack tape. So you can put it on something that’s sensitive with the idea being when you go to pull it off, you don’t pull the paint off or whatever it is that you’re trying to protect like pinstriping or something like that.
So we got the normal masking, we got the FrogTape, we got the delicate surface tape. This is some more 3M tape that I like to have around just ‘cuz I can get it in very thin. That’s 1/4 inch. There’s 3/8 of an inch. There’s an inch and there’s 1/2 inch. So it’s just nice to have a variety tape. This is some more stuff you can source online.
New Cars vs Classic Cars: Trim Differences
I will teach as we kind of pan over here. I want to show the difference. With new cars, they got plastic trim. On old cars, they got chrome and stainless steel and actually nickel and aluminum trim. So, there’s different types of metal. All of it oxidizes. And so, what I teach in my class when I practice is whatever I’m using for the paint, for the polishing step, I just go ahead when I’m done with that pad and kind of run it over the trim. It shines it up. You’ll see your pad turn gray. That’s a sign that it was oxidized. Even though this looks shiny, you pull gray stuff off. That’s oxidation.
Fresh Air Grilles and Splatter Dots
But another thing I just want to share is this is what’s called a fresh air grill. So a lot of your classic cars have a fresh air grill. And this is where they pull air in to cool the car down or to feed the air and just—just for cool air coming in. Air conditioning be somewhere else. Um, but one of the things I always do is when I work on a classic car is I look down here to see if there’s any splatter dots from someone that compounded or sanded and threw slurry into here.
Because if—if it is there, I’m not going to add any more to it. If it’s not, if there is no splatter, then I’m definitely going to be taping this off because I just don’t want to be the guy that puts all this—like this has little white dots everywhere. So, whoever did the original, uh, wet sand or whoever did the original cut and buff, they didn’t tape it off.
Use Low-Tack on Weak Paint
But the thing I just want to share is when you’re working on this, if you don’t have any kind of background in the body shop world, it’s really easy to sand and primer and get this ready to paint. This right here, what you’re going to spend the same amount of time doing each one of these ribs. So, usually this type of stuff kind of just gets done quickly. And what that means to you is if you put a high-tack tape on here and you pull it off, you’re pulling the paint off. So, that’s when you can use a low-tack tape on a classic car. New cars, a lot of cars have matte finishes, delicate surfaces, use the low-tack stuff.
Identifying Pebble-Textured Areas to Tape
Okay. Now, as far as technique goes, I’ll show you the bath towel technique in a second, but up here, we’ve got—right here, this is a good example of pebble-textured plastic trim. This has a smooth surface. This is pebble-textured. This is pebble-textured. The whole bottom of this is pebble-textured. So, I don’t want to cream this out with compound or polish. I want to tape that off.
This rubber gasket here is smooth, but it’s old and aged. So, I still want to tape it off. And it’s actually deteriorating back here. So, there’s not a whole lot you can do besides replace it.
Taping Mirrors and Gaskets
So, let’s just take some. This is, I think, a 1/2 inch ScotchBlue masking tape. And sometimes I may want to—if the mirrors fold in, I may want to fold them in to make it easier to get this portion right here. So, I want to be able to tape this in a way that if I fold it, I don’t take my tape off. And a lot of times there’s enough of a gap there that after you tape it, you can still move this around without pulling the tape off. So, there’s a little technique tip for you there.
And a lot of times these mirrors—and every car is different. The bottom side will be glossy. So you want to polish that. But in this case it’s just, um, it’s just matte or a pebble-textured rubber. So it’s—it’s ugly and I don’t want to cream it out and turn it white.
Learn From My Mistake
I—I’m not sure if I shared this story already. Uh, but I’ll tell you real quickly. Um, one of my favorite quotes in life goes like this. Try to learn from other people’s mistakes. You may not live long enough to make them on your own.
So, here’s a chance for you to learn from my mistake. Uh, back when I worked at Autogeek, one of the managers there had a Ford Escape, and, um, I needed a—a car with oxidation, swirls, and scratches to show how to buff it out, but also show a ceramic coating on it. And all along the bottom of the edge was this pebble-textured plastic. And I kind of thought, I’m so good, I don’t need to tape that off. Yeah, that was a mistake.
It didn’t look bad the night I did the work. I came back the next day so the polish or the compound, whatever I was using, had a chance to dry and turn white. And as standing back a ways, I could see all the places I accidentally went down into that trim with my polisher and creamed over it. And, um, then I spent an hour with a degreaser and a wax and grease remover, anything I could with brushes to try to get it off. And then I put some dressing over it so he wouldn’t see it and be mad. So, that’s why I tape everything off. You don’t have to, but I do.
Open the Door to Tape Faster
Okay. So, let me see. Um, sometimes when I want to do the door trim, it’s actually faster and easier to go ahead and open this up and then run this all the way down instead of trying to fight with the windshield.
And here’s a technique tip. I actually learned this from Chip Foose. Uh, most people when they tape off, if they don’t know what to do, they do something that looks like this. And—and it’s a natural thing. I mean, I started out doing this, too. So, you grab your tape and you pull some out. And you’re holding it like this. That’s wrong. Don’t do that.
How to Hold and Steer Tape (Chip Foose Tip)
What you want to do is pull this out. Now, you can steer it because I’m going to have to go around this curve here. It’s hard to steer when it’s just right there next—the tape you got off is next to the roll itself. So, you want to pull it out so you can steer it like this. Then, you want to find a great attachment place and do a really good job. Like, it ain’t sticking to that rubber there at all.
Do a really good job to first attach it so you can pull against it. And then just take your finger, and I use my fingernails, and just start running this around all that trim. And if you get a little bit onto the paint, to me, that’s okay. I’d rather miss a little—a few tiny miniature swirls next to a 16th or a 32nd little section of, um, trim than I would to stain the tape. But you can get as nuts as you want to about it.
Pull, Press, and Shape Corners
But see how I’m pulling this out as I go and then pressing this down to make these corners. And that little tip there will help you the rest of your life taping off cars. Okay. And then because I may open the car door again, I want to go ahead and stop it here. Um, as far as the edges go, at least on the sides there.
Okay. So, let’s pick up right there. And a couple months ago, I actually shot a video. It’s on my Instagram page. I—I polished out a, uh, I think it was a 2020 or 2021. It was a, um, Dodge Challenger black. It was a black blackout edition. It was also the drag pack. So, it was set up for racing quarter mile from the factory. Radio delete, all that good stuff. And, um, it had a ton of pebble-textured plastic on it.
Favorite Moment: Pulling the Tape
Anyway, the video I shot was just, uh, it was really kind of just one of my dumb little videos, but I just said, “Here’s my favorite part of the detail job,” and it basically just showed me pulling the tape off, which means I’m done. I did the whole thing. I’m done. I got to pull the tape off.
And I tell you, uh, over the decades, I have met a lot of guys that’ll say, “You don’t need to tape off.” Hey, you don’t want to tape off. You don’t tape off. I’m taping off. ‘Cuz I just—I know myself when I’m—I—I work really hard on these cars. A lot of times I start, I don’t take a break. I just go till I’m done and the last thing I want to do is come back and try to get wax out of the cracks, as I like to say, with a toothbrush. So, you know, figure it out on your own. But for me, in my time, I like to tape off.
Two Kinds of Glass Polishing
And also, when you’re taping this off, you know, um, in our classes here, I teach two kinds of glass polishing. I teach, uh, what’s—there’s two kinds of glass pol. There’s what’s called topical glass polishing and then there’s subsurface glass polishing.
So topical glass polishing is when you polish the glass just to remove like water spots or what I call drizzle stains. If you’re—if you’ve been working on cars at all, as a do-it-yourselfer or as a professional, maybe you’ve noticed sometimes when you’ve went to wipe some exterior glass, as you wipe it with that, you put some glass cleaner, take a towel, and wipe it for a brief moment when that film of glass cleaner is just about to evaporate, you see these lines that run vertical. Those are called drizzle stains. The water drizzles down it. And over time that water just finds a pattern that keeps repeating and then it usually leaves mineral deposits behind and, um, and now you’ve got drizzle stains that are on the glass. They’re not going to wash off and they’re not going to wipe off. So the only way to do it to get them off is to polish them off.
Tape Soft Gaskets Before Polishing Glass
Then let’s see when I close this. There’s a rubber gasket here and as you can see it kind of sticks out there. Now this is a different type of material than the gasket here and the plastic up here. It’s very spongy. And again, this car is, uh, 2012. This—going on eight years old. So that means this is weathered, which means it’s more opened up. It’ll more readily get creamed over with polish. So I do want to go ahead and tape this off versus come back later on and try to detail it with the toothbrush. And as a part of this detail, I will be doing topical glass polishing. So let me get back onto that topic.
Subsurface Glass Polishing and Class Demos
Topical glass polishing is when you polish just the surface to remove things like drizzle stains and water spots or traffic film. And top—or subsurface glass polishing is when you actually, uh, use a glass polish designed to actually level glass and pull things like wiper marks out.
And, uh, this last class I taught, I told any of the students if they wanted to come a day early ‘cuz there’s—the classes I teach here are so intense. There’s really—there’s really barely enough time to do—I mean we did eight cars in two days. Imagine that. Eight cars in two days. So there’s a lot of times I can’t cover every topic in the world, um, thoroughly in a class setting.
So what I did is I set a couple cars up, uh, to do subsurface glass polishing and told any of the students if you want to come by the day before the class, um, I will show you how to do subsurface glass polishing. And I had a 1979 Corvette with wiper scratches and a 1969 Dodge Dart with wiper scratches. And basically just let the students have at it. And even though, you know, it was their first time, they did a pretty good job. Got most of the scratches out. The only thing left was the deeper stuff. And that’s kind of normal. The only way to get the real deeper stuff out is to machine sand with the rotary polisher, which is actually grinding. And most people shouldn’t be doing that. I—I’ve done a lot of it in my life, and, uh, I always get nervous when I do it.
Tape Off Trim Before Polishing
Okay, at this point here, I’ve got all this taped off. There’s nothing around the door handle. Um, there is this 5.0 sticker down here, and it looks like it’s pretty much on its last leg. Um, if I was the owner of this car, I would go ahead and, uh, just order some replacements to take those off. But because I don’t know that, as a professional, I’m going to go ahead and tape it off, you know.
Now that I’ve kind of got the edges done, I can go ahead and go back to my fat tape. You got fat tape, skinny tape. Get my fat tape out here and just cover up all this stupid black plastic trim.
Back to like, “Hey, Mike, I noticed you like to work on old cars.” Yeah, I kind of do because the classic body lines look cool, but also they just don’t have any stupid black plastic trim. And I always tell people, the guy that invented pebble texture trim—it’s just my guess—he’s probably never detailed the car. If he did, he would not have made that stuff.
Curves, Tears, and Protecting Plastic
Okay. And sometimes when you’re doing a curve, it helps to, like, just put a little tear in one side of it so it can kind of curve around. I did that just now for that ‘cuz there was a high point in there. And of course, when you are doing this, be careful so you don’t run your polisher over the plastic trim. But if you do, at least it’s protected.
Okay. So, something like that. Then, um, the only way for me to get that is come back around here with a mini tool. So, I can do that. But just for fun, I’ll go ahead and put a little tape over here just to be thorough.
Mirror Trim and Highly Visible Areas
Someone decided it was a good idea to put a lot of plastic trim around this mirror. Then there’s also this top, uh, component here, this top trim piece that separates glossy paint from this. And think about it, if you’re doing this on your own car for money and you cream this over, every time on the driver side they get in, they’re going to see that. So take a few moments and tape off all the pebble texture black plastic trim there. Just like that. And this thing’s actually pretty oxidized.
Okay, that’s how I would tackle the trim real quickly. And just to note, I do a lot of Corvettes, too. The modern C8s and even the C6s right here. And right up here, they got a little thin strip of pebble-textured plastic. Tape that off. Don’t cream over it. Corvettes look cool. They don’t need someone like us making them look uncool.
Folding, Wrapping, and Finishing Edges
Okay. So, something like this. I would just kind of bring this down here. Attach it really well. Bring it around. And then I’ll just take and fold the tape into itself like that. And I—I messed that up, but there we go. That’s how I would tape that off.
Um, let me show you this and then I’ll show you wheel maskers. Okay.
Beach Towel Trick for Wiper Arms and Cladding
Um, up here around the windshield wiper arms, we have, uh, plastic cladding and we have the wiper arms themselves. This thing needs an engine detail. So, let me show you how I do this. Uh, normally I like to use a beach towel, okay? Because the beach towel’s usually a little bit longer in its length, so it’ll fit all the way. Um, I don’t have one down here today. I used to have one with a Jolly Rogers on it that I put in all the cars I detailed and, uh, somehow I left that on a car somewhere.
But take and run your towel through. And then what you want to do is pull this out so it’s out of the way. And then you want to just take this side and fold—fold it under the wiper blades themselves. Okay. And then in one fell swoop, as the saying goes, you’ve just covered up the majority of the cladding and the wiper arms themselves.
And again, uh, because I do topical glass polishing, I’m going to throw splatter that way and it would hit the front side of those wiper arms and wiper blades, and these are dried out just like the trim. So, cleaning with the toothbrush would take a while. So, you don’t want to do that.
Verify Clearance and Use Panel Gaps
Then come up here, and this is important. You shouldn’t start the engine until you remove the towel, but you just want to make sure it’s not interfering with any moving parts and with the hinges, okay? Nothing’s blocking the hinge. And once you’re happy with that, then go ahead and put the hood down.
And while I have this open, here is a technique by letting this sit up. When you talk about not buffing on an edge, or you could even do something like this, shove a microfiber towel or roll of tape or something in here. Okay. And what this does is it holds it up away from these panels. So then you can buff out this panel without any fear of being—hitting this edge. Same thing over here. I can easily buff this edge without worrying about hitting this edge. So, there’s another little technique tip for you.
Open Panels to Buff Safely
Same thing with the doors. Open the door, polish the edge, leave the door open, polish the side of the—the—the body, and, um, and that’s just a technique you can use. Open panels up to make it safer to buff them.
Okay. So, then when I’m done, I want to come up here. And this is important because a lot of cars have this. But right here, the top of this fender, there’s a piece of very dried out, aged rubber. And if you do not tape this off, you will stain it. And then you will be cleaning it. So go ahead and put a little tape right in there to protect it.
And because this is not a beach towel, I have a little bit of cladding over here I do want to take and cover up so I don’t have to worry about digging splatter stains out of it later.
Restoring Black Plastic Trim (Later)
Get down there and stick. Okay. And then towards the end of the video, just to kind of complete this job, um, I’ll show you how to fix that black plastic trim to make it look good again and explain, uh, some of the things that most people just don’t ever think about or understand when it comes to restoring black plastic trim.
I actually taught a class on restoring black plastic trim at Mobile Tech one year. I didn’t want to. I was asked to and I didn’t want to because it’s a boring topic and it’s probably one of the few classes I’ve taught at Mobile Tech that just wasn’t absolutely standing room only. Um, but I did cover it.
Be Proactive With Trim Care
But the thing I shared in there was what most people do is they, um, they buy a new car, the plastic looks good, they don’t do anything. They don’t do anything for years, then one day they look at it and it’s all faded. Then they look for a miracle product that’ll fix it. Like one and done, set it and forget it. And that just ain’t going to happen. What’s better is to be proactive and before it starts to fade, start treating it and stay on top of it.
Okay, we’ve got this done and then I want to show something I’ve been showing for about 20 years now. You wouldn’t know about this unless you had a body shop background, but this is called a wheel masker. And you can get this at a PBE store. PBE store is a local auto parts store that sells paint and solvents to local body shops. PBE—paint, body, and equipment. So, a PBE store or you—I got these off Amazon. They come in different sizes, but it’s called a wheel masker.
Wheel Maskers and Preserving the “Ugly”
Now, I used to show this all the time with the cars I detailed in the classes I taught at Autogeek for the last 15 years. So, I’ve been showing this for a long time. Nowadays, I see a whole lot of companies got these out there with their name on them. So, yeah. Uh, however you want to get them, whatever name you want on there. But if you just want these simple canvas ones, you can go to, uh, Amazon and they’re pretty cheap.
And—and here’s the point. I washed this thing, uh, Monday morning and part of that was getting these wheels clean, caked on brake dust. I machine scrub the tires, get the old browning of tire dressing off and now they’re ready to put a dressing on, but I don’t want to throw splatter on anything when I’m down here buffing. So, you know, wheel masker just helps you to protect it, save time.
But another thing I always teach people: get the car completely taped off. And now’s when you take your—your picture because what you want to do is you want to show the car real ugly. Show it ugly. Then when you’re done, you pull all this off and show it real beautiful. Okay? So the—the idea is to make it ugly on purpose. Do everything you can to make it ugly. Get your shot, then finish it all out, and then take the after shot. It has more of a dramatic impact or dramatic effect. So that’s why I do that. Always preserve the ugly.
Start at the Top, Work Down
Okay, so we’ve got all that done. And the next thing we’re going to do, if you remember what I said in the video, after you dial your test spot in on a panel you can look down on, that’s when you go to the top, work your way down. So, I’m going to work my way over to that side. And here’s what we’re going to do. I’m just going to buff out this side to show process. And then I’m going buff out the vertical panels. And the—the—the key about the vertical panels is just pick an end. It doesn’t matter which one. Pick this end or that end and start at one end and go the entire direction.
So, let me go ahead and get ramped up and I’ll show you how to. And I’m just going to keep using that same entry-level polisher I showed before. In the real world, I wouldn’t use it, but I know a lot of you are—are just getting into polishing. Um, I do have the forced rotation hooked up. I got the forced rotation hooked up so in case I get into a thin panel where this just is not maintaining pad rotation, I can switch over. I’ve also got my micro tools set up and ready to go.
Clean Your Pad on the Fly (Two Ways)
Before I start polishing, we were using this pad when we did the test spot and I’ve got a bunch of product that is actually kind of dried onto the pad. So, I want to just show you how to do what’s called clean your pad on the fly. There’s a couple ways to do this. Here’s the first way.
First of all, if you look at this brush, um, I’ve got another one around here. It’s got a tan handle with black bristles. I recommend always looking for the one with the white bristles. Here’s why. This is technically a tire scrubbing brush. If you’ve got black bristles and you scrub a black tire wall and you pull that black stuff off—the old tire dressing, the tire browning—and it gets, stains the bristles because it’s black. You can’t see it. Then if you take and try to do anything else with it, you risk staining that thing as it comes off the bristles. If you’ve got a brush with white bristles and you look at it and you see a stain, you’ll be smart enough not to go do anything stupid like rub carpet with it because you’ll stain it with the black stuff. So, I like the white brush.
Brushing vs Towel Method
But here’s what I would do with this. First of all, you see my hand here? I’m gonna come back here. I’m going to put that against the backing plate to keep this thing from spinning. I’m going to put this against my leg. And you could use a toothbrush, but this big fat brush works better. Then I’m just going to scrub off any excess. Take and spin it. Scrub off any excess. You don’t got to get it perfect. You just want to get the excess.
And you got to remember there’s two things that build up on the face of your pad when you’re buffing out a car. Just like that. It doesn’t really work to—oh, I got to plug this in. It doesn’t really work to turn it in—hold this ‘cuz just this brush will keep this thing from rotating so it doesn’t work. So just block it with your hand and clean it.
I do the same thing with the gear driven version. I don’t got to block it up, but I just take and clean it. And I do the initial cleaning by just like that. And then I will turn this one on and just kind of hold that on there and get as much stuff as I can.
The other way to do this would be to take a terry cloth towel. This is kind of small, but this is, uh, called clean your pad on the fly. And you would basically just take and you would hold this against there and turn it on and press this into it. And what that’ll do is it’ll take off this excess material here. And it also pulls some of the liquid out. Okay? So terry cloth works good for that. Usually a hand towel, not a wash rag like this. But that’s how I do that. And I’ll show you that as we get working on the car.
Why Pads Clog and When to Swap
Um, and this—always remember as you’re—anytime you’re doing paint correction, you have two things that build up on the face of your pads. And that’s spent product. Okay? So, the product you put on is used up, but there’s a residue. Spent product; removed paint. You know, when you do paint correction, you’re not filling the swirls and scratches in. So, the way you visually make them disappear is you level the surface and you try to bring the tops of the surface down to the lowest depth of the defects you’re trying to remove and that’s how they visually disappear. Whether they’re water spots, holograms, swirls, scratches, oxidation. Um, anyway, so you want to keep that clean off your pads.
And then let me just kind of touch on how many pads does it take to buff out a car. Um, because this video is kind of focused on foam pads, not microfiber, not wool pads on rotaries. When it comes to foam pads, um, part of the cut, as I explained before, comes from the cut of the pad and the cut of the product. When foam gets wet, it gets soft. So, as you’re working on the car, as you see the pad actually start to become wet with whatever compound or polish you’re using, it’s probably time to switch over to a fresh, clean, dry pad.
Dry Pads Cut Better
And a couple things about that. A dry pad, as compared to a wet pad, will rotate and oscillate better. So, you’ll get better and faster correction ability by switching to a dry pad often. You’ll increase the effectiveness of the paint correction process because now you’re using a foam that’s actually cutting ‘cuz it’s dry or only lightly wet. Once it gets to the point of pad saturation or it’s soggy, you basically are buffing out with a finishing pad, a foam finishing pad.
So, uh, and that’s why I’m not a big fan of, uh, using pad cleaners as I work around the car. I use pad cleaners at the end of the day. Clean my pads, let them air dry so they’re dry, so they’ll rotate good and oscillate good. They’ll have the cut restored, then go back and use them tomorrow. And actually, I go through so many pads in this shop for my classes or just detailing cars. I’ve got an old school washing machine. It’s old school. It’s got an agitator that goes nuts. And I just showed it to the classes last week and we threw absolutely dirty pads in there. Come out looking brand new. So, I clean most mine, but I will show you how to use a pad washer.
Power Your Tools Correctly (Extension Cords)
Okay, I need to grab some extension cords and get plugged in and then I will show you how to tackle the roof.
Okay, so if you look back here, I got a lot of extension cords ‘cuz I got a lot of tools and usually, um, I run my classes. In the old days, I used to run them up to 20 people. I know—I know the experts on, uh, social media will say, “Well, that’s too many people. You won’t get any one-on-one time with the instructor.” But that’s not true in my class. I walk around the whole time and watch everybody, interact with them, and help tweak their technique or let them know they’re doing it perfect. I don’t just sit down in a chair when the class is going on.
And when I have bigger classes, I just bring in more cars. And because of that, I need a lot of tools and I need a lot of extension cords. And here’s the thing about the extension cords. This is a 12-gauge. That means the wire inside here is very thick. It can flow a lot of amperage through it quickly to power up the tool. If you’re using like an extension cord like you would use—here’s how I do this. Throw this out. If you’re using an extension cord like you might use to run Christmas lights, it’s 16-gauge, then chances are really good, uh, you’re going to starve that tool for power and eventually it’ll burn up some of the components in the electrical system of that tool.
So, don’t skimp out. I just purchased some of these for the class this last weekend at Home Depot. The Husky—this is the Husky brand. Um, 12-gauge, 25-footers. Were just under 40 bucks with tax. So, if you’re going to buy nice tools, use good extension cords. There’s one. The other one’s done. Okay. So, we are good. Okay. Okay.
Clean Your Pad on the Fly (Brush or Towel)
Let me just show you how to clean your pad on the fly. This pad isn’t wet, so I’ll try to show it to you later on. But this is how I would do it. I would just take this, turn this on, and I’m pushing that in and checking it. Anyway, that’s how I would clean a pad with a cotton towel—called clean your pad on the fly—or I’d use the brush.
And then I said earlier if I’m cleaning the Beast or the copy of the Beast, I would start by just hand-brushing like this. But at some point, I’d go ahead and turn it on because this is going to spin that way. I hold it over here, run it down the center, just make sure you kicked off any spent product or removed paint so you’re buffing clean.
Roof Setup: Tape Sensitive Trim First
Okay. In keeping with using an entry-level tool, we dialed in the heavy polishing pad with our Core Cut, very fast cutting compound. Let’s come up to the roof.
Okay, so this roof is kind of unique in that a lot of times the section between the actual roof and the pillar where the door rides, there’s a piece of plastic, rubber, or vinyl trim. It’ll be just as dried out as the rest of this ‘cuz again, this car is 8 years old. You better tape it off. A lot of times, this doesn’t have a sunroof. The sunroof will have a gasket.
Now, in the old days, those gaskets were fuzzy. If you didn’t tape them off and creamed over them and come back with a toothbrush to scrub them, you’d take all the fibers out and destroy the gasket. So, that’s another reason to tape it off if you’re working on something with a fuzzy gasket. Nowadays, they’re intended to just be a rubber material, but they’re very spongy and open. And again, if you run your polisher over it, you’re going to stain it. And because they’re soft and spongy, if you try to clean them with a stiff brush, you’ll tear that material up. So, it’s better to tape that stuff off, even if you run the tape onto the paint a little bit, than it is to cream it over, especially if you’re doing this for money on someone else’s car.
Roof Technique: Center-Out, Four Section Passes
Okay, so this pad has kind of gotten dry again since we’ve been doing a lot of other things. So, I’m going to start out with three dime-size drops. And then here’s how you tackle a roof. You want to start in the center and work your way out. And you also want to pick either this end or this end. But you don’t start in the middle and then go this way, then come back here and go that way. You can do it, but it’s just not a good best practice.
So, I’ll go ahead and start in the front because it just really doesn’t matter to me. Cord over shoulder. Don’t turn the tool on until it’s in contact with the paint. The first thing I’m going to do is spread my product out just so I have a uniform layer of abrasive technology and lubrication. And then I’m going to start making my section passes.
I think we dialed in four section passes, removed 90–95% of the swirl scratches, which is what we were targeting for this abused daily driver moving forward.
Use Body Lines to Define Sections
And as you can see, there’s actually a raised body line on the—there’s a center panel, then there’s two raised body lines. So, I’m going to use the natural body lines to help me determine my section. So, I’m going to come up to this, but I’m not going to go past it. I will come up to this edge and then it looks like I can probably get two sections here. They’re kind of big, but we’ll do that anyway.
So, uh, I’ll count my section passes out loud. Heat. Heat.
Okay, there’s four solid textbook example of a section pass. I’m going to do one more and I’m going to bring my pressure up so any micro marring left in the paint will be shallow so it’ll buff out easier in the next pass.
Okay. So, technically that was five passes, but the last one was just kind of a shmoo over the paint kind of thing.
Residue Landmarks for UMR (Uniform Material Removal)
At this point, you know, depending on your style, you could leave that there, move on to the next section. I’m going to go ahead and wipe it off ‘cuz I want to show a technique I use. So, I’m wiping it off, but I’m kind of leaving some of the residue. So, I could reach and wipe it off, but I kind of want to leave that there ‘cuz that shows me where I left off and I need to overlap into. Make sense?
Okay. So, that’s—that’s what I do. Same thing here. I left a little residue right here. So, I know I need to come back just a little bit past that for—remember the term UMR, uniform material removal.
Grab-and-Stab: Spreading Product Without Splatter
Okay. So, next spot. Come over here. Uh, I always like to add my pea-size drops to a different place on the pad, which I just did right there. Like that. And now I’m going to knock out this center section all the way up to this little lip.
And again, I don’t—I don’t honestly know if this is piano plastic or painted. It actually looks like piano plastic. It’d be very soft. And this is a sharp pad. And this is some sharp abrasives. That’s where you get into trouble is the edges and the corners on these things.
Okay. Then here’s another technique I didn’t really cover. This is where people kind of dab this around. And there’s nothing wrong with that just to get your product spread out. But let me show a technique that most people don’t show you to do this the right way.
So now when you turn this on, as you’re running it, as you’re picking this up, just don’t run this edge into it, keep the back portion of the pad in contact with paint. Just kind of grab it and stab it. Just like that. Then as you move forward, grab it, stab it—grab and stab it. The idea being just to trap that product, finger paint the paint where you want it, not throwing it all over the place.
Finish the Roof Sections and Overlap
Okay, so now let me do my standard four section passes. One more to just lighten my pressure, then we’ll move towards, uh, this outside of the panel. Heat. Heat.
Okay, there’s four section passes.
Okay, so again, uh, you can, uh, buff out the whole half of the roof and wipe off. I’ll go ahead and wipe off. But did you see how I kind of overlapped into the previous section and that way you have a uniform defect removal. So at the end of the day, you have uniform appearance.
Okay. So now what I have left on here to do is I need to do this section, this section, the panel between the door, the A-pillar. I kind of already did some of the A-pillar. And then this goes all the way back to the trunk lid back here. And then I need to figure out what I’m going to do here. This is piano plastic and it is all cracked and crazed. So I’m not going to compound this. I’m just going to go ahead and, uh, I’ll just do the secondary polishing step. So I’ll light polish to that just to ensure I don’t cause any damage.
Clean the Pad Again; Manage Saturation
Okay. So, at this point here, I might go ahead and clean my pad. So, here’s my little fat brush. I’m blocking this up back here so it doesn’t spin. And I always like to get the edges really good, too. And this pad is damp, but it’s not soggy wet.
Okay, now I’m going to work this panel that’s actually closer to the outside. I started in the center working out.
How Many Pads for a Car?
Let me talk about how often to change pads. I just showed how to clean a pad, but if you’re trying to do show car work, you know, like high-quality work, a good rule of thumb is for each body panel, have a dedicated clean pad ready to go.
Uh, a two-door car like this has nine panels. It’s got the hood, the roof, the trunk lid. That’s three. Fender, door, fender, that’s three. Fender, door, fender, that’s three. So that’s nine panels. So imagine having anywhere from, say, six to nine of your aggressive pad. Well, in this case, it’s the Blueberry pad, which is a heavy polishing. But if you had a foam cutting pad, you’d have six to nine foam cutting pads.
And then after you finish a panel or an area, go ahead and set this aside. Um, usually what I’ll do is I’ll run it over the slop sink and I’ll kind of hand-wash it really quickly and get it wet so it doesn’t continue to dry and let it sit there. I’ll switch to a dry pad and keep working around the car. But, um, for the heaviest step, you usually want a pad per panel or close to that. So, a pad per panel would be nine pads. So, close to that would be like six pads. So, if you want to just buy six foam cutting pads, there you go.
Now, when you go to the next step, because you’ve done all the grunt work, it usually takes fewer pads, but you still want three or four polishing pads to do an entire car if you want to do high-quality work. If you’re just doing production work or a budget details, use one or two pads per car, but you’re going to wear your pads out faster and you’re not going to be as effective with your defect removal and with your time.
Overlap, Planes, and Pad Cleaning Reminder
Okay, so I’ll do this section and then I’ll do this back section. Okay, I left a little film here. And also, this has a little bit of a plane right here. So, if you’re watching, I kind of tipped my polisher up and got that plane ‘cuz I didn’t get it when I did the center section. You can do it either way.
Okay, back to Core Cut. Now, I’m starting to get a pretty good film of spent residue on here. So, I’ll show you how to clean the pad again.
Okay. So, now I left a little residue here. So, this is my section, but I’m going to overlap a little bit into that. That very last pass, I was actually getting quite a bit of pad stalling. And that’s because the pad’s getting wet. I said this earlier before: clean, dry pads rotate and oscillate better than wet pads anytime you’re using a free-spinning random orbital polisher.
And I just kind of want to point that out because in the online world, I do see people that say, you know, that what I just said was wrong. You’d only need one or two pads to do the whole car. But most of these guys are using free-spinning random orbital polishers and then they wonder why it takes them so long. It’s because they’re not getting good pad oscillation or good pad rotation—both of them.
I know some people always talk about pad rotation, like you don’t need pad rotation to remove swirls and scratches. And I never talk about just pad rotation. I always say I want good pad rotation and good pad oscillation. I want both actions, not just one. I definitely don’t want the pad just sitting there vibrating against the paint. That is not going to do anything.
Quick Rinse: Slop Sink Pad Wash
Okay, so this section, this section is all done. Let me show you how I—at this point I would go ahead and pull this pad off. Can we walk over to the slop sink? Okay. So, let me show you how I would do this.
Now, if you don’t have a slop sink, you know what you can do is you can just get a, um, a 5-gallon bucket, put like four gallons of water in it, and do this in a bucket and then let it soak somewhere. And for me, I’m going to throw it in my washing machine, but I’ll show you how to use a pad washer.
So, here we go. Just same brush. Get it wet. Watch how clean this comes out. Those NSPs, man, they just peel off there. A little bit of water. And if I did want to wash this in the washing machine, just doing this.
Now watch. I’m going to use my hand as a squeegee. I’m going to come down here like this and I’m going to squeegee. So, I’m pressing on that foam and I’m using water and pressure to squish out any of the product that went into the foam. And then here’s what I do. I mean, this is all the stuff I really do when I detail the car. I use inertia and gravity to get almost all the water out of there.
This is from my last class, so this is kind of dirty up here with pads ready to go in the washing machine. Set aside and let it dry. And maybe that’s all you need to do. You can wash it further if you want to, but a lot of times if you do it like that, it’s good enough.
Tackle Thin, Long Sections (A-Pillar & Above Door)
Okay, I need another pad. It’s okay. I got a lot of pads. Okay, look. Look at all the pads in there. I forgot to tell you the rotary polisher story. Don’t let me forget that.
Okay, back to my entry-level Harbor Freight Bower 8 mm free-spinning random orbital polisher. Okay, so now I want to knock out this. This is called the A-pillar. I’m not sure what they call this panel that runs across the top. This panel back here is called the Dutch panel. But because I’m going to be doing something that’s about 2 to 3 inches wide, here’s where I’m going to put my product for this. Just going to put a little circle of product right in the center ‘cuz that’s where most of the action’s going to be.
And then because it’s a long linear panel, just back and forth. And I’ve actually got two planes. I’ve got this plane and I’ve got this plane. So I need to spend a little time on both planes.
Okay, that was this horizontal plane. Now I’m going to go up on edge and just get this. It’s about a 1/2-inch thin. I say you like a—
Okay, this tool struggled to maintain pad rotation in some of the tighter areas here, but for the most part, I got it out. Just remember, you know, if you’re using this type of tool, mark your pad, mark your backing plate, monitor pad rotation with your eyes, adjust how you’re holding it, the amount of pressure, bump your speed up—whatever it takes to kind of power through the more difficult areas.
Above the Door: Finger Painting and Landmarks
Okay, same thing. I’m just going to put a few drops right here in the center. Now I’m going to knock out this right above the door. And I can do probably this whole thing in one fell swoop.
Got a half-inch plane right here. I got another little plane right here. These are going to be tough to get with this tool, but let’s see if I can do it. For this, I’m going to do a little bit of what I call finger painting. So, I’m just going to put some product where I can draw from it. And I’m just going to take and spread some across here. It’s important to have that lubrication aspect to help you to maintain good pad oscillation and good pad rotation.
Another trick I use is up here. I kind of did this section here and I used this, um, horizontal line between the windshield as a visual indicator. So, I went to here so I know when I do this section to go past that a little bit. Same thing here. Here’s where the back glass starts. So there’s a definition line between roof and glass. And I’m running the polisher just past that. Then I’ll pick it up on the other side. Run down this way, but overlap a little bit into that previous section.
So let me see if I can knock out the more difficult part. So that’s four section passes on this thin panel. Go up top. Repeat the same thing.
That section’s done. I’m just going to come up here and grab that little pile I left there ‘cuz I don’t like to waste product.
Hips, Sail Panel, and Rear Sections
And now I need to come back here and kind of divide this section up. So you got the hips, you got the tops of the fender here. You got—this is called a sail panel here. And then I still have these thin planes that run up to where the trunk lid opens and closes.
So to tackle that, it’d be just the same basic kind of thing. But just for fun, let me show you—if you don’t mind spending another 40 bucks over this one—what you can do with a gear-driven polisher. It’s just so much faster.
Gear-Driven Speed-Up: Concentrated Corrections on Thin Planes
Okay, for this I’m going to go ahead and do the same thing. I’m going to do some finger painting. So, grab my product. I’m going to put some on this panel. And if you watch what I’m doing, I grab some and I start out with my finger on edge. So, it’s all the way back by my nail almost. And then as I run this, I start spinning my finger forward. So, I can get this whole section done with that little gob that I had. All kinds of little dumb techniques I’ve perfected over the years.
Okay. Gear-driven. Here are the gears. It’s not free spinning. And this is a dry pad, but I’ve got plenty of product down here. So, watch this. This will be three.
Now, if this was in really bad shape and I really wanted to get some dedicated cutting power on just that plane, then here’s what I would do. I put a strip of product down. Probably might need to get some on the edges. Lock this in. Go slowly.
See, I’ve got product on the edges. Now I’m going to come up here, go up on edge, and then just really run that down that plane. And that is a lot of concentrated paint correction power in a small thin area.
And notice I just buffed—at the widest it’s about, what, two inches from here to there. Up here it’s about an inch. So I just buffed out a 3-inch and a 2-inch panel using a 7-inch pad. So one of the things I practice and teach in my classes is when you switch over to a gear-driven orbital, instead of switching to a different tool with a different size backing plate with a different size pad every time you come to a different panel so you can maintain pad rotation, just learn how to use the tool that’s already in your hand. You’ll speed things up.
Why I Like EdgeGuard Pads
Okay. And, uh, what else did I want to cover on that? Oh, the EdgeGuard pads. Here’s another reason I like these pads. Um, we used to show another line of pads here in my classes, and they’re good pads, but the EdgeGuard—look at this. This is what Rich Umbrell did. See this cutout back here? What’s going to happen is when I go up on edge is this pushes back, completely protects the backing plate and this, uh, plastic liner in here. And there’s no way I can hurt anything.
When you have a cylindrical pad and you go up on edge, it twists inward and now all this sharp material is going to be close to the paint. So, that’s one of the reasons I really like the EdgeGuard pads.
Sail Panel and Concave Curves with a Gear-Driven Polisher
Okay, now I still got—let’s see, this is just one plane right here. So, pretty easy. Okay, so that panel’s done. Now I’ve actually got the sail panel to do. And here’s a good example where the EdgeGuard would come in handy. Besides a thin panel, when I come down to here, okay, there’s a certain amount of my pad that’s going to hit this horizontal plane. I’m on a vertical going to a—running into a horizontal plane. And as I hit that—again, see how that curves back? That allows me to actually get in there and buff out that concave curve without pad stalling, without any danger to the process.
So, let me show you how to knock out that sail panel. And just real quickly, I’ve watched a lot of people on YouTube talk about gear-driven orbital polishers. Like they do a tool comparison. They show a whole bunch and I’m always surprised by what they say. They say things like, “Well, I tried that tool. I didn’t like it. Pulled me all over the place.”
Okay, let me just share something with you. There’s two words that start with the letter P. Pulling and power. The reason it’s pulling—it’s got a lot of power. A free-spinning tool ain’t going to pull ‘cuz instead of having power, it’s got lack of power and it’ll just sit there and jiggle and oscillate and spin out and it’s real smooth on you. That’s fine. If you want a smooth tool, get something like that. But if you want to knock things out fast, learn how to use a gear-driven polisher. It’ll save you a lot of time.
Lubrication, Sectioning, and Working to the Trunk Lid
Okay. Four. Okay, so now I don’t got to worry about that. I just need to get this complicated area. And that’s not that complicated. One, two, three, four, five. Light pressure is light.
Okay. So, now I’ve got this section, this section, this section. I got this big, fairly easy section to buff out here. And because I’m going to be running that edge into the horizontal, or the hips on this thing, I do want to put a little more lubrication on there. Actually, works better to go this way. Sorry about that. I want to show the camera.
Okay, so now I’ve got lubrication there. I got more than enough product on the pad. I will add at least one drop here. You always want something to work with. Okay, let’s knock out—I’ll do this all the way to where the trunk lid lines up. And then I’ll tackle this as its own section.
Move it over. Now I’ve got this whole sail panel done up to where the sail panel meets the trunk lid. I still got to get this area. And this is where I’d probably pop the trunk lid open. And that’ll lift this spoiler out of the way so I can do this whole section. So, excuse me for the break, but let me grab the keys and open the trunk.
Open the Trunk to Access Tight Areas
So, simply by opening the trunk lid, I got the spoiler out away—this huge chunk of paint—to make it faster and easier to buff out. I’m going to go ahead and switch back to this entry-level tool, 8 mm free-spinning random orbital polisher. I think you can all see why I like that one that you don’t have to mess with any pad stalling.
So, I’m going to do this section and then at this time I’d actually go to the other side and knock out the other side of the roof and then work my way around the car. But here we go. Right there, I get zero pad rotation, zero pad rotation. I’m on a high point. I’m in a concave curve. And that’s just the downside of, uh, entry-level tools. You know, I showed you ways to overcome that.
Anyway, while this is up, you could do things like hit the side of that. But that’s kind of the big-picture idea. Once you dial in your test spot, start at the roof, work your way down. Every car is kind of different. A lot of cars might not have the hips this has. So, while I was already here, ‘cuz I wanted to finish out this panel right here, I went ahead and just knocked out this, but at this point, now I want to go to the side and knock out the other side of the roof.
Door Handles: Flexible Shaft Tip (Do This First)
Okay, start at the back of the car going this direction. But when I get up to the door handles, I just want to share a little technique with you that helps me. This is a really cool tool Flex brought out. It’s a flexible shaft. It attaches to their Flex PXE. You do have to buy it separately. And then they’ve brought out a bunch of different types of foam pads that are just—they got the spring-loaded collar here. They just pop in here and, um, then they attach like that. And then there are different types of foam like foam cutting, foam polishing. This orange is kind of foam finishing. And you can get different shapes. And sometimes I take a piece of like 80-grit and I carve mine down to be my own shape.
But the thing I want to show you about this is this is basically a rotary polisher. And as you know, rotary polishers tend to sling stuff. So they’re real handy for getting in here to get the fingernail scratches that kind of build up behind the handle. But my tip is do this before you do the polishing because you’re going to throw splatter for the most part everywhere.
Then the way I would do this is—again we’re using Core Cut—is I would just take and actually take my finger and work this in ‘cuz if not it’s really—it’s just going to throw it, you know. Don’t ask me how I know. And this about the only time I really use this. I use it on louvers sometimes, too.
So then you want to take and turn your polisher on. I’m going to stick this in here first. Lock it into place and then basically just come in here and start polishing. And you usually got to attack it from two different angles. But that’s the way you can get out those real annoying fingernail scratches. And then, as you can see, I didn’t throw a lot of splatter ‘cuz I worked my product in my pad. But what I’ve seen a lot of people do is they turn it on and just throw splatter everywhere. And if you’ve already polished this and wiped it off, man, you got to wipe it again.
So do the door handles first. Then grab your polisher. And if you look, you can see I’ve kind of switched back over to the gear-driven. And the gear-driven, especially on these vertical panels, is simply going to be a lot faster. So I’ve knocked out this. So now just hit around the door handle.
Mirrors and Vertical Panels
And when I want to come down here, get this. There’s actually an indent in there. And there’s another place where this thing’s going to work out really good. Let me put a little product on there. Watch this. Just pick that product up. Now I can get right in here and get that lip. Heat. Heat.
Then of course, keep progressing down the top of the panel, work yourself down to the bottom, and then flip over and do the same thing to the other side of the car. That’s how that rolls.
Okay. As you’re working down the door, at some time if it’s got painted mirrors, you got to hit the painted mirrors. And a free-spinning polisher would actually tackle this pretty easily, but I do have the gear-driven, uh, polisher in my hand. Anyway, that’s how you tackle a mirror.
And of course, keep progressing. The big thing about doing vertical sides is start at one end, work to the other end. And the only tip I really got is every car is different, but this is a concave curve here. It runs all the way down the door. It’s always going to be a lot faster with a gear-driven orbital or switching to a free-spinning random orbital with a smaller pad. That would be my advice for that.
Topical Glass Polishing While Trim Is Taped
Okay, now that I’ve kind of finished the top portions of all this, I still got to go down the bottom. And I call that butt time ‘cuz I get on my butt. We don’t have a lift here and we don’t have a lift here because I do a lot of classes. They just become more of a hassle.
But while I have this pad on here and I’m kind of done with all the major body panels, let me show you what I would go ahead and do. We talked about topical glass polishing. And right now I’ve got all these gaskets taped off. So now is the time to do it. And it’s real simple. You just take whatever—for me it’s whatever I’m using for my first or second step for polishing paint. Same pad, same tool. Topical glass polishing. And if the water spots aren’t baked on, they’ll usually peel off pretty quick.
But this is important because if it’s your own car, of course you want to keep the windows clean. A lot of times the kind of stuff that builds up on these will not wash off. It will not wipe off, but it will polish off. And there are a lot of glass coatings on the market. Dr. Beasley’s makes some great glass coatings. And if you want to use a glass coating, the key thing about that is always—just like anything else—the prep work. You know, you need to get that glass down to pure base glass for that coating to make a proper bond.
But when I detail cars, this is one of the things I do is I hit all the glass, but I make sure I tape it off first so I don’t cream out those gaskets.
Step Two: Softer Pad, Faster Polish
Okay. So the next thing I want to do after all the first step is done, the first paint correction step—that’s where we were using the Blueberry pad and the Core Cut to remove 90–95% of all the swirls and scratches. So I want to go ahead and switch over to a softer pad.
Now in the test spot, I always like to test the least aggressive process. So that’s the pad, product, tool, and my technique. And I did dial in a process using the black soft foam finishing pad with NSP45. But off camera, I went ahead and just retested using a white foam polishing pad. You can’t really say it has a lot more cut, but a little bit more cut. And I switched over to the NSP95. Got the same results, but I could go faster. And to tell you the truth, that’s my style. I like to go as fast as I can while keeping my quality high.
So, the next step then is just to go ahead and retrace all my steps. So, starting at the roof and then working your way down.
Working Lower Panels the Right Way (Posture & Lighting)
But, I want to share a technique with you for working lower panels. This is important because when I’m teaching classes, I always see people doing it the wrong way. There’s a right way and a wrong way. So, the wrong way is when you’re trying to polish something on a lower panel, is to somehow bend over and polish. You know, that’s the wrong way.
Now, to do the middle portion of this car, say from the sail panel down to here, I went down the side of the car using a chair. But to get the lower points, that chair won’t go down low enough. So, here’s what I always recommend. Invest the money and get some sort of seat cushion. This is called the knee and back cushion. This is just a generic cushion off of Amazon.
And here’s the technique. You always want to be looking straight across from the panel you’re working on so you can see what you’re doing. And that way you won’t hurt your back. And a couple tools that can help you when you’re doing this—I mean, I’ve got wall lights in our shop, but if you don’t, this is where a good Scangrip light will help you to see what you’re doing. And another little cool tool made by Scangrip—this is the headlamp. It’s a LED headlamp. And it will really do a good job of lighting up the finish so you can see what you’re doing.
Anyway, so then to finish this out, then you would just—I would just take and I’ve switched over to a white foam finishing pad, NSP95. Do the little dabby thing. And this is the areas you got to still get is these lower areas here. I just kind of wanted to warm up my pad up there.
What you see me doing there is I’ve got a—I’ve got a body line right here that goes up to another plane right here. So, I just kind of wanted to tackle that section. Then I’m going to tackle this as a section ‘cuz these are just all smaller sections. So you can’t really do the thing like on the hood where you’re doing a big cross-section. You want to look at the panel, use the natural body lines, and then carve out—divide that panel into smaller chunks you can tackle, especially anytime you’re using a free-spinning random orbital polisher.
Okay? And so this is what I’m talking about. By getting myself down on the ground, I can look exactly across from where I’m running the polisher. So, not only can I see what I’m doing and see my progress, but I’m not hurting my back and I’m planted down here really well, so I’m stable ‘cuz, you know, this is going to take a couple more hours to polish out the whole thing. And the last thing you want to do is at the end of the day is be sore.
Besides that, just look at the natural panels and carve smaller sections at a time. And always remember when you’re working with a free-spinning polisher to mark your pads and hold the tool in a way that you’re able to maintain good pad oscillation and good pad rotation.
Intricate Front-End Areas: Options If You Only Have One Polisher
So an example of that would be here’s a thin plane right here and then there’s a different plane here that makes this a concave curve. So the only way I can tackle this is to tackle this section as a section and this plane as a plane. So let’s see if I can maintain good pad rotation. And, you know, these tools, in my opinion, are a little bit slower. It’s a great way to get into polishing, but you got to really focus on maintaining the pad rotation. But if you do, you can actually get the whole car done no matter what the shape of the panel.
So, let me get up and I’m going to share some tips and techniques. I’ll finish the rest of this out. Then, I want to share some tips and techniques on how to get those intricate areas at the front of the car and also in the back of the car.
The design of car body styles is so different among all the different brands and there’s just no way to really show you how to fix every single car. But this Mustang is a good example. It’s got a lot of different intricate designs. Here’s a fairly large flat panel. Here’s a flat plane. Here’s a plane. Then you start getting into the headlights. There’s actually a section of paint under the headlights. So these areas can be very difficult to try to tackle if you only have one polisher.
But if you only have one polisher, there’s another way to tackle this. So, just for example, this section right here using this free-spinning random orbital polisher—and also, since it’s been a few minutes since I used this, it’s always a good idea as you’re working around the car just to clean your pad on the fly. And again, I’m just kind of blocking this so it doesn’t spin freely with my hand as I kind of scrub off any of the extra compound there. And of course, the same thing over here before you use it. Just keep your pads clean.
Okay. So, back to the Core Cut. And then watch how I can get this in here and tackle most of this, but I can’t probably get all of it. Anyway, you can kind of see that it’ll tackle most of it. When I start shoving it up here to try to get this little section of paint up here, the pad just basically stalls out because now you got pressure on the edges of the pad. So, as nice as these tools are for an entry-level tool, they are limited in what they can do.
Gear-Driven and Micro Tools in Tight Areas
Let me show you conversely what I can do with the gear-driven tool. So, we showed this earlier and because it’s gear-driven, there will be zero pad stalling. And what I just basically did is I took the head of this and I just pushed it all the way in here as far as I could get. And because it’s gear-driven, I was able to maintain good pad rotation and pretty much get all the way up into there and get this thing as good as it’s going to get. It’s got a lot of—um, this whole front of this car, I think this car has been tracked. It’s got a lot of damage, but that still looks 10,000 times better.
Okay, let me show you another way to tackle this. Again, you can go back to your micro tools. This is a good way to get into tight areas. And for something like this, let’s see. Here is a tight area that I can probably only get a little ways in there or I start running the backing plate actually into the headlight. So, this is not going to be a good option. I can get—I can get the front parts of it, but I can only get in there so far.
Okay. So when you get to areas like that, how do you correct them? You go old school. A little bit of elbow grease, work by hand. And to do that, you have two choices for the most part. You could use terry cloth. Terry cloth is actually quite scratchy. Um, and I do use terry cloth for some things, but for base coat/clear coat paints on modern cars, this is a microfiber applicator pad. It’s actually another one of those coating saver pads, um, for applying coatings, but because it’s soft microfiber—but it’s also a fiber—the fiber is a form of abrasive, so it gives it more cut than a simple foam wax applicator pad, which has a uniform surface.
So, if I really want to get into those tight areas, here’s what I would do. I would put some product right here on the end of my pad. And I’m actually going to work this in a little bit with my finger. Okay, so now I have two things there. I got abrasive technology and I’ve got lubrication. And now I’m just going to come in here and just do this. And sometimes this is, you know, unless you pull the headlight out, that’s about the most you can do.
But you can extrapolate this out to the car you’re working on and you can kind of figure out all the tight areas that you can’t get your larger pads. And if you don’t own the little cool micro tools, then here’s a way you can tackle this at home in your garage.
And of course after you do the first step using the microfiber pad—and again fibers are a form of abrasive. So just now I went and polished all that out using Core Cut, microfiber pad. Now if I really want to go nuts and make it really look good, come back with the 95, change my applicator, less aggressive product, and then come in here and kind of shove it over. And the goal is in case—just in case—the fibers left any kind of marring at all, switching over to something with the uniform surface texture, putting a little, as I like to say, passion behind the pad. You can work all that out and get an acceptable looking finish.
And again, the only other way to really get into tight areas would be—what—disassemble the car. Nobody’s going to do that.
Gear-Driven + EdgeGuard in Nooks and Crannies
Anyway, that’s how I would tackle the intricate areas. I would start by getting a gear-driven orbital polisher so I didn’t have to mess with trying to maintain pad rotation. But if this is all you have, then remember all you got to do when you’re working through these sections is just monitor how you’re holding the tool to maintain pad rotation.
And just real quickly, here’s kind of a hard part. Notice I got all this taped off ‘cuz there’s pebble textured plastic trim everywhere. But let’s see how much I can get in here. Right there. Good. I got pad rotation right there. As soon as I start to get in here, uh, I just lose pad rotation. So, can it be done? Yeah, it’s going to take you a long time.
It’d be faster just to take something like this. And watch this. And I’ve actually got all the way up into that little nook and cranny there. And two reasons. One, gear-driven, but also remember when I went to this tool, I got a larger pad size, and I got this really cool EdgeGuard pad that keeps me safe as I kind of shove this polisher into that tight area.
Then come back, switch to a white foam polishing pad, do the second step, and then this area would be ready to move on to the ceramic coating. But that’s how I would tackle that. Heat. Heat.
Using a Detailometer to Measure Results
In the earlier part of this video, we explained how to use and why to use a handheld inspection light to really do a good job of evaluating the surface condition of the paint you’re working on. I forgot to show you this other cool tool. This is called the detailometer. And what this does is it measures five different aspects of paint quality. It kind of just tells you what you can already see with your eyes, but it does it in an empirical way.
So, let’s go ahead and we’ll take a reading to start with here. And it’s important to put on a flat surface and hold it very still. Okay. So, I’ve got a DOI of 90.5. I’ve got a reflected image quality of 71. I got a haze of nine. And in simple terms, you want these two numbers on the outside of this bottom row to be as high as they can. And you want that number in the middle, the haze, to be as low as it can.
So, let me go ahead and polish this out using the same process we’ve used over the rest of the car. And we’ll come back in and see if we can move the needle a little bit, as they say. Okay. So, here’s some Core Cut. This is the Blueberry heavy polishing pad. Heat. Heat.
Okay, so I made a series of section passes there. I think I counted eight. Someone on YouTube can correct me. Okay, that looks good. But let’s go ahead and refine those results. Then we’ll take another reading. So, back to the white foam polishing/finishing pad. Little NSP95. This pad’s already broken in. So, just a couple pea-size drops there.
Okay. Oh, much better. So, I can tell with my eyes it looks good. But this is kind of a cool tool you could use kind of as a marketing aid. Okay. So, there’s our before numbers measuring. And we’ve had a bump up in both the DOI and the reflected image quality. And we’ve reduced the haze down to 0.04.
Anyway, that’s the detailometer. It’s kind of a cool tool. You can show your customers—if you do this professionally—the before and after differences of what you can do when you do the paint correction and ceramic coating to their car.
Restore Faded Plastic Trim (Solution Finish + Sealant)
So, after detaping the car, pulling all the tape off, all this pebble textured plastic trim, and of course, pulling the wheel maskers off, kind of what we’re left here is this ugly faded trim, and this is common on a lot of cars. So, let me show you the best way to fix this.
Now, a lot of people look for like a one and done, set it and forget it. But to be honest, that stuff’s never really going to work. And think about it this way. If this plastic trim on everyone’s car didn’t look good and last looking good for a long time from the factory, chances are nothing you buy late-night TV is going to fix it permanently. So have some common sense.
This is a product from my good friend Chris West. It’s called Solution Finish. And what this is is this carbon black. Shake this up well first. And it’s milled to the size of a virus. So it’s very tiny so it can get into the plastic. What happens is plastic is exposed to UV rays. It starts to fade. And what this does is it just restores a deep dark black look like it came from the factory. In fact, from the factory when they make this plastic they put carbon black in it to make it black.
And the way you do this is you just want to come in. I like to use some sort of cloth applicator so I can really kind of massage it in. You’re trying to push it into the plastic. And of course, what’s going to happen is you’re going to get some on the paint. And some people freak out, but that’s why I’m—I’m purposely getting some on the paint, uh, because it’ll just wipe right off as long as you do it right away.
Anyway, so you put this in really good, work it into all the faded plastic. It’s important to wear gloves ‘cuz it is kind of messy. And then after you’ve got it coated to where you’re satisfied, then you want to bring another microfiber towel down here and just wipe off all the excess.
Remember, this has this pebble textured plastic lip all the way around the side of the window. So, this is what you do. This is—so, what I’m using here, this is a used microfiber towel. It’s already got some stains, but it is clean and it is uncontaminated ‘cuz I don’t want to scratch the paint I just polished. But just come back and gently wipe anything you got on the paint off. Wipe the excess off the plastic. And then you’re ready to go to the next step. Let me get that. Remember I put some up here.
And the next step is—this is important to understand. Solution Finish is not a dressing. It’s not a sealant. It’s not a coating. It’s a dye. It’s carbon black, milled to the size of a virus that you can massage back into the plastic. So, when you’re done, you want to actually come back and put on a sealant. So, there’s step one. So, it’s always a two-step process.
And then I’m just going to—this is the Dr. Beasley’s Plastic Sealant. It’s for exterior plastic trim. And what it’s going to do is it’s going to seal over the plastic, try to lock in some of that dye, add some protection, and of course, it makes it look good, too. So, every time you do something, you’re kind of adding some beauty to the car.
And—but that’s basically how you use this. You just want to massage in the Solution Finish and then come back and seal it with whatever your favorite sealant might be. And of course, after you’ve applied the sealant, come back with a microfiber towel and just wipe off any excess. Then you can move on to the next section.
And this car has a lot of black plastic trim. It’s called pebble textured black plastic trim. There. That looks so much better.
Pad Washers: System 4000 vs. Grit Guard (and Why Dry Pads)
At the beginning of the video, I showed you how I kind of clean pads with a brush under running water in my slop sink. If you don’t have a slop sink, a lot of people are interested in what’s called a pad washer. I’ve got two here. I got the Lake Country System 4000. I got the Grit Guard Universal Pad Washer. They both kind of work the same way. So, let me just show you how to use this one.
First of all, the key thing you got to understand is how much water to put in there. For the System 4000, it’s 1.6 gallons. For this one here, it’s got this Grit Guard insert. It’s actually sitting on top of some spring-loaded water cups that pump water up into the pad. So, what you want to do is you want to push this all the way down and then just add water until it just starts to crest over the top of the Grit Guard insert. So, like a 1/8 inch or 1/4 inch of water. Okay, just like that.
Okay, and you put the splash guard lid on. But first, let me just show you how this works. What you’re going to do is you’re going to take your polisher, you’re going to put it in here, you’re going to pump it up and down. And when you pump it up and down, here’s what happens. See how it squirts water? So, it’s going to squirt that up into the pad itself. And then it’s going to be sliding against the Grit Guard insert. And this acts like a squeegee. It kind of squeegees off the gunk that the water’s kind of loosening up.
Now, Grit Guard and Lake Country both say any kind of tool will work. So, I’ll show you how to clean the pad using the tool I buffed out the majority of the car with. This is an entry-level polisher. Then, I’ll show you my favorite way to clean a pad using a rotary.
So, important. Put the splash guard lid on. Try to keep yourself a little clean. Keep splatter from all over the place. This just kind of lifts up so you can open it and close it. Put your pad in there. Close the lid. And what you’re going to do is you’re going to start out just by pumping a little bit and then turning it off. So after you pump it a few times, run it across the Grit Guard insert, lift it up, and let some of that inertia and centrifugal force sling out a bunch of that water. So that’s fairly clean. And it didn’t pump it that much.
But let me show you my favorite way to use a pad washer. And that’s—instead of using a random orbital polisher—get yourself a rotary. It could be corded or cordless. And this is the key. Get an extension on there. And here’s why. Because a lot of times when you’re pumping up and down, the body of the tool hits the lid. So by putting this extension on there, you can actually do a full pump without the body hitting the lid, and you get your pad really clean. Bring your RPM up. Sling out some of that water. Boom. There you go. Clean.
So, there’s, uh, two pad washers. And, um, let me just kind of talk real quickly. You know, there’s a lot of people that teach using foam pads wet. Um, I’m not one of them. And here’s a real simple experiment you can do for yourself and prove what I’m saying to yourself. And that is anytime you’re using a free-spinning random orbital polisher, once you dial in your process and you’re buffing around the car, as that pad becomes wet with product, pay attention to how you start to lose pad rotation and pad oscillation. Then switch to a fresh dry pad and pay attention and instantly you’ll see pad rotation and pad oscillation pick back up again.
And that’s an easy way to show yourself that it’s better to use a dry pad and switch often than try to clean a pad and take that wet pad and go back to work. And besides having the wet foam slow down pad rotation and pad oscillation, anytime you get foam wet, it becomes soft. So this is a heavy polishing pad. And by getting it wet, I just turned it into a polishing pad. So now I’d have to rely more on the abrasives to do the work, less on the pad. So prove it to yourself. Do the little test I just shared with you. But, uh, I save pad washers for the end of the day and, um, switch to a clean dry pad as I work around the car.
Paint Thickness Gauges: Go/No-Go Decisions
In the beginning of this video, we talked about coating thickness gauges and I did a few measurements up here on the roof of the car and some of the other body panels. And every time I make one of these videos, people always say, “Hey, did you take after readings when you were done?” And I usually say no because really all I’m looking for is getting the paint corrected without going through the clear coat.
So measuring to find out what the after results are might be, uh, solve that curiosity factor. You know, how much paint did you remove? But the only way it would really matter is if you took a diagram of the car and then as you plotted out all the thicknesses, you wrote it down on the diagram—you know, 4.32 mils in the middle of the hood, 3.7 mils on the roof—and then came back, followed that process, and took more measurements, put it on the paper, and then what are you going to do with it?
Okay, so paint thickness gauge is exactly what I said it is for. I use it to make the go or no-go decision whether I’m going to get aggressive or stay very non-aggressive or maybe not even work on the car at all. I’m going to measure to see if I got really thick paint or really thin paint. And that’s going to tell me what products to use, what tool, what pad. That’s paint thickness gauge.
Recap, Tools, and Next Steps
Anyway, so we’ve kind of finished out the car. Uh, look how much tape we pulled and put on this car. You know, a lot of cars have this black plastic trim. Some cars only have a little bit, you know, but just make sure you got enough of the supplies you need for the car that you’re working on before you get into it. The last thing you want to do is stain all that trim and have to come back and clean it up.
So, just a quick recap, I demonstrated how to dial in a test spot, doing multiple test spots on different sections of paint to make sure you, uh, are always testing on virgin paint till you dial in your process. And then pretty much I showed how to use this entry-level tool. It’s called the Bauer 8 mm free-spinning random orbital polisher. I also did share with you other tools that have more power like the Griot’s Garage G9, which we showed over here going in and out the concave curve. And out of all the free-spinning random orbital polishers I’ve used to date in my life, I’d say the G9 is the best at maintaining pad rotation for a free-spinning random orbital polisher.
Also showed you how you could also pick up for about a hundred bucks the Hercules gear-driven polisher. We talked about my favorite pads, the Buff and Shine EdgeGuard, because of the way the pad’s shaped. And, um, then we just went through and used the different Dr. Beasley’s NSP primers. Um, the key thing to remember about that is instead of using traditional, uh, petroleum oils, mineral oils for carrying agent, they use the Nano Gel. And that means as soon as I’m done wiping it off, I can go right to my ceramic coating.
And that’s kind of where we’re at here. So, the next thing I’m going to do—and that’s going to be a different video, a different project—is I’m going to go ahead and ceramic coat this. I’m going to use the Dr. Beasley’s Nano-Resin 2.0. It creates a lot of water beading, makes washing faster and easier. I know the owner is going to love having his Mustang polished and coated. And then after that, I’ll do the Dr. ColorChip, fill in all those rock chips, and pretty much call the customer and tell him to come get his car.
Anyway, that’s kind of the process. I hope this helped you. Please leave your comments down below, whether they’re good or negative. You know, if I did something right, let me know. If I did something wrong, of course, point that out as you always do. Besides that, all this stuff can be had up at drbeasleys.com. And remember, we teach car detailing classes right here in sunny Stuart, Florida. They are the most hands-on detailing classes on planet Earth. I always bring in really jacked up cars that are also really cool for you to train on. There’s no chairs, there’s no PowerPoint, there’s virtually zero sitting. Hope to see you in a future detailing class.
Questions? Comments?
Email Us