


Last Updated July 9, 2026
Random orbital, free-spinning polishers are the easiest type of polisher to use and are safer for beginners than more advanced tools like rotary polishers. But don’t let their user-friendly reputation fool you — random orbital polishers are complex tools with many ins and outs to know. In this condensed reel from a recent live detailing class, I explain some of the most important things to know about random orbital polishers like pad stalling, orbit stroke and the difference between gear driven and free-spinning DAs. Watch below and follow along with the included transcript.

The following is an unedited transcript of the above video and may contain errors.
Today we’re going to be going over the topic of pad stalling, which is a common issue that people got to deal with anytime they’re using a free spinning random orbital polisher. I’m also going to be touching on a number of other topics.
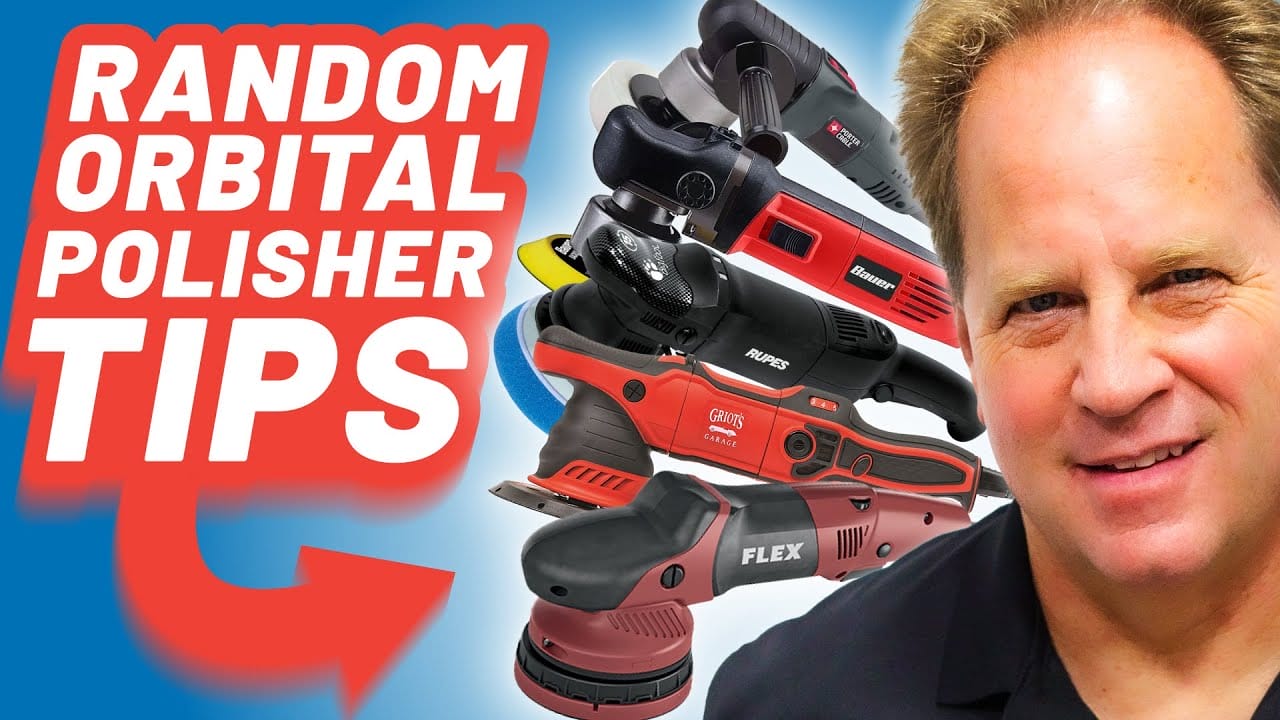
Now, as you can see up here, I have a very large collection of free-spinning random orbital polishers. And before we get started, I kind of want to just take – I’ve got a Porter cable here, and I’ve already taken the backing plate off, and I want to explain to you what it means when we talk about a free-spinning random orbital polisher. So if you can zoom in, let me show a couple of the components.
⚠️ Before You Start Polishing…
Paint correction feels intimidating until you understand the process. Our beginner’s guide to car polishing breaks down how to remove swirls and defects safely.
Go to Decision GuideThis is the counterweight, okay? And it’s attached to the spindle, but the spindle is still free spinning. And you can see that because I can take my finger and just spin it easily. So that’s the spindle. So this is what the backing plate would attach to.
And the way this tool works and the way all these tools work, when you increase the speed, the it spins faster and you get inertia so that’s like locked up power and it releases that power into spin into the spindle and it causes the pad to rotate and oscillate the downside of that is is is um there’s a couple of different things that’ll affect this that’ll cause the pad to slow down or to completely stall out but that’s how the drive mechanism works and they’re all a little bit different but if you were to take apart every one of these tools right here on this black table you would see a free-spinning spindle in some size and form of a counterweight, and that’s how they work.
And while I got this off, if you’re ever swapping out a backing plate, always remember to make sure that the little what they call a compression washer doesn’t drop off on the ground. This is really common with the tools that use a compression washer, and I don’t know if they all do, but I think they do. But what happens is if you don’t have that little tiny little thing in there, you will snug this thing down and run the rivets into the counterweight. It’ll do two things. It’ll make a horrendous noise.
It’ll create a lot of heat, and it’ll scar the counterweight, and it’ll overheat the backing plate. So just always make sure when you’re putting that on that you lock. I use my thumb to lock that on as I put on the spindle. Don’t lose your compression washer. Okay, so then, and I’ll get to how the gear-driven units work.
I’ve got one apart right here, and I’ll show you the gears, but we’ll do that later on. Let’s stick with just free spinning for right now. Okay, so before we get into what causes pad selling and how to counter it, I want to walk through and just show you some of the more common tools because I’m sure a lot of people watching this have one of these tools or are thinking about getting one of these tools.
So starting right here, this is the Flex Pixie. Now, when you purchase the Pixie, it comes with three drive units. It comes with a three millimeter drive. It comes with the rotary drive unit. And it comes with a 12 millimeter, which is the one I’ve got into the tool right now. There is also nowadays an optional 6 millimeter. So there’s three available free spinning random orbital drive units and then one rotary drive unit.
So let me just show you what 12 millimeter looks like on the Pixie. I’m going to turn this thing on. And then I’ll have Craig zoom in. And what I want you to look at is there’s two perimeters, two circles here. There’s the inner perimeter and the outer perimeter. And that distance between these two circles, that’s 12 millimeters.
So when someone says I got a 12 millimeter random free spinning, random orbital polisher, that’s what they’re talking about. That gap there, that space. Okay. So now let me throw in a three and you’ll see a huge difference here. So here’s a three millimeter. Now when I turn this on, Now look at the two perimeters.
They’re very, very, very different. This is very tiny. It’s really hard to see, in fact. Okay, so that’s what we mean when we talk about an orbit stroke length. It’s the diameter of the orbit okay so and that that’s the flex pixie and uh and i can show you the six real quick just so you can see it so here’s the six so we have three and twelve you’re gonna see this one’s kind of right in between the three and the twelve so there’s two perimeters the outer perimeter to the inner perimeter and that distance is six millimeters you getting that craig good okay Okay, so that’s what we’re talking about.
Now, this is no longer available. I’m really, I’m kind of sad it’s not, but this was called the Griot’s Garage 3-inch Mini Polisher. And everybody had always complained that it was weak or the words anemic. It didn’t have enough power to maintain pad rotation. But for years, I told people to buy one of these tools while you can get it because retail was about $110 because if you ever do any machine sanding, they’re great sanders.
So using it with Trizac or Mirka or Eagle Abrasives. And they’re small. So a lot of times when you’re working the car, you got these thin panels. You don’t want to be taking a big sander to it. You want a small panel. I’ve seen one up for sale recently on eBay. It was $165 new in box. But this is five millimeter. So let me show you what five millimeter looks like. Okay, so see the outer perimeter and the inner perimeter, fairly small. And that’s why it works really good for sanding. You don’t want a huge stroke in most cases when you’re sanding, at least on car paint. Okay, so there was six, three, and 12. There’s five.
This is the tool that replaced this tool. They call this a three-inch polisher. What’s kind of funny, just let me touch on this. Sometimes people, they name their tools over the size of the backing plate. So Griot’s called this a three-inch mini polisher, but it wasn’t ever a three-inch mini polisher. It was a five-millimeter polisher. polisher.
You know, you should name the tool after the action of the tool, not the diameter of the backing plate, because it’s just kind of silly. Anyway, so this is the tool that replaced it, and they did go ahead and name this accordingly. This is called the G8. This has an eight millimeter orbit stroke. So here’s the outer perimeter and the inner perimeter, and that distance there, that is eight millimeters. And this is actually a fairly functional tool because it’s short stroke. Here is a porter cable. And this is kind of the tool, if you guys are new to detailing, nowadays you have so many tool options. There’s just so many tools out there.
But in the old days, we had a rotary. We had what they call a traditional orbital polisher and the cyclo. None of this stuff existed. And if you couldn’t do it with one of those three tools, then you were screwed. But this is a wood sander. It was borrowed from the wood sanding industry. And back in the 80s, both Barry McGuire and Richard Griot discovered this tool. And they found out because it would hold a five-inch backing plate, they could attach a buffing pad to this. And the average person could plug this into the wall.
They could pull swirls and scratches out. So this is eight millimeters. So here’s the outer perimeter. There’s the inner perimeter. That’s what eight looks like. Anyway, this is kind of the tool that started it all. And this is the Harbor Freight version of the Porter cable. So this retails for around, you can find it as cheap as $100 online. Most retails are around $130 to $150 online. And after you buy it, remember, you’ve got to buy a backing plate.
It comes with a foam pad that’s glued to the backing plate, and the foam is really thick. And we’re going to talk about thick foam pads and why you don’t want that. So most people just kind of pitch it or use it for a doorstop, and then you’ve got to buy your own backing plate. So keep that in mind when you’re shopping for polishers.
So this is called the Bauer. And again, they call this a six inch DA or dual action polisher. And it comes from the store in the box with a six inch backing plate. But that’s not what this tool is. This is an eight millimeter free spinning random orbital polisher. And again, I’ll just turn this one on. And there’s what eight millimeter looks like.
Here’s the outer perimeter. Here’s the inner perimeter. So that’s what an eight millimeter tool looks like. And these here, I just looked it up. These here run for, when they’re not on sale, for about $69, $70. So about half as much as a Porter cable. Here is the Griot’s G9. And as the name implies, this is a 9mm. And there’s outer perimeter, inner perimeter. That’s what 9mm looks like.
Okay, now we’re gonna jump over here to the flex finisher. I’m gonna talk about the word finisher in a second here, but this is the finisher. This is a 15 millimeter. Now look at the gap there. Look how big we’re starting to get. There’s the outer perimeter. There’s the inner perimeter. That’s 15 millimeters. I’m placing these upside down because otherwise when they sit crooked, they warp the pad and it’d look funny on camera.
Okay, so this is the Harbor Freight version of the Rupes Bigfoot 21. This is actually a 20 millimeter is what they call it. Let’s check out the orbit stroke length on this sucker. Okay, so there’s the outer perimeter, there’s the inner perimeter, and look how big that is. That’s 20 millimeter. compared back down there to the five millimeter that’s quite a jump and of course here is the rupes 21 this is my personal it’s the number 16 mark 2 given to me by rupes and check this out this thing’s huge there’s the outer perimeter inner perimeter that’s what 21 millimeter looks like.
Okay, so now hopefully everybody that’s watching this has a complete understanding when someone talks about the millimeter of the orbit stroke, that’s what they’re talking about. The pad’s gonna rotate in a circle, it’s gonna oscillate in a circle in that circle, and it’s the diameter of that circle in the circle that is the measurement of the orbit stroke.
Okay, so when it comes to pad stalling, if we go back to the porter cable here, since I got this apart, but these all work kind of the same way, you got a free spinning spindle, Okay. And you got a counterweight. And the idea is, is you turn this up and, you know, no one really buffs really on the speed one or two. So you need to get it up to the three, four, five. In this case, it goes to six. And as you bring that speed up.
That counterweight gets a spinning. It creates inertia. It locks the energy into it and releases it into the spindle, in a way of saying. And then you see the pad rotating and oscillating. But the things that will cause pad stalling are these. One, if you’re not holding that pad, I’m going to walk over here.
So this is a 1952 Hudson that was in my last class a couple weeks ago. But if you’re not holding that pad crooked, so you’re holding, or flat, if you’re holding it crooked, okay, that means one of the edges, there’s air under here, that means you’re gonna be putting more pressure on just a portion of the pad, and that is enough to cause the pad to stall out. So it’s really important to always try to hold these pads flat to the surface.
So that’s one of the reasons that you can get into pad stallings. You’re not holding the pad flat to the surface. Now that becomes very complicated to do because look at this. This goes down into a nice concave curve here and a convex curve here. And so what happens is when you run this polisher down into the concave curve, I have an air gap in the middle and I’m getting pressure on this side and this side and nothing down the center. And now that you’ve got extreme pressure on the edges, it causes the pad to stall out.
So, it gets rather tricky to use a free-spinning tool on a car that’s very curvy just because of the way it puts pressure on the different portions of the pad. Now, when you go to a concave curve, like the top of this fender, it’s much less of a deal because what’ll happen is you’ll have most of the pressure in the center, little on the outside, and it’ll maintain pad rotation fairly well. So that’s one of the things you need to do, hold the pad flat to the surface.
And then one of the ideas behind Rupes, and let me just kind of point this out because I know a lot of times we got younger people in the audience that may not know this, but I did write a book for the Rupes company. And at the time, the Millet, their gear-driven tool was not invented. So this is really pretty much a tool about free-spinning Bigfoot polishers.
And I wrote one for the Flex 3401. Now, the 3401 is a gear driven tool. So I’ve written a book for gear driven and free spinning. So I think I feel qualified to talk about these things. And and if you look when I when I titled this is this is important because like I’m a word guy. Every word is very important. When I titled this, it says how to use the Rupes Bigfoot paint polishing tool. System. Okay, it’s a system. It’s not a tool.
It’s not a pad. It’s not a product. It is a well thought out system. And what Rupes tries to share with people is when you’re working on a car that has curves, you’re not supposed to try to buff out the entire car with one tool. what they want you to do is buy a collection of their tools, and then what you would do is you would match the pad size, which means you’d match the backing plate size and the tool, to the panel you’re trying to buff.
So instead of trying to take a Bigfoot 21 and come down here and buff out this concave curve, which at some point is going to cause it to stall out because it’s an extreme contour there, they want you to put this tool down, And I don’t have any other smaller RUPES tools, but for example, if he had the, the Bigfoot Mini, then you’d switch to that with a smaller pad. Then you would get in here to get that concave area.
So see, it’s a well thought out system, but it also assumes that you buy more than just one Rupes polisher. So you have the right size tool with the backing plate and the pad to match the panel you’re buffing. Very well thought out system. So anyway, so that’s one of the reasons, the way you hold the pad. So here’s another reason. Sometimes if you’re holding the polisher and you press down too hard, just that pressure alone can cause that pad to stall out. Sometimes it can actually help to increase pad rotation.
It just depends on a couple of different factors. But you are limited as to how hard you can press down. And if you try to go up on edge, which you can do with the gear driven tool, sometimes they’ll maintain pad rotation, but they’ll rotate in a reverse or counterclockwise motion, which is kind of interesting to watch.
But you can at least maintain the pad rotation. So anyway, so that’s one of the reasons. Okay, so then some other factors that affect pad rotation. Too big of a pad. Okay, so… When I started in this industry, really, Meguiar’s was the only company, at least that I knew of at the time, that had foam buffing pads out. And their first pad was eight inches in diameter and about an inch and a half thick.
And when you have a larger thick pad like that, and you put it on a weaker anemic tool like the porter cable, what happens is the foam absorbs the energy coming out of the tool and it dissipates it. And this just shows up as to weak pad rotation. So I think back in about 2013 or 14, Finally, Lake Country introduced these pads called the Hydrotech, and they made a thin version.
They were called the Thin Hydropon 5 1⁄2. They made a thicker one, too, for rotaries. And then they brought this out in a—the Hydrotech were a closed-cell foam. Then they brought this same pad design into their open-cell foam, and they were called Thin Pro, one word.
And the pads are about 7 1⁄8 inches thick. thin very thin so less mass they rotate better and then griot’s garage took this even further when they came out with their boss pads and i think they’re even thinner than the lake country thin pro pads so less mass enables them to rotate better because you don’t have all this foam absorbing the energy and dissipating it so luckily today we have a lot of pad options and a lot of them now are uh you know they’re tuned to the type of tool that you’re using so you get the maximum performance of the drive unit So too thick of a pad and too large of a pad.
For example, this is a five and a half inch pad on a Porter cable. This is a copy of the Porter cable with a six inch pad and look at the pad size difference. This tool would work better with this backing plate. And so anybody that’s been following my videos and articles for the last few decades know that I’ve always told people that when you buy something like the Porter Cable or if you buy the Harbor Freight version, spend the extra money to get the smaller backing plate so you can turn and churn smaller pads versus be stuck with this big backing plate and then put big pads on and then go out and buff your car and go, oh yeah, the pad’s not rotating.
So spend the money, get the other backing plate. Okay, so that’s one of the reasons. Thick pads, big pads, and holding the pad flat. Then we got raised body lines. So here’s a raised body line right here. There’s a raised body line here. There’s three of them just right here. And sometimes when you’re running over a raised body line, it’ll put excess pressure to just one portion of the pad. And again, that can slow down pad rotation.
So that’s just something that’s almost unavoidable unless you do something like buy the Rupes Nano, and then you could take a one or a two-inch pad and buff out these little thin areas like that. So there’s always a way to skin that cap. Okay, so then we talked about concave and convex body panels and how they put different pressure on the pads. Too large or too soft, too thick, and then wet. That’s the one I talk on. Wet pads.
Now, This can be a little bit of a controversial subject because I know some people sell what they call a pad conditioner, which is kind of like a spray detailer. And what they’ll say is before you start out buffing, especially when you’re using a cutting pad like this, it’s pretty sharp. You had missed it in the moisture, the water, whatever agents, you know, conditioning agents are in there would tend to soften this up a little bit.
So that sounds like a good idea, but there’s two downsides to that one. is when a pad becomes wet with product or wet with water, it’s not going to rotate as good. So a dry foam pad will always rotate better than a wet foam pad. So using a pad conditioner is like inviting the problem to be on the pad. And the other reason getting a pad wet to me is not a good idea is because –
When a foam pad is dry, that’s when you have the most cuts. So if you get the pad wet with a pad conditioner, or as it becomes wet with your product, the pad softens up. And now any cutting that’s taken place on the surface level is coming from the abrasive technology, primarily very little from the pad.
So that’s why I’ve never been a big fan of getting pads wet, whether you use a pad washer to condition it or spray something on it, because you’re removing the cut of the pad. You’re making the pad weigh more, so it’s not going to rotate as well. So always dry pads. And actually, I think I got an article on this.
It really dates back to, I think, like 2005. But I detailed a 1954 Corvette with black lacquer paint for Corvette Mike. Some of you guys know who that is. Corvette Mike has three different Corvette retail locations across America.
I did this one for him in Anaheim. And this is when it really hit me because back then the only small foam pad we had for the porter cable was about an inch and a half thick. It was the Meguiar’s W5500. So five and a half inch diameter and really thick, even thicker than this pad right here. And as I was buffing out this Corvette, I noticed my pad wasn’t rotating very well. So I took it off and put a dry pad on.
Then I noticed it was rotating really well. So it was pretty obvious what the reason was. And when I was done buffing out the car, I stacked up all the pads I used. And I think there’s like eight or nine pads there. So every time I started to see the pad become saturated with the product, I swapped it out for a fresh pad. Rotation, oscillation was better, and I’m removing defects faster and more efficiently.
That’s just another reason is wet pads tend to slow the whole process down. Anyway, that’s what I’ve got for pad rotation. Then there’s another controversial subject where some people disagree over whether you need both pad rotation and pad oscillation. And I’ve always been a person that my belief is, is you actually want both.
You want good pad rotation. You want good pad oscillation. And when you have that mixture working together, you’re going to get faster, more efficient defect removal. If you only have one, for example, say the pad’s just kind of oscillating, but it’s not really rotating. Sure, you can remove swirls and scratches, but it’s going to take longer.
So I’m always kind of in the camp of, I want to see both. uh but anyway that’s kind of a controversial subject but it’s not a controversy for me because i don’t argue with people i got my way you got your way pick away the as long as we all get to shiny that’s all that’s important so here’s a couple other techniques you can do and here’s a backing plate this is a brand new one there’s nothing on it and here’s what you want to do is take a sharpie marker and just place you know one maybe three or four marks on here.
And you can also do this to your pads, so just like that. And there’s a reason for this. When I turn a polisher on and I’m buffing with it, without those marks, what I see down here in case of a yellow backing plate is just a yellow blur, okay?
I see the green pad, but it’s like a blur. As soon as you take and put a distinct mark on here, and you can mark both, you could actually mark the back side of the foam pad and the backing plate, and they don’t gotta be together.
This is just because this is how I’m doing it. But now, when I turn this on, and I’m looking down on it, now my eyes can easily see, hey, look, I’ve got good pad rotation. I’m gonna be moving swirls out of this paint job. Or if I see I have anemic or weak pad rotation, well, then I know I need to change how I’m holding the tool to keep that pad flat in the surface, or maybe I need to bring that speed up.
Now I’ve got really good pad rotation. So the mark on the side of the backing plate and or on the side of the foam pad, it helps your eyes to see if you’ve got good pad rotation or if you don’t, and then you can start doing some things like I just listed, change to a dry pad, change how you’re holding the tool, bring your speed up, switch to a different tool to knock out that portion of the panel that you’re working on. I’ll have to repolish and coat this.
This has actually already been done. This is my guinea pig today. But that leads to another topic. A lot of people hear me talk about the topic of brain drain. Okay, so, and here’s what I mean by brain drain. And this is, you know, Let me start this up by saying that everybody’s got their own detailing style. So my style is not everybody else’s style.
But here’s how I view detailing a car. It takes a long time just to start with. So let’s take just a general overview of detailing a car. You’re going to start in the morning. Most people maybe do it the day before, but most people start in the morning washing the car. So that means getting on your butt, washing the wheels and tires, then washing the car from the top down, drying the car. You may clay the car while it’s wet.
You may dry the car off and bring it in clay, but at some point if it’s contaminated, you’re going to clay it. So washing the car, washing the wheels and tires, cleaning the paint, getting it dry. Okay, now your car’s in your garage. You’re going to take some masking tape, probably tape off any pebble-texture plastic trim so you don’t have to worry about staining it.
Then you’re going to start at the top and work your way down and buff out the car. And if you’re using a tool like the Porter cable on the Speed 6 and you’re swapping the dry pads all the time using greater abrasive technology, to do the average size passenger car so let’s pick on a 2022 honda four-door accord okay you know nine panels or 11 panels basic size car for most people using a tool like this and if it’s completely swirled and scratched up My guess is you’re gonna be a low of four hours.
Most people are gonna be on the six hour range to buff out every single panel, making section passes, dividing larger panels into smaller sections, buffing the whole car out. So we got washing, wheels and tires, clean, prepping, machine buffing, and then at some point you’re gonna seal the paint.
You’re gonna use a car wax, a synthetic paint sealant or a ceramic coating. And then most people are going to put a tire dressing on the tires and they’re going to clean the windows, both sides. So the car is finished. And the idea, we call this the finishing steps. So from start to finish, you’re looking at anywhere from eight to 12 hours. So here’s how my brain thinks. It already takes a long time to go from start to finish.
Why would I want to do it in any way that takes longer? okay i i don’t i don’t i don’t and i won’t so i think it was 2008 flex invented the beast okay you can identify these by the aluminum housing there and this is a gear driven orbital polisher so for me and again this is just my style instead of getting a free spinning tool like this just free spinning marking the backing plate, then looking at it for hours as I buff out the car to see if the pad’s rotating.
That means for four to six hours looking, is it rotating? Is it rotating? Is it rotating? Is it rotating? And that’s what I call brain drain. It just drains your brain. With something that’s gear driven, you don’t got to look and monitor the pad’s rotating. You can just buff out each panel and think about whatever you want to think about.
Now, I still count my section passes out loud, so I am thinking, but at least I’m not sitting there looking to see if the pad’s rotating. So It’s your option. You can choose either style you want to, but I just prefer to not do the brain drain. And with a gear-driven tool, I also don’t have to worry about if the pad is rotating or oscillating.
It’s going to rotate and oscillate no matter what, which means, as I like to say, I can plow through a car as fast as humanly possible while keeping my results pro-grade, pro-quality. Okay, so those are the free-spinning tools. I’m going to bump over here just a little bit and talk about the gear-driven alternatives.
Now, first I want to start out with is showing you what I mean by gear driven. So can you go ahead and… zoom in okay so uh let me sit this down here’s an inner gear set or gear ring on the on the flex 3401 and here’s the backing plate and the backing plate has a set of gears that fits inside the gear ring and then there’s a spindle which is free spinning but when you lock this up with the backing plate and there’s a slot there for it it’s going to drive that this polisher See if I can get this on there.
It’s going to drive that in a fixed orbit, okay? Fixed orbit, fixed rotation. Okay, so now you can hear the gears, but that’s how a gear-driven orbital works. There’s actually a set of gears in there, and they define what the orbit stroke is going to be. These are all 8 millimeters, so they’re going to be in an 8-millimeter orbit stroke.
And let me just show you what that looks like. So here’s the Harbor Freight version of the Flex, and when I turn this on… eight millimeters we’re back to something very small like the porter cable very small but there’s no matter what i do i cannot get this pad to stop rotating if i tilt it If I put too much pressure on, if I’m buffing out an extreme concave or convex curve, it’s going to rotate and oscillate no matter what.
So that’s the primary difference between gear driven and free spinning. And of course, here’s the original beast just to show you side by side. So here’s the Harbor Freight version. Same action. And then there’s two other gear-driven tools in the Flex line. This is affectionately called the Supa Beast. It’s the replacement version of the original Beast, so you can no longer see that aluminum head.
The aluminum head’s still there, but it’s been covered up with the plastic shroud. But that’s the eight millimeter gear-driven orbital polisher and then down here i’ve got the c beast and um i did coin the name for these for flex c is just i didn’t want to type out cordless every time i talked about it so i just added the letter c in front of beast you have cd another eight millimeter gear driven tool uh so um Free spinning, gear driven.
With this, you gotta monitor pad rotation. You gotta make all kinds of adjustments as you’re buffing out the car to try to maintain maximum pad rotation and pad oscillation. I always refer to both. I see a lot of people just talking about rotation, but I like to refer to both pad rotation and pad oscillation. It’s called a DA, a dual action for a reason. There’s two actions taking place. This is also DA, but it’s gear driven. And then just let me touch on this real quickly.
This of course is a rotary. What I wanted to point out about this is I always see people on the internet talking about this as a forced rotation tool, or this as a forced rotation tool. Think about it, forced rotation is a rotary, okay? Not a DA. So if you’re going to talk about the tools, at least address them correctly. It’s forced rotation, forced oscillation.
Two actions, not one. Anytime you see someone talking about a forced rotation tool, they’re talking about a rotary polisher. They probably just don’t know it. Anyway, that’s what I got. Let me see. Is there anything else I’m missing on this thing?
Free spinning, random orbital, gear driven. um oh let me touch on this topic um most the time when i detail cars for example uh can you pan over this this car is still here i did this i did a live broadcast you can watch the live broadcast where i machine sanded the hood then buffed it out and ceramic coated it it’s on the dr beasley’s website under live the live tab it’s still here we need to get back to the owner it’s been raining we don’t want to get it wet uh but when i did this one i cut it with the wool pad it had da sandy marks everywhere every body panel had da so someone sanded it and they didn’t get their sandy marks out so i got them out with the wool pad and a rotary and dr beasley’s nsp 150.
Then I came back with the beast And I used the foam polishing pad with the Dr. Beasley’s 95. And then to really maximize the gloss and clarity, I came back and chased every body panel with the Rupes Bigfoot 21, a soft foam finishing pad, not polishing, but even softer finishing, and the Dr. Beasley’s NSP 45, which is a product that works great on soft paints and plastics. And then I ceramic coated it.
My point being is anytime you’re working on softer paints, a free-spinning tool like this, now watch how I word this because I type this out all the time, a free-spinning random orbital will finish out better, more consistently over a wider spectrum of paint finishes, meaning paint soft or hard, than a gear-driven tool.
and a lot of times because the gear driven tool has so much power there’s just a dynamic taking place there if you’re working on soft paint you’ll see pad marring from the tool not the chemical so when you run into situations like that you’re going to get a better finish even if you just switch over to the lowly port cable and do that for the finishing step i’m kind of a big fan of the 15 and the 21 and because if you look at this car it’s got a lot of big flat panels i was able to use the 21 on a lot of those panels Let me talk about this too, because they’re talking about power.
Sometimes when I see people talk about this tool, they say it has a walking effect or it’s pulling up, and that’s true. Let me explain what that is. Because this is gear-driven, If you hold this in a way that it’s not completely flat to the surface, you’re going to have more pressure on one portion of the pad face.
And that portion is going to grab that paint, and the tool is going to feel like it’s walking towards you, walking away from you, walking to the one side or the other. That’s called the walking or the pulling effect. But people that don’t like that, they position that when they talk or type as a negative.
And that’s actually not correct. that pulling power, that pulling effect is power. It’s power, okay? And just like the rotary does the same thing. If you’ve ever used a rotary, if you come down on a car, you’re going to feel it pulling on you because it’s a very powerful tool.
Now, when you grab a free spinning polisher, and here’s the Bauer, okay, because, I mean, I can literally… hold this pad in the air while it’s running, there’s slippage. Okay. And that slippage, it presents itself to when you’re polishing is smooth, just smooth.
Cause before that paddle bind up and grab the paint, it’ll just slip a little bit, move on and grab somewhere else. So when people position that walking effect as a negative, what they’re kind of saying is, you know, I’m going to buy a Corvette, but I want the wimpy motor.
I don’t want all that thinks like that you want power but anyway that’s what that walking effect is it’s power and it’s something that the free spinning tools they just don’t have it or at least they don’t have it in the same way sure they got power but uh but they they have slippage and that equates to feeling really smooth uh at the class i had this last weekend uh it was actually it was on the eighth i had a i had these these three cars that are here you can’t see them all and i had a 1948 four uh yeah if you want to pan over them you’re welcome to There’s a 36 Ford Declass worked on.
There’s a 78 Camaro back over there in the far corner. And the 48 Ford’s already gone home. But for these three cars here, for the Hudson, the 36 Ford, and the Camaro, we used gear-driven or rotary. So we used rotaries.
They’re gear-driven. And we used their choice of Beast 8-millimeter gear-driven tools for the polishing aspect or the Hercules. But when it came to the 48 Ford, I let it be, you know, your choice. You could pick any polisher I got against the wall, anything that’s up here, whatever you want. And then what I did is I walked around and I kind of showed people, okay, now you use the flex over here on the 36 Ford and on the Camaro and whatever.
on the, uh, the Hudson, but now that you’re working on the 44, let me do this. And I would push on the polisher kind of crooked and I go watch the pad stop and they would notice the pad stop rotating. So that’s, I’m trying to drive this point home.
So it has impact when they leave my class. I want them to know exactly what they like, what they don’t like, and not make mistakes when they buy tools. And a lot of the guys like the free spinning tools had one guy down there using the flex finisher. Very, very smooth, you know, It’s got slippage. I can hold that pad still with my hand.
That’s slippage. That kind of hurt. But that’s what that walking effect is. It’s actually power. So when you see somebody complaining about it, you know what they’re saying is, I don’t want all that power. And that’s fine. If you want to take more time to buff out a car, that’s your style. Me, I want to get in and get out. I want to keep my quality high, but I don’t want to have brain drain the whole day long.
Anyway, Victor, I think that kind of sums up everything I wanted to talk about. If I remember anything else, I will bring it to your attention.
Questions? Comments?
Email Us