


Last Updated July 23, 2026
Polishing the paint on a car’s hood and door panels is easy — but what about those hard-to-reach areas and tight spaces? In this condensed reel from one of my recent livestreamed detailing classes, I show several methods for polishing out the nooks and crannies using a rare 1964 Amphicar as my test subject. Watch below and follow along with the transcript!
— Mike Phillip
Chief Education Officer, Dr. Beasley’s
(760) 515-0444 | mike@drbeasleys.com

The following is an automated transcript of the above video. It has not been edited for clarity and may contain typographical errors.
So working on intricate areas and I would say louvers are about as intricate as they get we’re going to show you a couple other places there’s a couple ways to skin that cat so the first way I want to show you is by hand most of you already own two of these so since you have them I’m going to show you how to use them now to do this you want to have both a fiber pad and a foam pad.
And always remember, fibers are a form of abrasive. They’re a gentle abrasive, especially this, this microfiber, but they still offer more abrading power than this smooth, uniform texture of foam. So what I’m gonna do is I’m gonna come back here and I’m gonna share a couple tips and techniques.
So this first one, I’m gonna be using the Dr. Beasley’s NSP150. And one of the techniques I teach in all my classes for doing a lot of different things is I put some product down The panel where I’m working to draw from and then I use what’s called the finger painting technique and so I’m just gonna take my finger because wherever I go I I have my finger, so it’s not like a tool I gotta remember to pack.
And what I’m gonna do is I’m gonna take, I’m gonna come down here and I’m gonna apply some of the NSP 150 to each one of these louvers. Now, something, for the guys that just took my, guys and girls that just took my recent class last weekend, it was a three day class, You guys are going to remember, I teach this in all my classes, but I’m putting two things on the paint on these louvers.
And it’s important to understand this. So one is the abrasive technology and the other is lubrication. And it’s really important when working on louvers because you’ve got this thin, hard raised edge. And if you spend any kind of time there at all, especially without some kind of lubrication, you’re going to burn through it. And this trunk lid or rear hatch, I guess is what it’d be called, has a lot of louvers.
One or two. I’m not going to be the guy that burns through these edges. So just like that. So I just covered it. Now, there’s another reason that I want to do this. And that’s because if you just, this is what most people that I’ve seen do this. What they do is they put some product on one louver and then rub it.
Then they go to the next louver, put some product on there, rub that one. But what happens is when you rub it, you kind of remove the product and… And then if you’ve got a long row of louvers, you can actually forget where you’re at.
⚠️ Before You Start Polishing…
Paint correction feels intimidating until you understand the process. Our beginner’s guide to car polishing breaks down how to remove swirls and defects safely.
Go to Decision GuideYou have to really focus on it. So by coating each one of the louvers with some product, I’d be able to visually identify which ones I’ve worked, which ones I haven’t worked by the volume of product on the louvers.
So it’s just a simple technique. So for this first one, I’m going to go ahead and just show you working by hand. I’m also going to take and lubricate my pad. Now, I don’t know anything about this paint job. It’s single stage.
I’ve already done some buffing on the hood, and I’ve been pulling this beautiful teal color off on my wool pad. But I don’t know anything about the paint job, so I don’t know if it’s thick or thin. So I always just kind of operate from the fact that it’s probably thin.
And the goal then is to just not to buff on these edges or you’ll burn through, and then you’ve got to get the touch-up paint out. So now to do this, watch, I’m just going to come in here by hand. and just work this back and forth. And this paint has swirls, scratches because it’s single stage. It also has oxidation.
And I don’t normally try to get the louvers to be like 100%, but I definitely want them to be cleared up, shined up, glossy, and full of richness of color to match all the flat panels that I am going to buff by machine. So it kind of ties the picture all together when you polish out the louvers.
Not polishing them out, they’re going to be real noticeable just due to the oxidation level on this paint. Okay, so… There’s hand rubbed. And then at some point, you can grab a clean microfiber towel, wipe that residue off, and inspect.
And it looks good to me. So at this point, I would move on to the next louver. But I’m going to show those by machine. So I’m going to show you what I would do as a follow-up step. For a follow-up step, I would get something less aggressive, say like the NSP-95. So you’re going to do like a two-step? On this I’m going to.
Yeah, this is a show car detail. If it was just a mundane daily driver, I might just, you know, it looks good in NSP 95, but I want to demonstrate the foam. So if you want to come down and really refine your results using a fiber applicator, come back with foam and repolish. And what that’s going to do is eliminate the fiber marks?
Tally marks or fiber marks. So always keep in mind, fibers are a form of abrasive. And, you know, I was at McGuire’s when they introduced the microfiber DA system. And so a lot of people don’t know the history, but it was a very noble goal that they had and the goal was to get rotary buffers out of the dealership and the used car and the auction industries because they were leaving swirls everywhere so they wanted to replace them with DA.
So the problem is DA has nowhere near the power of a rotary so How can you amp up the power of DA to get rid of the rotary? And the answer was to come out with a fiber pad. So if you doubt me at all that fibers are a form of abrasive, just look at all the different microfiber pads we have on the market today, and they’re used for cutting, not finishing.
Okay, so fibers are a form of abrasive. Okay, so rub that down. And of course, you’d come back and wipe that residue off. And then in the Dr. Beasley’s line, because you don’t need to use a panel wipe, you could go ahead and that’s ready to put a ceramic coating on right there. So that’s one way, working by hand.
And you can see the blue paint that I’m pulling off. All right, there you go. So single-stage paint. Okay, so the next way I’m going to show is using the Flex PXE80. When this tool first came out, I’ve named a bunch of the Flex tools. I named the Beast, the Super Beast, the Sea Beast. And I sent to the president and everybody at Flex an email, says, why don’t you call this the Pixie? You know, just run the letters together, PXE, Pixie.
And if you look up Pixie, it’s a small fairy-like creature. And they just did not want that association with their tool. So, hey, it’s their company, whatever. But I still call it the Pixie. So it’s the PXE80 or the Pixie. Now, the Pixi comes with a number of different polishing pads in different shapes.
This is a barrel pad. I’m not sure what they call this one. It’s kind of like a cone. I guess it’s the cone shape. And then they come in different consistencies, like the orange is hard. different cuttings yeah so they call this hard but it’s like a foam cutting pad this would be foam polishing the purple and then this soft orange want to be a foam finishing so but the thing about this is if I bring this down here I want to start buffing here this this pad is going to be really hard to keep part of it off this edge here and I don’t want to burn the edge.
So here’s a hack that I use I just went and got some this is I think this is 80 grit There you go, 80 grit. I got some 60 grit over there too. So I’m just gonna turn this on. And I do this all the time when I wanna make a custom pad. I just make my own pad. So, hold on Nancy.
Okay, I’m just gonna take and grind away some of that foam. oh you’re so smart boom these don’t really wear out that fast it’s not like you’re ruining anything okay so now i’ve got this nice little thin foam pad and i’m going to come back and i’m going to i’m kind of go back up here i kind of used up all my 150 so i’m going to show you again what i do is i just put some product out so i can draw from kind of like a painter.
So that would be your palette. That’s my palette. Yeah, the back is the palette. Whatever panel. I’m going to take some of this. I’m going to go ahead and pre-lubricate the pad. And the reason I’m doing this is because this thing, I’m going to put this on the low speed setting.
But keep in mind, if this, if I touch the edge, this, can you show how sharp these edges are? They’re incredibly sharp. okay and that would definitely it wouldn’t take long at all to buff on this and burn through the edge and uh yeah look that’s just not how you’re supposed to operate so okay so i’m gonna turn this on and i always kind of swing this thing up over my shoulder here comes back to the cord over the shoulder.
now i’m going to come down here and do this one here i’m going to bring the speed up let’s see now you’re pretty much like like drawing it I’m also using my finger, if you look down here, as a guide to really just keep me on the louver and not on the edge.
And I’m shoving that down there to get that little strip of paint that’s in front of the louver. You start seeing some of that blue paint come off, can’t you? Yep. Yeah, we didn’t have this when we did that Porsche. No, we did not have this.
Anyway, so that’s how you would use this tool here to get into tight places. And let’s walk over here. Let me show you another place you can use this real quick. This is the most common place I use these things is the fingernail marks in here.
‘I’d use the barrel for this area, but you can get in here easily. and knock out all those fingernail scratches that people tend to put in by the door handles. Okay, so that is the Flex PXE-80. Now, I have another little cool tool here that goes on the PXE-80, or the Pixie.
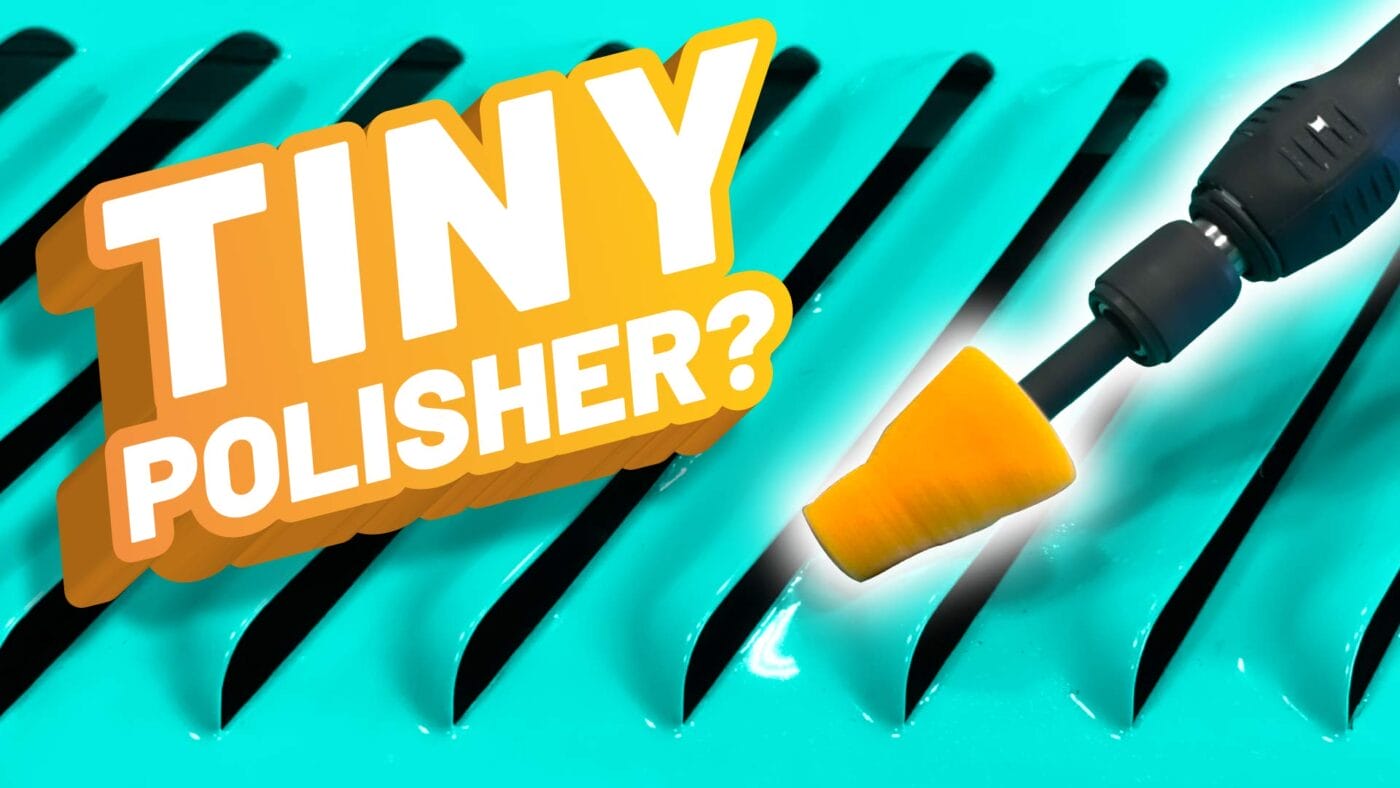
Let me get even closer on that. Yeah, so what this is is an extension shaft, and this is made by the APS Company, and it’s carried by my good friend Scott Gok… Gok… Gauquier. I want to make sure I don’t butcher this. Gauquier. Scott Gauquier at DetailDivision.com. And they make all kinds of accessory items for the Flex Pixie, different types of shafts.
But this is just the extension shaft. I’ve got a light foam cutting pad on here. And… What I like about the extension shaft is this gets the body of the tool away from the action so I can more accurately see what this thing is doing. And I want to come up here and I want to go ahead and get some product on here. So I’m just going to spin this slowly.
And why are you doing that? Because I want to lubricate that foam. The edge? Yeah, I want to lubricate the foam so it’s not as softer. It has abrasives to do some polishing work, but it’s not dry because that’s very abrasive. Okay, so I’ve done this louver and this louver. Now I’m going to move up to this louver. I’m going to bring the speed up.
And look at that with like precision accuracy, just with that extension. And the thing you got to keep in mind is you couldn’t do this without it, but the housing for the pixie would start to get in the way. So the extension really makes this tool a lot more functional. Because I think it makes it where you’re able to see it better.
Yeah, it’s just getting this body away from the action. So there’s the third way to handle intricate areas. Okay, we’re on three. How many more you got? I did hand, two tools there. Okay, rotary polisher. Here is a three-inch pad. Here’s another way to do this. Again, I’m going to come up here. Again, moisturize your pad.
Get some product on my pad so it’s lubricated. Excuse me. Okay, now bigger tool. I’m on the one setting. Notice I hold the battery and I’m going to come down here. I’m bracing my hand here. And this you got to be a lot more careful with, but you can do it. So basically, if this is the only tool that you have, you can make it work.
You don’t have to run out and buy you a pixie. Exactly. The key thing is maybe if you could shoot that again. I’m pulling this back a ways at an angle, so I’m not running along that edge. So let’s try this again. Let me put some more. Go to the next one. I could do that too. OK. There’s the next one. So there’s really no polishing taking place on the edge. Yeah, you’re not hitting that edge at all. Okay. So that’s four ways to do intricate areas.
And then, say you don’t have a small backing plate or even small pads, here’s something else I do, it’s another hack. This is the Dr. Beasley Orange Foam Polishing Pad, and it’s got this nice, gentle taper here, but I need more of a taper. So check out the difference here. Let me put this down against my black shirt. There you go. And what I did- The exact same pad. The exact same pad, but look at the taper I’ve created.
And for that, I used a piece of, I think this is 60 grit. So just some really coarse paper and I just really ground down this foam interface back here in the seam. And now I’m going to stick this on a rotary smaller backing plate. So I am 100% sure the backing plate is completely out of the way. You want to make sure that’s centered as good as you can. I think I can get a little bit better though.
I’ve already pre-marked mine. Boom. That’s centered. Okay. And then same thing. You want to take and lubricate the edges. Now I’m going to show you two ways to do that. The old slow way and the lazy man, Mike Phillips way. So you could do this. Just spread some on. Just get some onto that edge so it’s lubricated.
Plus, it has abrasive technology. So as long as it’s spinning, it’s doing work for you. But the way I like to do it is just kind of… Just slowly kind of draw it in there a little bit. Get some product on there. Once you got it lubricated, you don’t really got to do it again, but you can see I got plenty on there. Now, this is a bigger pad, so you got to be careful. Come down here.
You really gotta have a sense of touch. You know, I’ve been using the rotary buffers since the 1980s. Possibly the 70s when I was in high school. I bought my first rotary in 1987. In fact, it’s in my office. It’s a Makita. It was the first model with a variable speed switch. And I keep it around to show people that if you’re going to take a class on how to use a rotary, you really want to take a class from someone that’s used one.
And I can prove I’ve used mine because I use it so much the gears quit working. They completely don’t even match. Anyway, so that’s the fifth way to do that. And of course, come in here, wipe all this off. And then you could go to the next step, which would be in most cases, going to a softer pad, repeating the process with the NSP 4095, which I put up there. But that’s how I tackle louvers. It’s also how I tackle intricate spots.
Now, we have a couple of places on here that we can show also. Yeah, down in there. Very intricate. And for this, I’m going to switch back over to more of a full size. Well, we’ll try the barrel cone since I got one here. The good thing about the foam is that it compresses into the shape you need. So the first thing I’m going to do is I’m going to throw this over my shoulder and come up here real slow speed.
Want to get some product on here and I don’t, I don’t worry. The key thing that I’m taking is make sure that your pads and everything have plenty of product. Yeah. So abrasive technology and lubrication. Oh, that was bad. I forgot to turn my phone off. I forgot to turn her ringer off. Okay, so now that you’ve got this ready to go, I’m going to change hands here because you’re on that side of me. Okay.
Whoops, not my car. Okay. And if you just push on that, it’ll conform to the space you’re trying to polish out. And there’s really no way besides working my hand you could ever get into tight places like this. So thinking back over your detailing career, I bet you really wish that something like this was invented way back when.
Oh gosh, back in the east of the 80s. Okay, and I’m going to take some of this part. So again, finger painting technique. Put some abrasive technology and some lubrication where I want it. And then come in here and do some polishing. And I recently did a… I think it was a 1970 Challenger, and it had a lot of intricate places on it in the back of the car where I used this.
Oh, no, it wasn’t a Challenger. It was a 1957 Chevy Cameo pickup. And the whole back is full of chrome. It’s very ornate. It’s a very beautiful truck. And it’s all equally swirled out. So without this tool, I would not have been able to pull the swirls out. I could have got it by hand, but not as efficiently as working by machine because, you know, machines don’t get tired.
The human does. So that’s my collar. Anyway, that’s kind of the class is how to work intricate areas. I showed you one, two, three, four, five, six ways. So the Flexi, that’s the shaft that goes on the Pixie. The extension that goes on the Pixie, working by hand, that’s three. Small rotary, small pad on rotary, large pad that’s tapered
five five ways to tackle intricate areas and the easiest and cheapest one of course is working by hand the key thing the takeaway if you’re new to detailing is just is just learn that fibers are a form of abrasive and you can use them to your advantage.
But always keep in mind if you do any kind of heavy working with a fiber pad to come back with foam because the the benefit the foam has is unlike individual fibers sticking up you have a uniform texture and this tends to kind of I like to use the word shmoo shmoo over the the paint as you’re rubbing it to really perfect it and but yeah and of course when we’re done here I gotta buff out the rest of the car this thing’s in bad shape all right this camera over here Mike.
Okay All right. So that was very educational. Yeah, we’re a man of many different things. Yeah, we don’t we know I don’t we do sell the Flex Pixie and the attach to the Flexi shaft up on Dr. Beasley’s dot com. But this isn’t really like, I’m not trying to get you to go out and buy one of these, but I will tell you, if you do a lot of detailing and you work in a lot of intricate areas, this is one of those tools, if you spend some time with this tool, you can make it dance on paint.
Questions? Comments?
Email Us