


Last Updated September 5, 2024
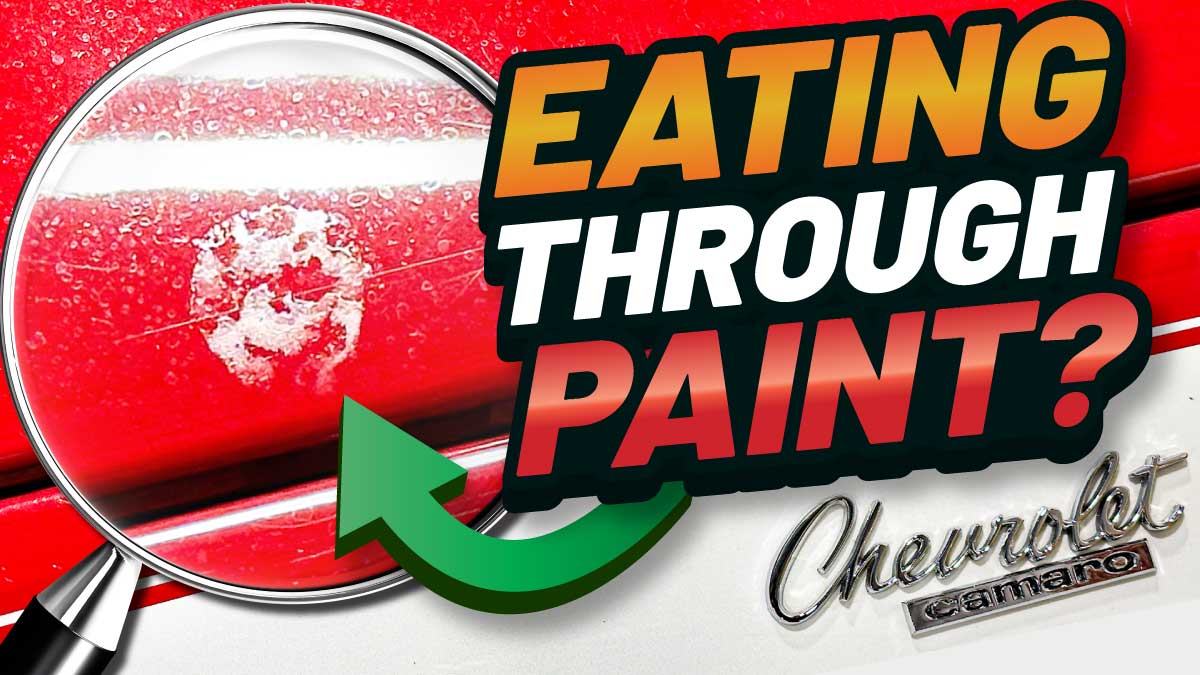
When a bird dropping sits on a car’s paint for too long, it bakes in the sun and becomes acidic, eating into the clear coat and leaving an imprint that can only be removed through paintwork correction.
Ideally, you’d never let a bird dropping get to this point.
But we don’t live in a perfect world, so if you do find yourself in this situation, be sure to watch this video from a recent livestream detailing class I taught using a 1967 Camaro SS with more than a few bird droppings etched into the paint!
— Mike Phillips
Chief Education Officer, Dr. Beasley’s
(760) 515-0444 | mike@drbeasleys.com

The following is a transcript from a recent livestream detailing class. It has not been edited for clarity.
Okay so this is a friend of mine this is his nineteen sixty seven Camaro convertible SS and originally I thought there was five bird dropping etchings but I found a fresh one or a new one or another one right here so there’s actually a total of six now the owner of this car he wants he doesn’t want these etchings so he is he’s asked me to do my best to remove them and it’s and to not go through the clear coat But he says, if I go through the clear coat, it’s OK. He’ll repaint the hood because they drive him up the wall.
They’re pretty nasty looking. Either way, he wants them gone. Now, the thing about bird dropping etchings is the- Show me one so that way they can see what we’re doing. Sure. This one here should be fairly easy to identify.
Get your light. Get a scroll finder light. That’s ugly. And the paint is actually crinkled. So someone asked me, Mike, why don’t you just try to buff it off? That ain’t gonna work. If it’s just a stain, topical stain, you probably could, but when the paint is actually altered, the only way to really make it visually disappear is to level it, and that’s best done by sanding, either wet sanding or dry sanding.
So I am a big, huge fan of the Eagle Abrasives by Kovacs, or Eagle Abrasives by Kovacs sanding discs. And we cover this topic in our three-day classes. It’s the topic for the second day. You have to take the first day if you want to take the second day. You just can’t come take the second day.
But we cover the hand action, hand sanding, and machine sanding. And so for this, I’m going to start out with, I’m gonna try a twenty five hundred grit first you always want to use the least aggressive process or product to get the job done and the part that everybody forgets to add to that little cliche is the reason you do that is to leave the most paint on the car so I’m gonna try the twenty five hundred I’ve already been using this disc you can see some clear coat on there see that All right, but as you see, why do you have Crayolas? Oh, thanks for reminding me.
So this is a little tip that I use for myself. Whenever I’m doing what I call surgical buffing, surgical detailing, and as I get busy here, it’s, you know, I got to remember where they’re at and track them down. So instead, I got my big old fatty bunch of Crayola jumbo crayons and And they come in multiple colors, so if you’re working on different color cards, you can kind of pick a color that works for you. But what I’m going to do is I’m going to just take the yellow here, and I’m going to draw a big old circle around each one of these spots.
And that way, I can still get my three-inch disc in here, but the wax there is going to show me where the actual… And you’re not damaging the paint. No, and I’m going to buff this out anyway. Here’s the other one. Here’s the one that I didn’t know I had until today. Okay. And then up here by the Fresh Air Grill, there’s one Right there, kind of going into that gentle curve there. And I think that’s it. So one, two, three, four, five, six. One, two, three, four, five, six, yeah, six.
So anyway, that’s just my crayon trick. Now, some other places I use this also is after I’ve buffed out a car, sometimes I will go around, if there’s some rids, random isolated deeper scratches, I’ll go around and mark them all, then I’ll come back and put a little more effort to try to get them out. Okay, so visually you see it.
Yeah, so you know where they’re at. Plus it’s just faster to go around and mark them and then start working on the car than to work on the car, look to see where they’re at and buff them, look to see where they’re at. It’s just faster.
And another place I use is if I do a complete sand on a car, the hardest part about sanding down an entire car is removing one hundred percent of your sanding marks. And most often you’ll find them next to edges. or into curves or tight areas because they’re harder to buff. I always tell people don’t put sanding marks where you can’t put a spinning buffer, okay?
We can’t put that spinning head or you’re gonna have to come back and take them out by hand. But anyway, so I’ll use the crayon trick for highlighting sanding marks I need to go back around and get out because usually it’s, It’s kind of impossible to do a hundred percent defect removal the first time around. So you want to go back and check your work.
Anyway, so now that I’ve marked them, the next thing I want to do is I want to go ahead and put a fresh sanding disc on. Now, one thing I just want to point out to people, this is the Flex PXC-E or as I call it the Pixie. And when you purchase one of these, it comes with the rotary unit.
it comes with a twelve millimeter unit and it comes with a three millimeter unit and a couple years ago i asked flex to make me a six millimeter millimeter unit and the reason why is because the rotary you can’t really sound with rotary because when you sound the rotary that’s not standing it’s grinding the three millimeter so anemic it’s really hard to maintain sanding disc rotation with the three inch or even a two inch disc and the twelve millimeter the orbit stroke is so big you can’t stand next to an edge without hitting the edge therefore when you go to buff you’ll probably burn through so they just needed a smaller tire orbit stroke and they made this six inch one for me i got one already in here and uh…
And anyway, they work great with these sanding discs. So I got a three-inch pad. And then if you look, I’ve got an interface pad. Okay, this is the Eagle Abrasives or Kovacs interface pad. What the interface pad does is actually helps to maintain sanding disc rotation. It smooths out the action of the sanding. And of course, it compresses because it’s got a foam interface there. So it’ll allow for the curve of the car because no panel on this car is absolutely one percent flat. So it just kind of helps in that area.
Okay, so let’s grab a three-inch disc and get right at it. I wanna center this up. And I’m gonna tackle that one that’s easy for you to see. And dry sanding, normally you’d wanna wear a dust mask or a respirator of some sort. For this small amount, I’m not gonna worry about it because it looks horrible on camera. Okay, so I’m just gonna take and turn this on. And I want to bump this down to one. And then usually what I teach in my classes and I practice is you would take and place this down and see if you’ve got sanding pad rotation. You don’t need it to spin like crazy, but you do want to see a little bit of rotation versus no rotation at all. So I’m going to put this down here and just kind of sand.
And I really don’t have any sanding rotation, but you can tell I’m already getting quite a bit of paint off there. So I’m going to bump this up to two. It has a little digital… uh spinometer digital speed setting right there i’m going to come down and just hit it again you see the sandy just rotate there fancy just but just barely okay let’s wipe this let’s look at the back of this whoa look at all that white paint that’s coming off that’s clear coat so anytime you scratch something clear say like glass you ever seen frosted glass because it’s been um when they make it frosty it turns out whitish or opaque same thing when you sand something clear it turns white so you just take and turn this on Hold that against your pad. Boom, it’s clean.
And we’ll come back down here and inspect it. You know what? To me, that looks like it’s a hundred percent defect removal. So, you know, what I don’t want to do is I don’t want to see red paint on my buffing pad over here. So I know a lot of people are always curious about paint thickness. We should have done this before, but at this point right now, let me turn this thing on. It’s eight point three, but let’s test this one I haven’t sanded here.
So I’m right on that. It’s thirteen point two. And let’s see, let’s try out this one. Twelve point three. twenty two point zero so this paint is custom and it’s just all over the place so a paint thickness gauge is what I call a go it’s a tool for making that go or no go decision either I’m gonna do something sand it buff it whatever or no I think it’s so thin I don’t want to mess with it or maybe all I will do for the car is to polish it I won’t compound it because maybe I think the paint is so thin but I use a paint thickness gauge to make the go do it or no go, don’t do it decision.
And again, the owner of this car, he said, look, I want the bird droppings out of there. If you can’t get them out, I’m just going to repaint it. So go for it. Okay. Let’s do another one. Okay. So let’s do another one. Let me grab my dusting towel here. Okay. We’ll come right up here. Now I’m still on the two. I’m just going to bring this down. And you can still see some of the etching, can’t you? The shiny parts are the lowest parts of where the crinkle is. So let me just hit that again.
Now, what do you see, Yancey? You know, I can see a faint… There’s a little bit left on that one, too. Just a little bit. Just a little line. We’ll just go in here and just give it a little love. A little sanding love. You know, usually when I make videos, Yancey, I don’t… There we go. I don’t like to wear glasses, you know, because I don’t want to look my best. But I’m nearsighted, so when I’m doing surgical work, it’s important I really see what I’m doing.
You’ve got to be able to see. So for cars like this, of course, I would wear my glasses. For cars like yours, I’d put a blindfold on and then sand your car down. Oh, thanks. You’re welcome. Thanks. Okay, let’s try this one. Now this is going to be tricky. This is a technique I use. Now watch this. I’m actually going to go up on edge. I’m not going to sand the whole thing. I’m just going to come down here and kind of flutter over that.
I want to stay away from the edge there because as we all know, Boom, that’s gone. As we all know, sanding takes off paint, compounding takes off paint, polishing takes off a little paint. Pretty soon, you’re going to see red paint when you’re that close to an edge because you’re going to burn through the edge. Well, that one was worth twenty-two, so you got a little ways to go. Okay, here we go. Okay, that one was thirteen point two.
Go ahead and fix it totally. I’m just going to do a little feathering here with it. You know, I wrote an article called Feather Sanding probably like fifteen years ago. And it kind of talked about what I’m doing here. Just lightly coming in and just kind of feathering. Alright, now grab your… Gone. Okay. Paint thickness, I’m not moving so there’s no raw editing.
Right there, behind your polish. Oh, there we go. Alright, that was thirteen point two, if I remember correctly. Twelve point four. Twelve point four, go back to this. That one actually gained. Well, twenty-two point seven. I wasn’t right on it. We’ll check out this one. Do you remember what this one was?
I think that was like thirteen, twelve something. Yeah, go to this one. This one was eight. Remember? Yeah, I did this before you got here. Eight point zero. Yeah, so barely anything, if anything, got there. Oh, very little. Let me go ahead and get this one since I’m here. See it’s still there? Yeah. Okay. Then you actually got some pits right there too. Yeah, a little DIP dirt and paint. And of course I went around and got really good high resolution before shots just to remind the owner.
Now there’s just barely, barely a trace there. It’s really hard to see. And what I usually do is I try to get really close, but I don’t go a hundred percent and then come back. Cause you remember taking a compound of wool pad on a rotor, he’s going to take a little paint off too. Now this one’s going to be a little tricky cause we’ve got a very nice convex. Yeah, it’s not flat. Not flat. Like a surgeon. See it’s still there? I can’t see it.
Mostly gone though. Little bit more. People always say, do you ever get nervous doing this stuff? And I say, heck yeah. But I don’t know, I always have confidence in the products I’m using, sanding discs, the compounds, the tools, you know, and experience goes a long ways too. Okay, so at this point, the next thing I want to do is I’m just going to give this a quick wipe, you know, we want to make sure any paint is removed from these areas, and we also want to make sure that any sanding particles that may have come off the disc have been removed. That way you don’t pick them up and…
and earlier this morning I washed this car and clayed the hood this car is actually going in for some minor service work and when it’s all done they’re gonna bring it back in all detail do all the paint correction give it a fresh ceramic coating okay so now it’s time to do a little work with the rotary Now, I put this together earlier. It’s not quite centered on there.
And I always tell people it is so worth it to spend the time and get that thing centered. Because otherwise it feels like a flat tire on a car going down the road because it’s not centered. And even though I don’t know where this pad’s been, I mean, for all I know, it could have been on the ground today. I don’t know.
So I always clean my pad with a spur. So important. You know what happens if you’ve got one little particulate in there you buff with this pad? You get little pigtails. Here’s a term for everybody. It’s called an arc, A-R-C, an arc, arc scratch. You’ll go around and you’ll put arc scratches everywhere in the car.
Then you get the feeling of coming back and taking them out. So clean your pads often. Okay, a little showmanship there. So now we’re going to use the Dr. Beasley’s NSP-LB. And I’m just going to put some right on top of that. And my pad is dry. So you’ve got to remember, my pad’s going to absorb some of that liquid. So some of you are going, Mike, that’s way too much. Well, my pad is dry. My pad’s going to absorb a little bit. So I’m just going to come in here and smoosh it around a little bit. Technical term.
That is a technical term. There. So I’ve got it spread out. I like to use this. Notice the two different colors here. This is actually a prototype they sent me before they launched this tool. And I’ve buffed out so many cars with it. It’s actually not even a production tool. It’s a prototype. Okay, so, Yancey, I’ve never… I’ve never worked on this car before, so I don’t know if it has hard paint or soft paint, but that scratch came out, that sanding mark, it came out fairly easily. You saw I didn’t even press on the rotary.
It’s gone. Okay, so let’s go to the next one. No red paint. No red paint. Knock on your thing. Little dab will do ya. Little dab. Little dab. One more for good measure. Okay. Now, same thing. I’m just gonna come down here and feather the trigger here just a little bit. Swish my product around a little bit. Go this way. And what that’s doing is it’s getting the product onto this clean dry pad. The cordless flex tools, they are so easy to use.
It looks like you’re having a hard time. You know, I always tell people, if you can make something look easy, it probably is easy. Okay, let’s see if we got them all out there. They are gone. Any red paint? No. No red paint. Okay. Let’s come down here. Loses like a scalpel. I’m going to go this way. I can just come right along here. Isn’t that what you want to do? You want to go off the panel, not under the panel?
Well, I’m just going to run along it, but I will talk about the buff off and edge technique. But mostly I wanted to make sure, even though you see fibers here, there’s no pressure behind them. The inner cup there is about an inch in, so I can get right up next to it. And they’re gone. Yeah, there’s a technique called buffing off an edge.
So here’s an edge. And that always means when you look at your pad and it’s spinning, as you look down on it clockwise, this would be buffing off an edge. If I come at it this way, it grabs it and yanks the tool out of my hand. So learn how to buff off an edge. Not only is it safer for the car, it makes you look like a pro. So in my classes, Nancy, nowadays the first tool I teach is the rotary. By nine o’clock, you will have a rotary in your hand using a tool just like this. And we do extreme tank correction.
So it’s, or multiple step, however you wanna look at it. But what I always call show car detailing. You know, we’re gonna try to take as many defects out as we can. That one’s gone. Two more. Kind of hard with the lights to see but I think I got them on. I’m not seeing anything from my angle. Nope, they’re gone. All right, your last one. Just to make sure. Your last one. Someone’s going to say, Mike, shouldn’t you clean your pad more often?
Sure. I always clean my pad. I’ve cleaned it more than anybody I’ve ever seen. My good friend Mike Pennington always drilled into my brain, work clean, work clean. And he’s right. You’ve got to work clean. I don’t want to spray your camera. Whoops, a little messy that time. That’s okay. You had one job. Oh, I forgot a technique tip. I’ll share it anyway, because I’ve got to buff out the whole hood here. Let’s check it out. Gone. Okay.
So the other technique tip I wanted to share was when you’re working on these classic cars like the Valiant behind you, the nineteen eighty-two Eagle Pacer up there, and this six-seat Camaro, they have what they call a fresh air grill.
So this is where fresh air would go into your air conditioning or just your fresh air vents you know as you’re driving down the road and I don’t always I hate taping these off with masking tape.
I even got low tack tape because here’s why when it comes to painting a car and Yancey you’re a car painter you know this it’s easy for the people to prep this big flat area get it really prepped up primered and the paints gonna stick good this becomes more difficult and a lot of times you put tape on there and pull it off you’ll pull the paint off.
So what I have instead is if I put a dry cloth up here and cover this up you know fold this in a way to cover that up the spinning air current from my pad will yank it and throw it off the car so what I do is I get a towel this is wet I get it wet not dripping wet but wet now it has some weight to it and I’ll sit it like this so as I’m buffing here I don’t throw splatter dots down inside this fresh air grill and whenever I go to a car show one of the first things I do when I see cool cars is I look to see if the guy that buffed it out Covered it up.
If you did it, you’ll see white dots everywhere. And how are you going to clean that out? Don’t be that guy. Very, very difficult. Don’t be that guy. So cover everything up. All right. So now we’re done with the compounding. Yep. So now we need to pull out our holograms. The holograms were not caused by the Dr. Beasley’s NSP-LB. This uses abrasive technology that’s One point five microns in size, smaller than a human hair I believe.
But it’s the fibers, these fibers as they’re spinning. Put it up against your shirt. Yeah, they cut in the paint. They put a cut in the paint. That’s why I always tell people it’s okay to start with wool on a rotary. Just don’t finish with wool or any kind of fiber pad on a rotary because you’ll tend to leave hologram scratches behind. Okay, so the next thing I’m gonna do is I’m gonna grab one of my favorite tools. Red Beast inside.
And this is paint buffed out pretty easy. I’m just going to grab a foam polishing pad. And just like the rotary, I’m going to center that up. And this is an eight millimeter gear driven polisher. And you can see what eight millimeter looks like by looking at the two diameter circles there. There we go. Yeah. See, we’ve got the outer perimeter and the inner perimeter.
And that distance in between there, that’s eight millimeters. If I were to grab my Rupes XXI back there and did that, you’d see this huge inner perimeter and outer perimeter. Would it be twenty-one millimeters? Yes. It’d be twenty-one millimeters. And so on and so on. Okay. This is brand new, so I’ve got to pull the seal off.
So this is the NSP-Ninety-Five. This is actually a fine cut polish. But I found that that paint to be just a little bit on the soft side. And because the pad is dry, I’m gonna overuse the product just a little bit. But once this pad becomes damp with product, then you can cut your product use way down. Okay, let’s just go in the same order.
Cord over shoulder so you don’t drag it against the paint. Spread my product out. Did you see any red paint on my pad? I didn’t look. Nope. That is a good sign. Boom. Okay. I’ll give you a hundred dollars so you can find that bird dropping at you. All right, where’s your light? Get to the light. Here you go. Here, let me do it.
There. I’ll let you, I’ll just turn it on for you. It’s gone. It was right there. It’s gone. All right. OK. And here, I’m going to. Next. All right, hold on. See, now you can see the holograms. See the holograms? OK, now go. Let me wipe the dust off. Not going to add any more product. This is the weight of the machine. So it’s basically five passes. And no holograms. No holograms and no bird dropping etching.
Okay, then we’re back up to here. At this point, I am going to drop a pea-sized drop onto the pad. You know, whenever you’re polishing… Infamous pea-sized drop. I’m not a big pea-sized drop guy. But, you know, the thing about that is it has two things. People always forget. There’s abrasive technology and lubrication. Okay, you need the lubrication so you don’t scour the paint. Remember, we’re here to create beauty. It’s not a grinding process.
One, two, three, four. Bring my pressure up. Five passes. You know, I got to buff out the rest of this hood before I go home tonight. Boom, everything’s gone. All right. Okay, let me go ahead and knock out. There was the one right here. You can go back. I’ll buzz these out.
Gone and right there. For anybody that’s never used the gear driven tool, one of the cool things about it is when you go up on edge or you’re working into a curve, there’s no pad stalling. As I like to say, it’s all brawl, no stall. Hologram’s gone. Bird dropping completely gone. Last one right up here. Boom. That’s how it’s done.
Questions? Comments?
Email Us