


Last Updated March 27, 2025

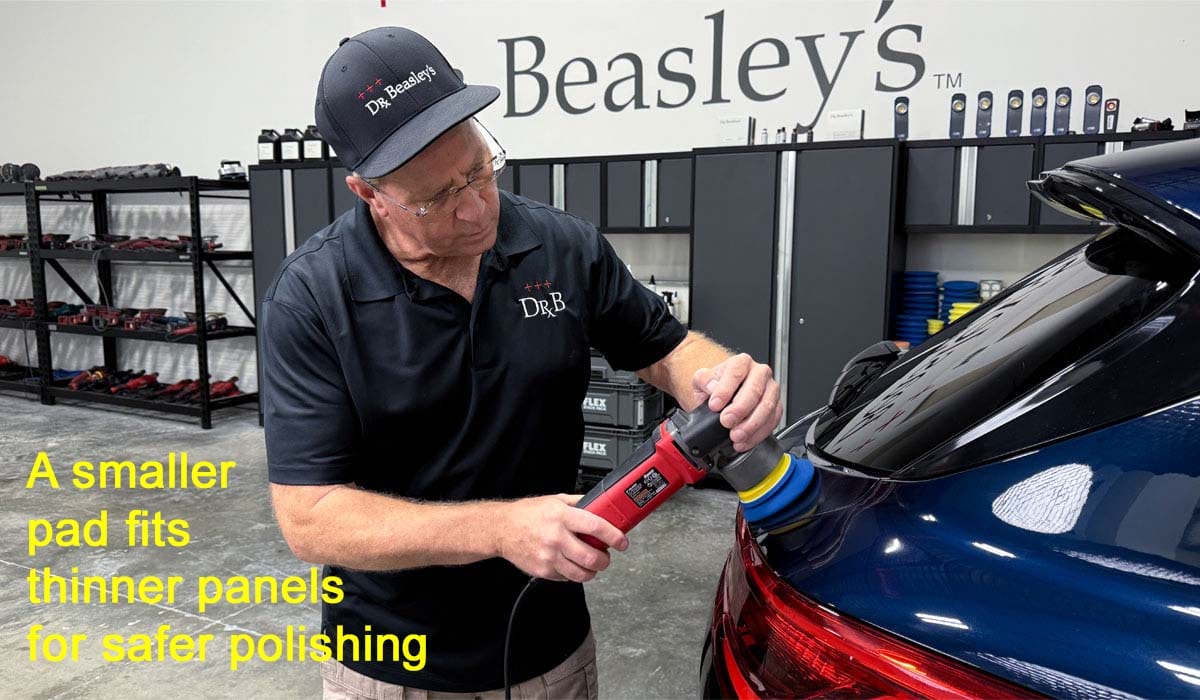
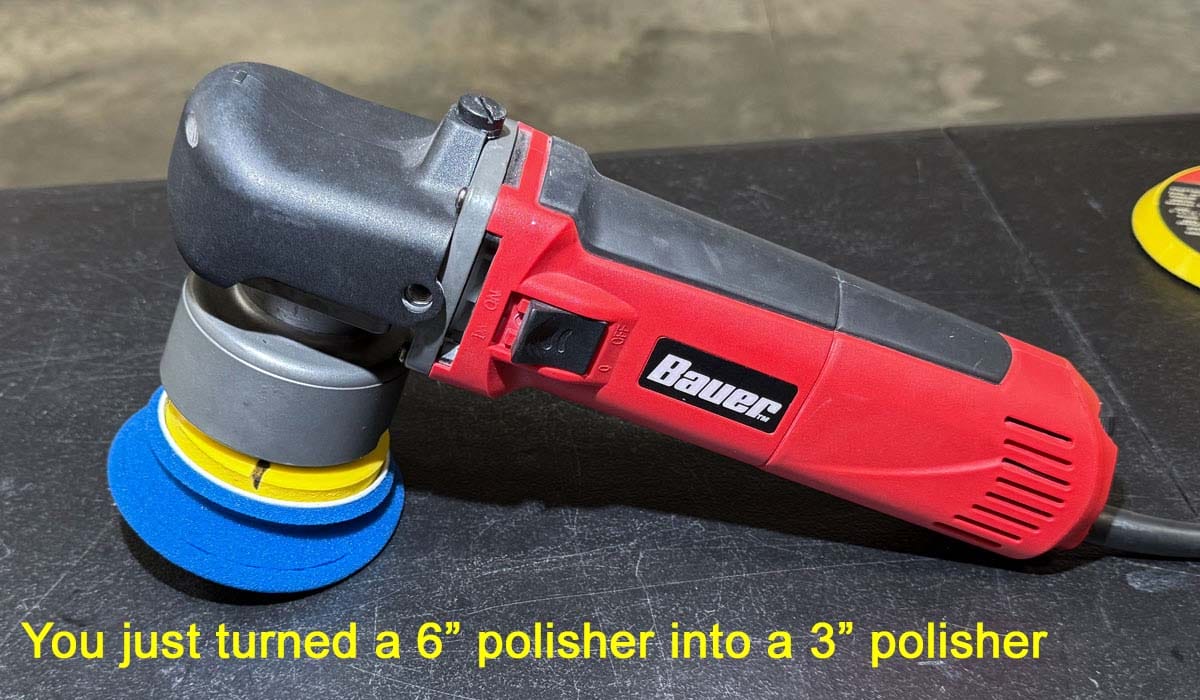
Sometimes when you’re using a buffer to polish paint on a car it helps to have a smaller pad for smaller sections like A-pillars. But what if you only have one polisher that can only fit big pads?
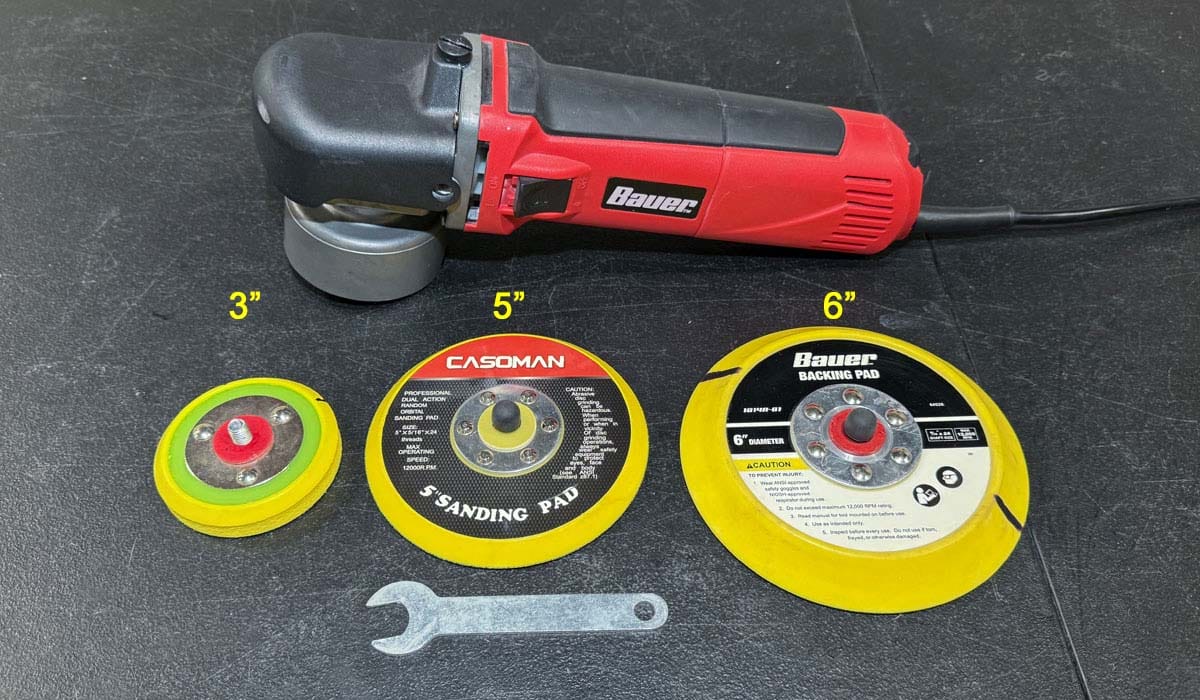
Here’s something you may not know — you can adjust the size of a Bauer 6” DA to 5”, 3” or even 2” backing plate to fit smaller pads. You can turn one tool into four tools and save even more money.
In this article, I will show you how to change the backing plate on the Bauer 8MM Short-Throw Random Orbital DA by Harbor Freight from 6” to 3” and 5” backing plates. 2” backing plates are also available on sites like Amazon, but for the purposes of this guide, I’ll be sticking with 3” and 5” backing plates.
Backing Plate Size vs. Orbit Stroke
Although the Bauer 8MM Short-Throw Random Orbital DA by Harbor Freight is referred to as a 6” tool, that’s technically incorrect as the 6” backing plate is totally interchangeable. It’s better to refer to random orbital DAs by their orbit stroke length, or how far out the pad oscillates as it spins — in this case of this tool, 8MM.
As much as I wish manufacturers and distributors would refer to their tools solely by their action instead of the interchangeable backing plate, like the saying goes, once the Genie is out of the bottle, it’s pretty tough to put him back.
When and Why Should I Use Smaller Pads for Polishing?
Using a smaller backing plate is essential when working on smaller panels like A-pillars. A smaller backing plate allows you to maneuver more easily and avoid things like raised body lines or panel edges, which have less paint and are more easily damaged by polishing. Larger backing plates should be reserved for larger panels like hoods or doors.
Step-by-Step Directions for Changing Backing Plate
Below are step-by-step instructions for changing the backing plate on a Harbor Freight Bauer 8MM Short-Throw Random Orbital DA. This tutorial is DIY-friendly and does not require any previous experience. That being said, please follow the safety warning below.
⚠ IMPORTANT: Read Before Starting
Before you repair, modify or take apart ANY polisher, ALWAYS ensure the tool is UNPLUGGED before beginning.
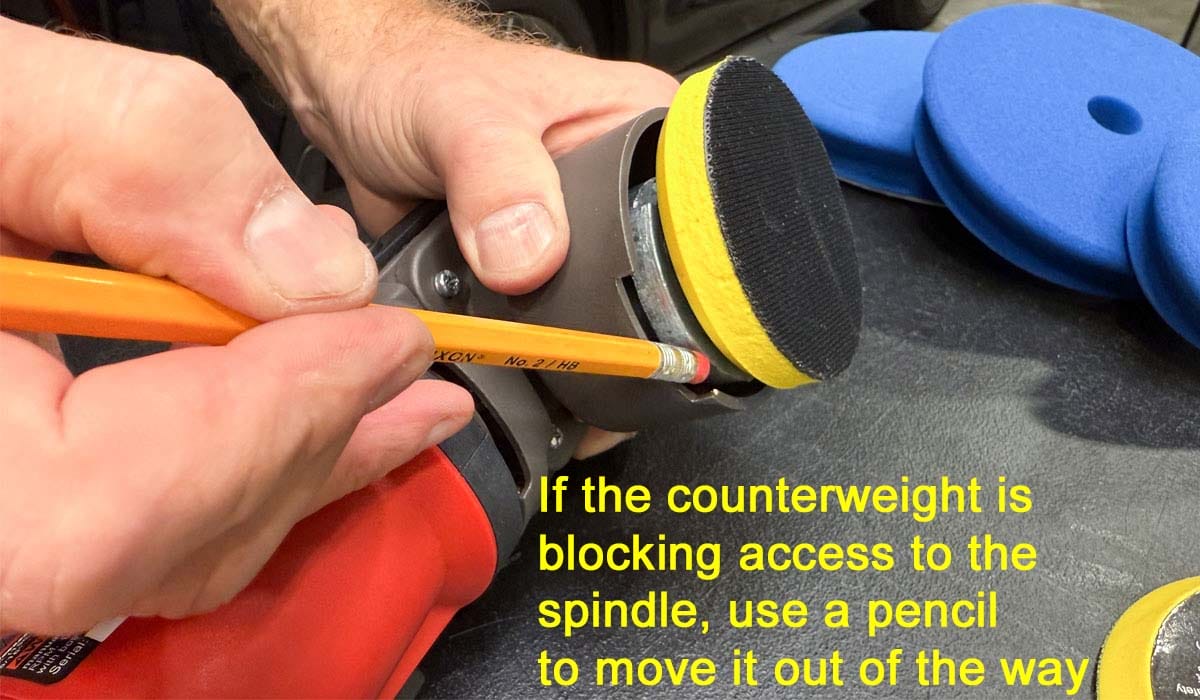
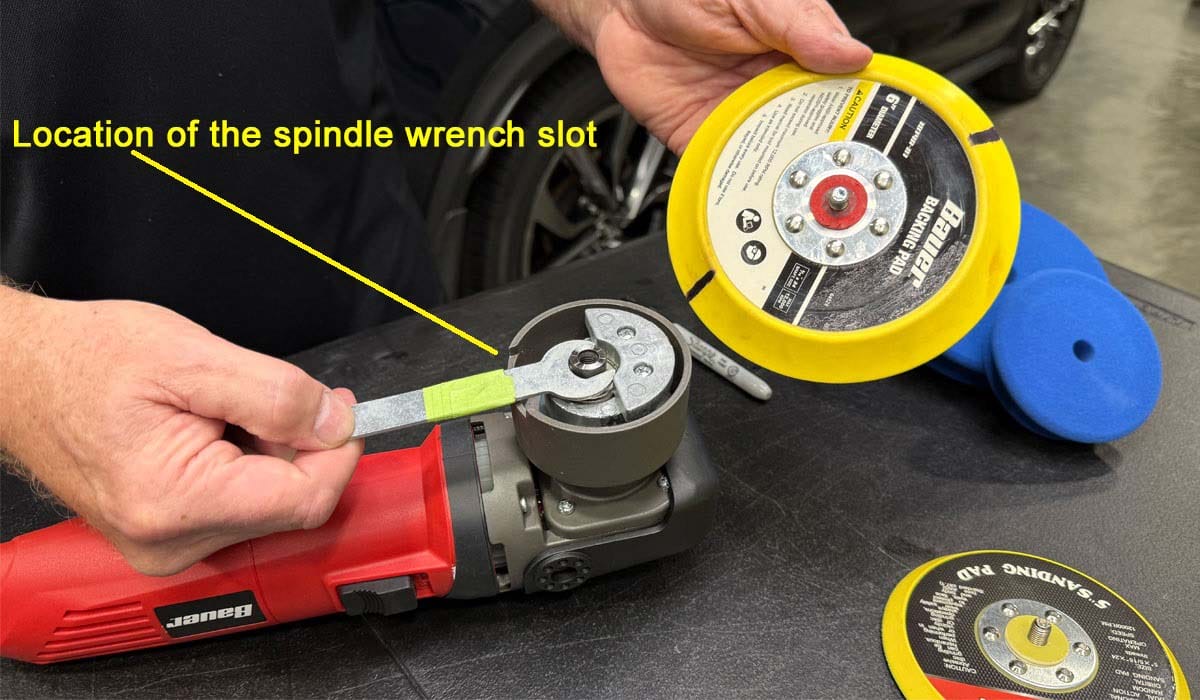
Step 1: Insert Spindle Wrench Through Slot & Secure Spindle
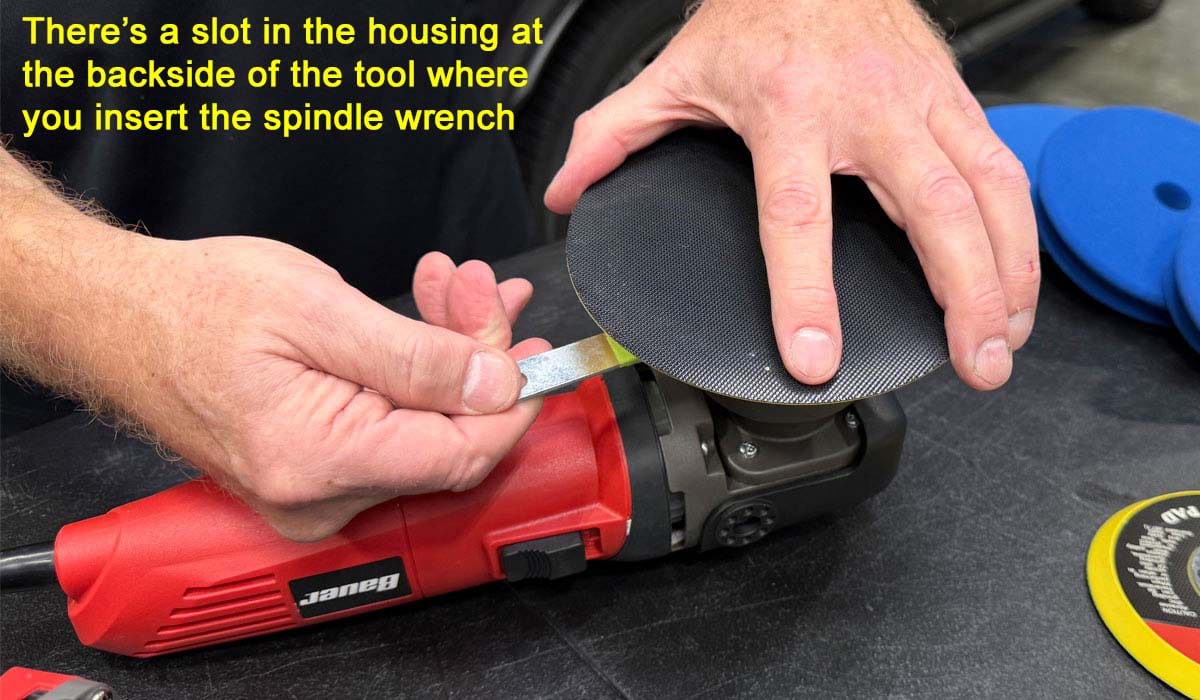
The spindle wrench slot is located at the back of the metal housing that holds the spindle and counterweights. If the counterweight is blocking the spindle wrench slot, you can move it out of the way using the eraser side of a pencil.
Once you have removed the backing plate it’s a lot easier to see the slot and its location for future backing plate swaps.
⚠ IMPORTANT: DO NOT LOSE COMPRESSION WASHER
The compression washer can sometimes be loose on the threaded stud on the backing plate and can easily fall off onto the floor and get lost. This important component is crucial for the polisher. It serves as a crushable interface between the backing plate and the counterweight, ensuring that the metal rivets on the backing plate don’t grind against the counterweight as both parts spin at high OPMs.
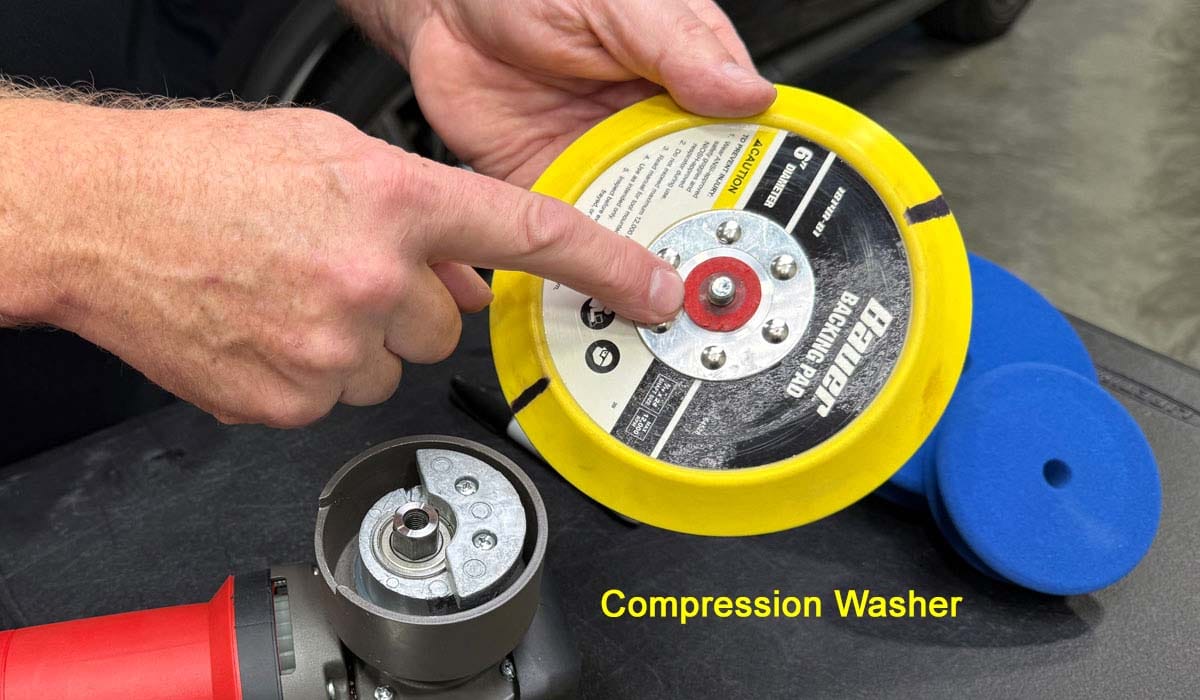
Without this component, the grinding metal will make a loud noise and even cause shards of metal shavings to fly onto the car’s paint. So pay attention and DON’T lose the compression washer.
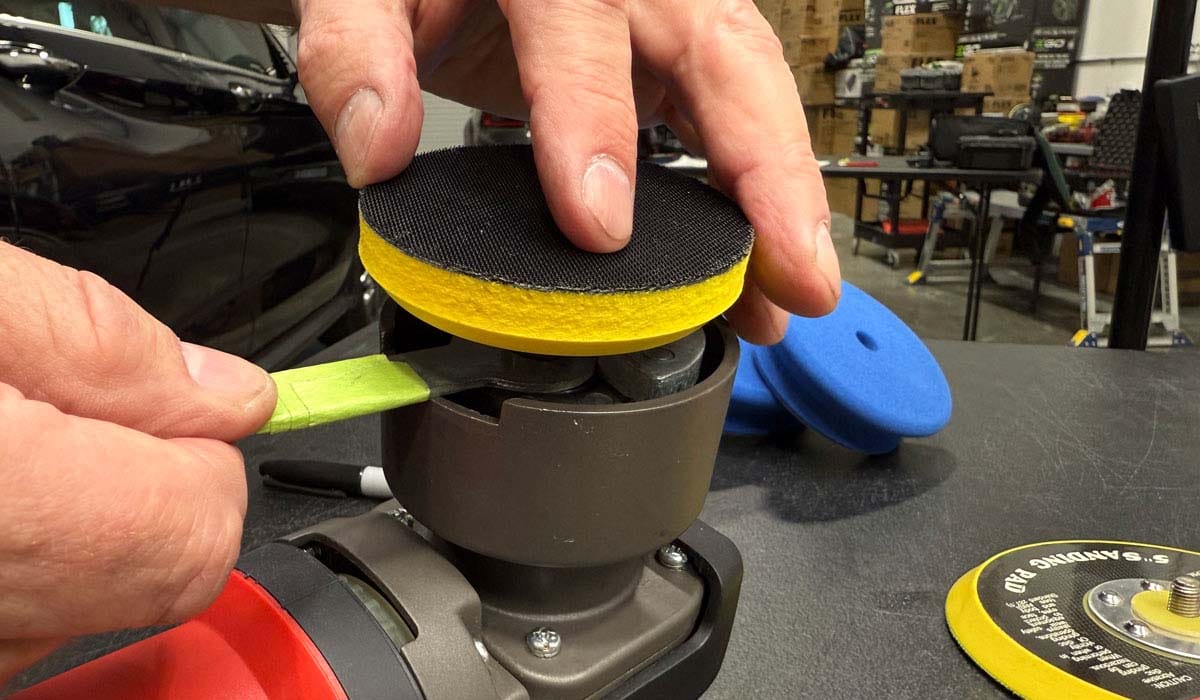
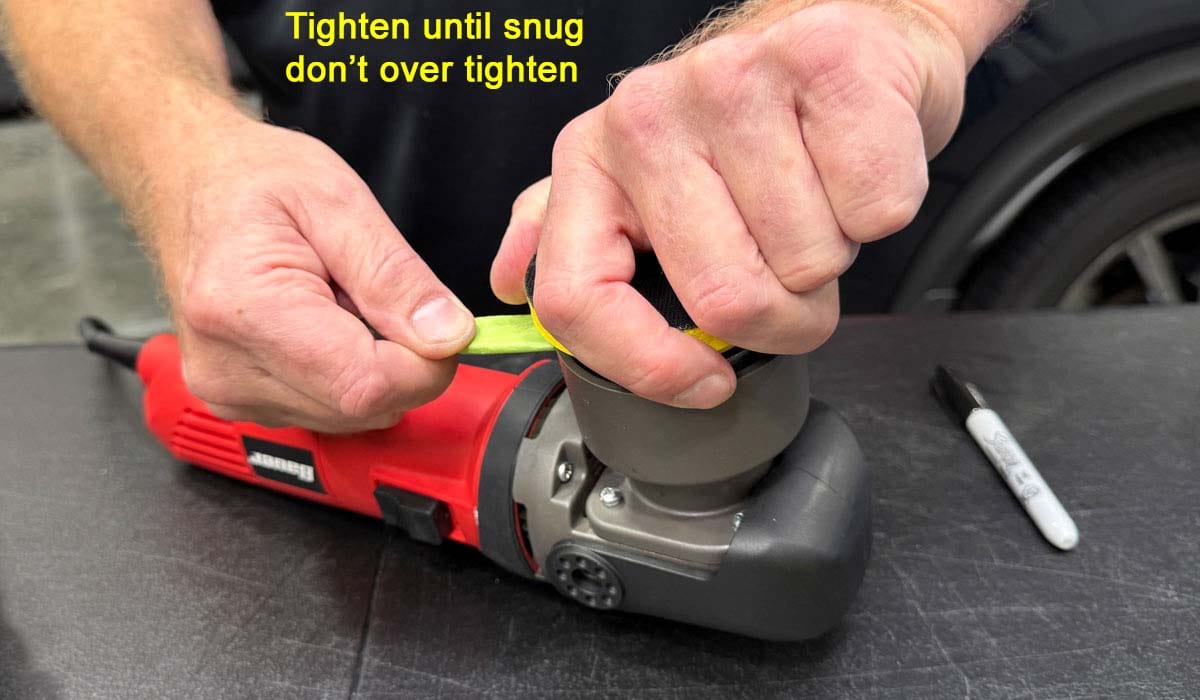
Step 2: Attach Backing Plate to Spindle and Tighten

Be sure the compression washer is on the back of the backing plate. Next, place your thumb onto the compression washer to prevent it from slipping off.
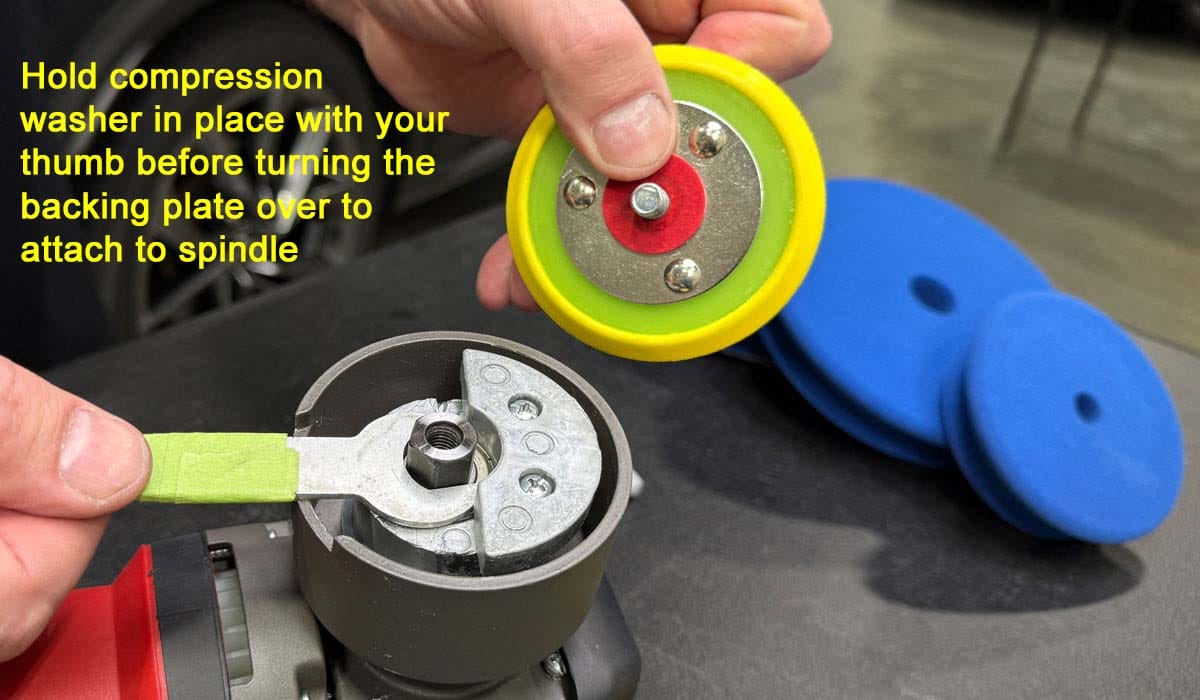
Then turn the backing plate over and insert the stud threads into the spindle threads. Spin the backing plate onto the spindle and then tighten until snug using the spindle wrench. Do not over tighten.
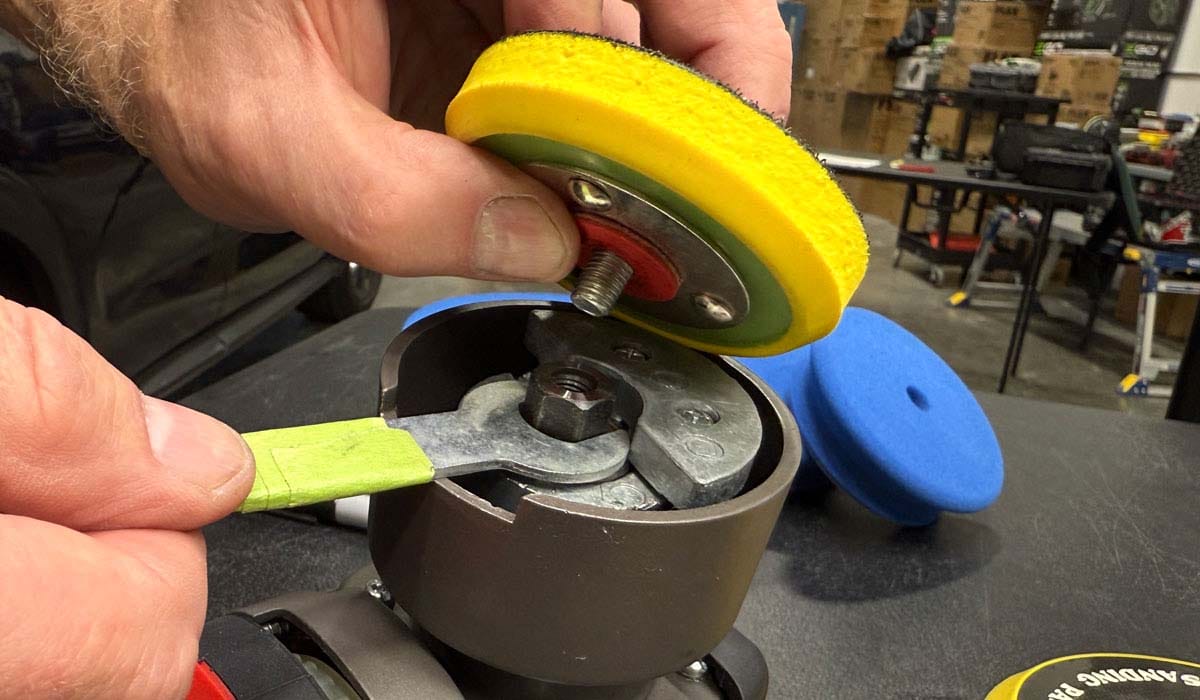
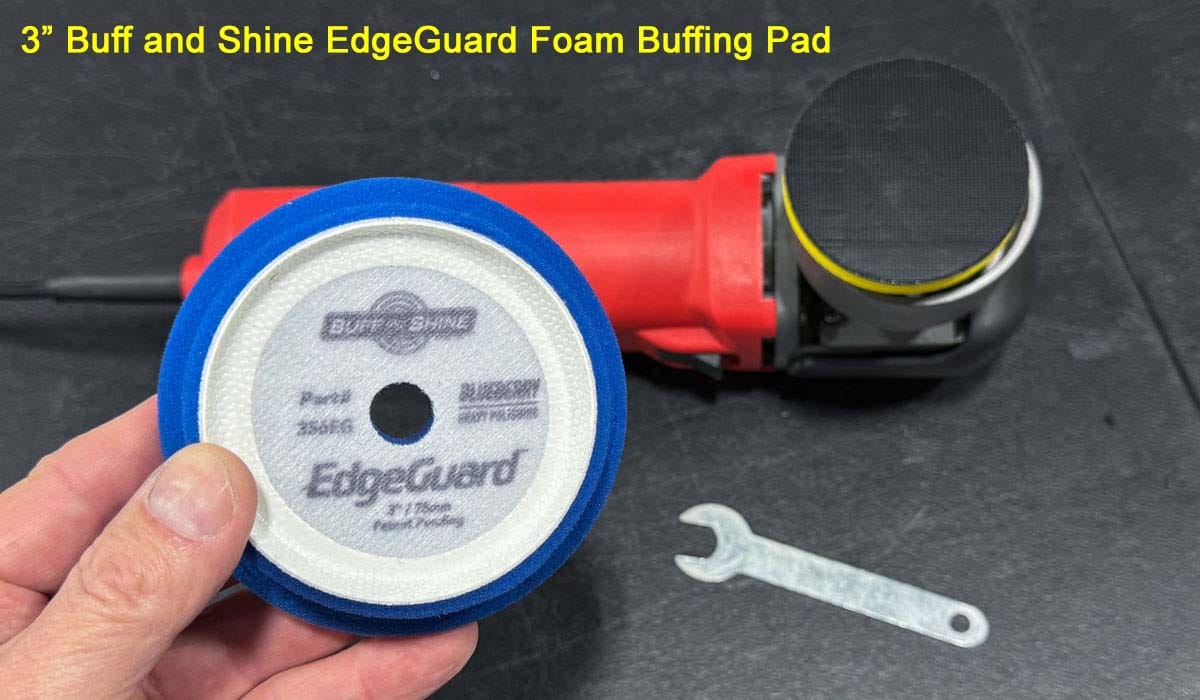
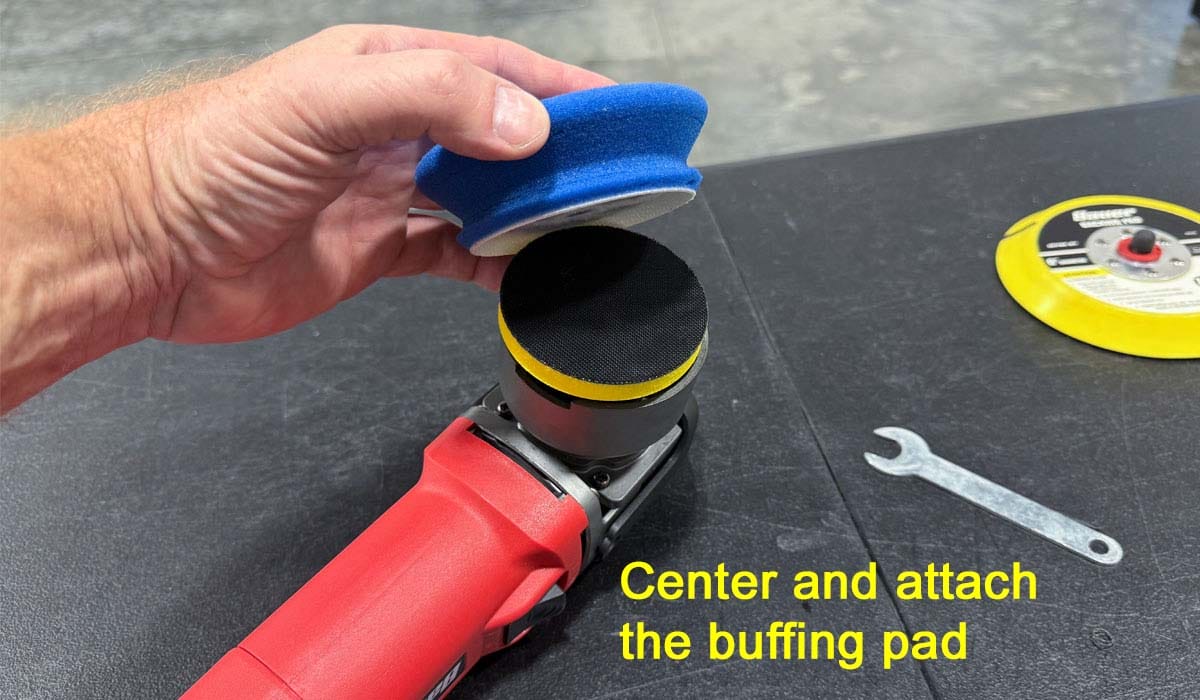
Once the smaller backing plate is installed, you’re ready to attach a buffing pad and get to work. Here at Dr. Beasley’s Future of Detailing Auto Detailing School, we use Buff and Shine EdgeGuard pads. Their foam is high performance and edged design provides an extra level of protection when buffing into tight areas or near other components.
Professional Technique Tip: Avoid Stalling by Marking Your Backing Pad
Anytime you’re using any brand of free spinning random orbital polisher, it’s a good idea to place a mark or two using a black Sharpie Marker. The reason for this is because a black mark or two on the backing plate enables your eyes to more easily see if the buffing pad is rotating and oscillating while you’re doing paint correction.
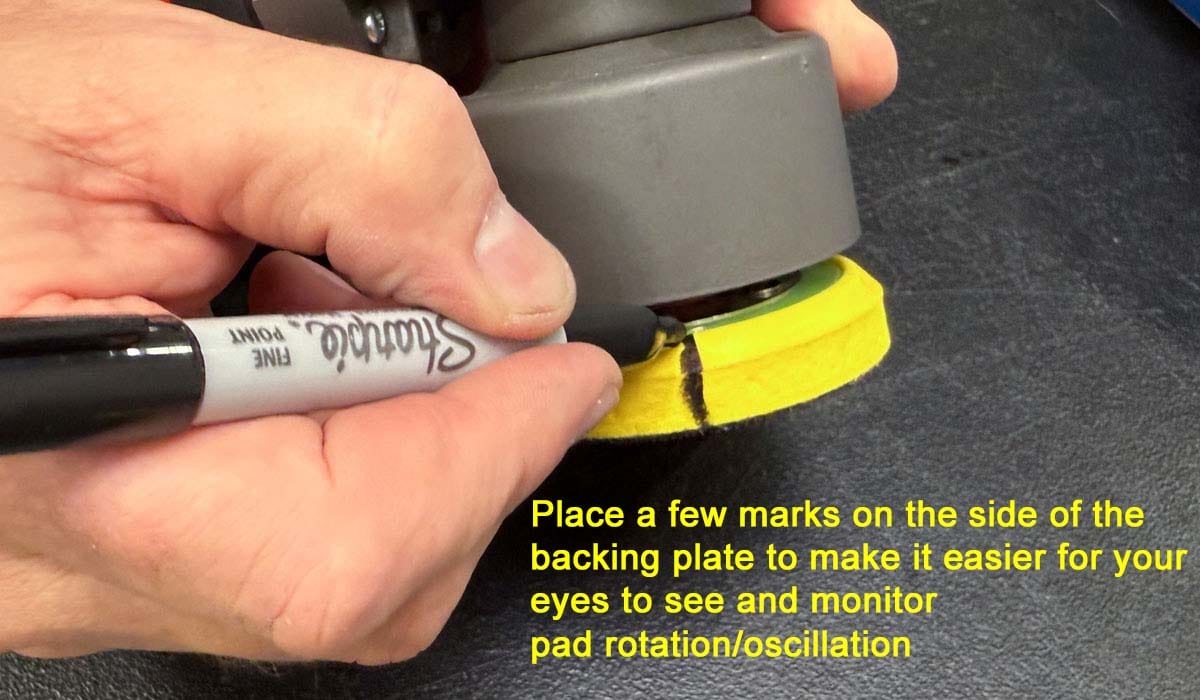
Without the black marks, the spinning backing plate will simply be a BLUR of yellow, (or whatever color the backing plate is), and it’s difficult for your eyes to see if the backing plate is in fact rotating and oscillating or simply just jiggling and vibrating against the paint.
This topic is a tick controversial because there are those of the opinion that you DO NOT need both pad rotation and/or pad oscillation to remove defects when using a free spinning, random orbital polisher.
Their theory and belief is that even if the pad is not rotating and basically only oscillating or jiggling against the paint, that combination of the abrasive technology, the cut of the pad and this jiggling or vibrating of the pad against the paint is in fact REMOVING defects.
Keep in mind, when we talk about removing defects, things like swirls, scratches, water spots and oxidation, we’re talking about REMOVING PAINT.
For what it’s worth, I am not in the camp that believes you can remove defects when the buffing pad is only jiggling against the paint. I’ve been machine buffing cars since the 1970s, that’s a long time. I’ve not only used the majority of tools on the market, I’ve often done testing for prototype polishers before they are released publicly. I’ve also written 6 books on the topic of detailing, one book for FLEX tools and another book for RUPES tools – so I feel confident in my opinions shared with you.
I’m here to tell you, while it might be possible for a pad that is only jiggling or vibrating against the paint to remove defects, (remove paint), if it is in fact removing any paint it’s doing it so slowly that you for all practical reasons are doing nothing except wasting your time.
Me? I don’t want to waste time, I want to get in and get out, meaning I want to start and finish the job as fast as humanly possible while maintaining professional quality results.
This is why if you’re want to get the job done in a timely manner and avoid the entire issue of pad stalling, I would highly recommend you take a look at a GEAR-DRIVEN orbital polisher like any of the FLEX brand of gear-driven orbital polishers, the RUPES Mille or the Makita PO500C – these are all gear-driven orbital polishers and thus there is ZERO pad stalling.
My Personal Offer to Help
I’ve been answering car detailing questions professionally since 2002 and moving forward, if after reading this article you have any questions about polishing and waxing, or how to use an AIO, my contact information is below, reach out to me, I’m always happy to help.
Would You Like to Learn How to Machine Polish Like a Pro?
- Would you like to take your detailing skills to a higher level?
- Do you find you learn better by doing versus sitting in a chair looking at a PowerPoint presentation about car detailing?
Here at Dr. Beasley’s O.R., (Operating Room), in sunny Stuart, Florida, we teach the most hands-on car and boat detailing classes on planet Earth. And we prove it too. You can find write-ups on the Dr. Beasley’s Blog that photo-documents just how hands-on our classes are plus you’ll see the kinds of cars and boats you’ll be training on.
Click the link below to find the dates, locations, topics, and prices for all upcoming detailing classes.
Upcoming Detailing Classes – Prices – Info – Topics – Locations
And if you ever have any questions, always feel free to reach out to me personally via text, phone call or email.
I hope to see you in a future detailing class!
Sincerely,
Mike Phillips
Chief Education Officer for Dr. Beasley’s
Mike@drbeasleys.com
760-515-0444
Questions? Comments?
Email Us