


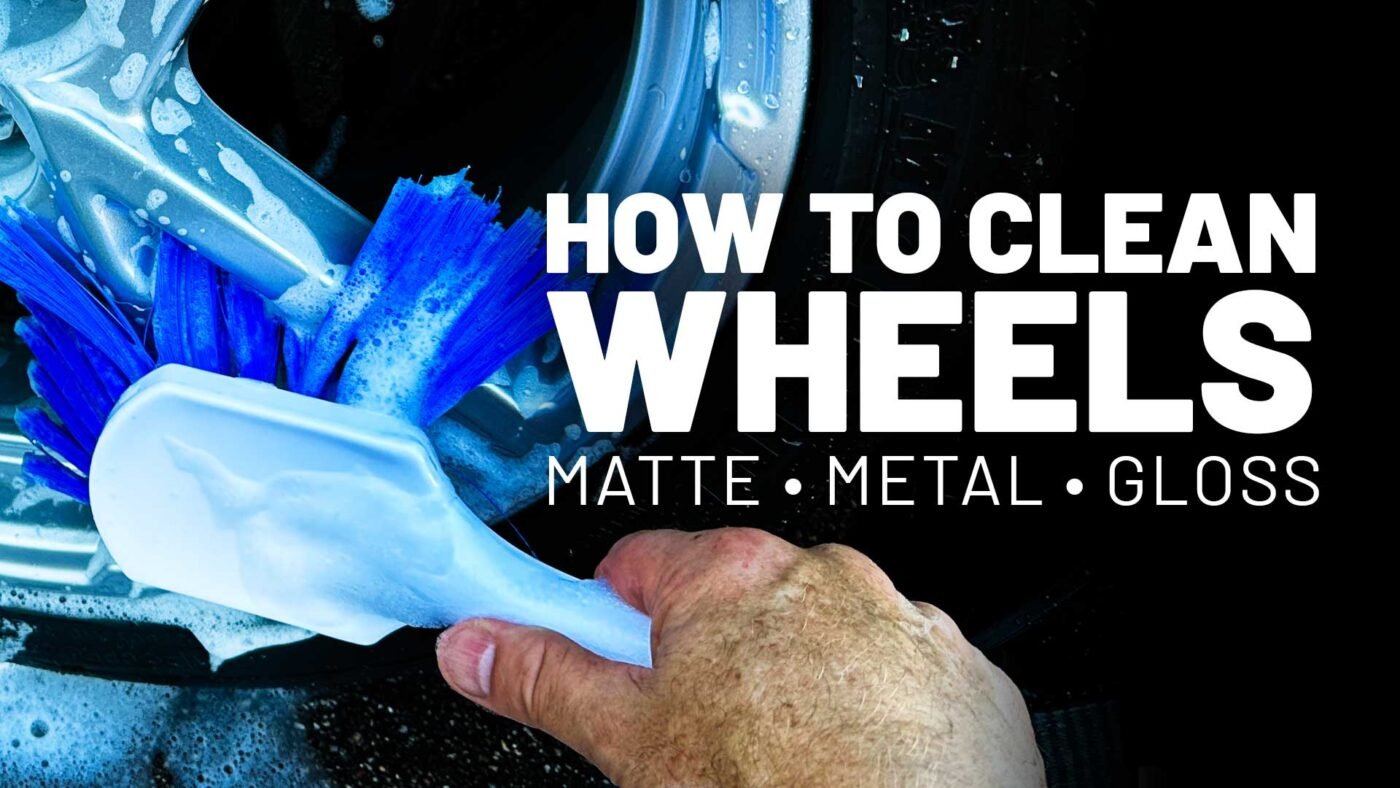
When it comes to cleaning your car’s wheels, a simple mistake could cost you thousands of dollars. I’m going to show you how to clean your wheels safely to get them surgically clean. And at the end of the video, I’m going to show you how to protect them.
If you choose the wrong wheel cleaner or you use the wrong brush and damage your rim, a replacement rim can cost thousands of dollars, even just for a normal clear-coated factory rim on any car, truck, or SUV. I’m going to cover the different types of wheel brushes that you should have on hand to clean your wheels and talk about some wheel cleaners.
But here’s some reasons why you want to clean your wheels. Okay, first of all, if you don’t remove the brake dust, as the brake dust sits on the rims, it’s going to cause pitting in the rim, little tiny holes, and you really can’t fix this type of stuff. If you get traffic film buildup—so traffic film is the dirty, oily water that anytime it rains and you’re driving in the rain, the cars in front of you spray that oily, dirty water onto your car—well, that gets on your rims also.
And when it’s on your rims, if you don’t remove it, because the rims get hot, it actually bakes it on and that makes the wheels more difficult to clean moving into the future. So, of course, the best thing to do is to always clean your rims and tires and do it on a regular schedule. And that way, it’ll always be fast and easy. And at the end of this video, I will show you a way to make cleaning your wheels faster and easier moving into the future.
The Chemicals and Brushes You’ll Need
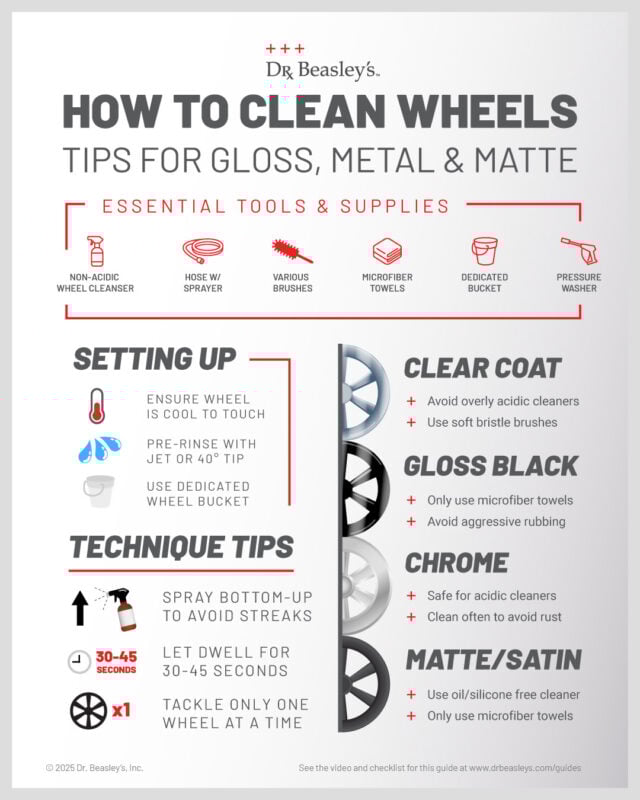
So, the next thing I want to talk about is the different chemicals you’re going to need and the different types of brushes you need to do a proper wheel cleaning. But don’t try to remember all this or take notes. You can download a PDF checklist in the description in this video.
So, the first thing you’re going to need is going to need some wheel cleaners. Now, there’s a lot of wheel cleaners on the market, and this is really important. A company that I used to work at, they spent a lot of money replacing other people’s wheels because the person made a mistake by using the wrong wheel cleaner on the wheel, destroying it, and just to save their reputation, they would just replace the wheels.
That costs a lot of money because, as I said earlier, a single replacement wheel, even just a factory wheel, can cost thousands of dollars. Imagine ruining all four wheels. So, you want to use a wheel cleaner from an established or reputable company. And what I would suggest looking for is a wheel cleaner that is non-acid. Okay? And the reason for that is that that way no matter what type of finish you got on your car—and maybe you don’t even know what kind of finish you have on your car’s wheels—it’ll be safe.
The problem with acid is if it dwells too long, it can stain. And if you use it on the wrong type of surface material, for example polished aluminum wheels, it will also stain the aluminum. And the only way to recover that is to polish the aluminum. And because aluminum is porous, the acid can seep into it, and that can cause a very deep stain that’ll take a long time to remove. So, just try to stick with acid-free wheel cleaners. And if you choose a reputable brand, they’re going to do a great job of cleaning your rims.
Brush Types: Wheel Face, Barrels, Lug Nuts and More
Once you’ve figured out your wheel cleaners, the next thing you’re going to need is a variety of different brushes. Okay, so some wheels are very simple in design. They got five spokes, fairly flat, easy to clean. Some wheels are actually very intricate. In fact, as time goes by, manufacturers are coming out with more stylish and intricate wheels. And while they may look cool, they become a lot more difficult and time-consuming to clean.
Now, let’s talk about brushes. Now, when it comes to cleaning brushes, you’re going to need a variety of different brushes to really do a good job of cleaning the wheels. Let’s start off with these. These are simple wheel face brushes. This is actually a boar’s hair wheel face brush. This is pig hair is another way to think of it—pig hair—and it’s very soft and gentle. In fact, it’s actually very safe for just about any kind of wheel.
This is also a wheel brush, wheel face brush, that we sell at Dr. Beasley’s. And the tips of these are flagged. That means they’re split. And that makes them softer. It also helps those little tips to get into tiny intricate areas, agitate the wheel cleaner to remove brake dust and traffic film. Both have sturdy handles, but those are wheel face brushes.
This is a Wheel Woolies brush and this is really good for getting the barrels dirty, especially if you’ve neglected your wheels for a long time. And there’s a special technique for using this that I will demonstrate when we get down on the ground. This is called the EZ Detail Brush. And what makes this unique is it’s flexible. Okay? And what this means is besides using it to clean the barrels and get around the brake calipers, you can bend this and you can get behind the spokes if you really want to get your wheels clean. So that is the EZ Detail Brush. And it also comes in two different sizes.
Detailing Brushes, Paint Brush, and Comfort Gear
This is just what’s called a round detail brush. And this works really good for getting around lug nuts, the lug nut barrels. And this is really good for cleaning the lug nut barrels, the lug nuts, and around the valve stem. And I’ll share a tip with you about cleaning around valve stems later on in the video.
And then this is just your normal household paint brush for like painting a house. And where this comes in handy is if you’re ever working on a car with wire wheels, either painted or chrome. And in this last year, I’ve actually detailed two cars with wire wheels. And this just helps to get in around all the spokes to get them clean. And because the bristles are about 3 1/2 inches long, it’s got some pretty good reach with it. So it’s a handy little brush to have on hand.
This is a knee and back cushion. Okay. And besides offering plenty of cushion, so it’s more comfortable to sit on the ground as you clean four wheels and tires, it keeps your pants dry. So, I always recommend one of these. These can be sourced up at Amazon. They’re kind of spendy, but once you use one, you’re always going to appreciate having it.
Water Pressure, Air, and a Dedicated Bucket
You’re going to need either a garden hose with a good sprayer to, you know, blast something with a jet setting to really blast those tires and get them clean. I also like the shower setting for doing a final rinse. You’re going to need a hose sprayer. You can also use a pressure washer if you have one. And of course, a pressure washer, because it offers such high-pressure water spray, it’s able to do a really good job of cleaning the outside, the back, the fender wells, and the tire.
And then besides that, I have a secret technique in this bucket that I will share with you to show you how to clean both matte and glossy wheels. Okay? And at the very end of the process, you’re going to dry those wheels and tires off. So, a leaf blower works really good for that. Any kind of form of compressed air will just help you to blast all that water off the rim to help you avoid getting water spots on the rim just like you can get water spots on the paint.
Oh, and then let me cover this real quick. It’s always a good idea to have a dedicated bucket for your wheel and tire brushes. You don’t want to be taking a tire brush that you’ve cleaned brake dust—which is a metallic particle from the rotors and the brake pads—it’s on your brush and then, say, dip it back into your wash bucket or your rinse bucket, contaminate that. Then when you put your wash mitt in there and wash the paint, you could potentially be scratching the paint.
So always have a dedicated bucket for your wheels and tires. And it’s always a good idea to put some car wash soap in there. And the reason you want to do that is because after you apply and agitate the wheel cleaner, it’s nice to be able to dip this into a soapy water solution and come back and rinse everything off—the brake dust, the traffic film, and the wheel cleaner. So, just a little bit of soapy water helps to get that wheel completely clean and rinse-free, so there’s no residues left on there.
Wheel Types We’ll Cover
We’re going to clean four wheels in this video. Um, but this first set of wheels is the most common kind of wheel. So, it’s the factory wheel that came on your car, SUV, or truck. And these wheels tend to be what are called painted. So, they have a base coat, which is the color—usually a silver, a gray, sometimes black or other colors—then it has a clear coat over the top of it, just like your car’s finish has a clear coat.
Only the clear coat on your rims is a lot harder than the clear coat on the body panels. And this is why this is important to use quality brushes because if you were to scratch that clear coat, because the paint’s harder, it can be really difficult to try to polish by hand or machine, get the scratches out. And this is even more true for glossy wheels and matte or satin finish wheels because if you’ve got a matte or satin finish wheel, you pretty much can’t polish them at all.
So, you want to make sure you have quality brushes and keep them clean. And in this video, we’re going to cover how to take care of factory painted wheels. We’re going to cover how to take care of matte finish wheels, chrome wheels, and clear-coated aluminum. And it’s important to know the difference between clear-coated aluminum wheels and uncoated, polished or unpolished aluminum wheels so you use the right cleaner and don’t make any costly mistakes. So, let me get down on the ground and show you how to clean a wheel.
Best Practices: Shade and Cool Wheels
So, whenever you’re cleaning wheels and tires, here’s a couple real important best practices. First, always work in the shade. You don’t want your soap or your wheel cleaners or anything drying on the rim, potentially staining it. Second, the rim should be cool to the touch. You should be able to put your hand on the rim.
So, if you’re detailing your own car or, say, a customer car and they just brought it in, a lot of times the wheels are going to be hot. You want to wait till they cool down and that way your wheel cleaner won’t dry instantly when you spray it on there, possibly stain the finish.
Rinse First or Spray Cleaner First?
Now, the next thing you want to do is there’s kind of two approaches and two schools of thought. One is to rinse the wheel first. What this does is it removes any loose dirt. So then you don’t take your brush and scratch the dirt against the paint or the finish and put scratches in. But the other school of thought is to spray your wheel cleaner onto a dry rim because when you get this thing wet, I’m going to go ahead and show how to do this. I just want to remove as much of the loose dirt as I can.
The downside of cleaning the loose dirt off the rim first is then when you spray your wheel cleaner on there, what happens is the wheel cleaner breaks the surface tension on the rim and everything runs off into the ground. Um, but the safer approach is to blast them first either with a spray nozzle like this. And I’m using the jet setting. Okay, so spray it like that or to use a pressure washer. Pressure washer, of course, is going to blast off a lot more loose dirt than a garden sprayer.
Apply Wheel Cleaner Bottom-Up
Okay, so the next thing you want to do is you want to put your wheel cleaner on. Now, this is a very, very important tip. Most people, they just naturally will spray from the top down. The risk with that, and especially on a rim with a delicate finish, is you have concentrated wheel cleaner dripping down the rim as you’re spraying up here; there is a potential for that to stain it. So, a safer approach is to start from the bottom up and equally coat the whole rim with your wheel cleaner like this.
And I’m using a technique here that I’m actually going to share that I don’t see a lot of people do. And that is, if you get up really close, you put a lot of wheel cleaner into a small area. If you pull back a little ways and adjust your nozzle so you have a nice big fan spray, you can actually cover more of the wheel and use less product while doing the same work. So, I’ve got the face done. Now, I’m going to spray the barrels.
Wheels vs. Tires Order and Multi-Rinse Logic
And another thing I just want to talk about is a common question. There’s the lug nut barrels, a little bit into those and around the valve stem. A common question is, “Do I do wheels first or tires first?” And the correct answer is you do wheels first. And here’s why. You clean the wheel, then you rinse it, then you’re going to do the tire.
Now, we’re not going to show tire cleaning in this video because we got a separate video because I’m going to do a brain dump and show tons of techniques for getting tires clean. So, that’s a matching video to this one. But the reason you want to do wheels first and then tires is so after you clean this and rinse this, then you go to work on the tires. While you’re working on the tires, gravity will kick in and all the residues you’ve loosened are going to start dripping and pooling into lower areas.
Then when you rinse the tire, you’ll have a chance to re-rinse the wheel. And of course, as you wash the car, you’ll have another chance to rinse the wheel because I guarantee you this wheel cleaner and all this brake dust and traffic film that you remove, they will start to—you won’t be able to rinse it completely in the intricate areas—but they will start to drip down. And doing this after the tire cleaning gives you another chance just to rinse everything off just to keep them spotlessly clean.
Barrels First: Wheel Woolies and EZ Detail
So, the first thing I like to do is I like to do the barrels first. And the reason why is cuz that gives the wheel cleaner a chance to really penetrate on the front part, the part that we look at, so I can get it really clean. Now, here’s two different types of brushes for cleaning wheel barrels.
This is the Wheel Woolies, and it has this tufted wool attached to a strong nylon handle with a nice grip on it. And this is how you use this. You don’t—watch this—this is not how you clean wheels like this. Okay? I guess you could if they’re pretty clean, but what this handle’s for is so you can push on it and now you can really get in there and scrub. And if your wheels are extremely neglected, like years of built-up brake dust, um, this is a great brush to get in there and get them clean.
If they’re just lightly dirty, then the EZ Detail Brush with these—I think they’re 3 1/2 or 4-inch Nylex bristles—and this has a flexible wire shaft here, but it’s also covered with nylon so you don’t scratch in case you rub that against the rim. But what this is good for is also just to get in there and get the barrels really clean. And of course, you can also bend this. And now you can get the backside of the spokes. This brush also comes in handy for getting around the brake calipers.
Finishing the Face: Boar’s Hair vs. Flagged Nylon
Anyway, so those are barrel cleaning brushes for the most part. So, let me go ahead and knock this out real quick. Something I forgot to mention when I was spraying the wheel cleaner on and showing you how to spray from the bottom up was there’s a lot of different wheel cleaners on the market. And just kind of a shout out to the Dr. Beasley’s Intensive Brake Dust Remover. This is actually, if you look at it, it’s actually a thick gel and that gives it cling. So it dwells and it cleans. It clings to the surface where it can dwell there. And then the chemical cleaning agents can go to work loosening and softening both brake dust and traffic film.
Now when you have dirty rims, I want to kind of explain the types of dirt that you have on there that you’re trying to remove. So, I kind of mentioned this at the beginning of the video, but anytime you’re driving in the rain, the cars in front of you are splashing a dirty, oily water mixture onto your car and also onto your wheels and tires. And of course, as you’re driving, your own wheels and tires are picking up this water on the freeways and the roads and getting it all over your rims and tires.
And that is an oily, dirty mixture. And what happens is when it gets onto the rim, now when the brake dust comes off any time you hit your brakes, that oily film is going to lock the brake dust onto the rim. So when you’re using a wheel cleaner, you want something that actually will clean two things: oily traffic film and brake dust.
Lug Nut Barrels and Valve Stem Tip
Okay, so I’ve got the barrel done. Now, I’m going to go back to this. So, I’m going to get the spokes really good, and I’ll show you a technique I use to get the back of the spoke rinsed. Because if you think about it, it’s kind of hard to get a sprayer back to the back of the wheel and spray towards the back of the spoke. But I got a little technique that usually works good for me.
If you’re a professional, then one of the things I’ve kind of noticed is people nowadays, they actually expect to have the barrels and the backs of the spokes—you know, the whole thing—really cleaned. Even though in most cases, your customers don’t own a brush like this, so they’re never going to clean them. So, it’s kind of all for nothing anyway, but it’s just a good best practice.
Okay, so I’ve got the barrel, I’ve got the brake caliper, and I’ve got the back of the spokes. So, now I’m ready to do the wheel face. And let me just show you two different brushes for that. Okay, here’s the boar’s—this is boar’s hair—think of pigs. A pig—this pig hair—very soft. And these are plastic or nylon. And these tips are flagged. They’ll both do a good job. I would say this would be a softer and safer approach for delicate surfaces.
But this is how you just use this. You want to just come in and just start kind of massaging those bristles over the wheel face and the wheel spokes, the center cap, pretty much anything you can reach. And of course, this one works the same way. It has a little bit longer bristles, so it can actually get in and clean things a little deeper into the spokes and then behind the rim there.
Round Brush for Emblems and a Warning on Rubber Valve Stems
Okay. So, I’ve completely cleaned everything that you can see there. Now, let me show you where this thing comes in handy. So, we’ve got our lug nut barrels and our lug nuts. You can just kind of put this in there and just twist it back and forth. And that’ll usually be enough with your wheel cleaner to remove any brake dust or traffic film.
And then it’s also handy—a lot of times your rims will have an emblem here for the make and model of your car. So, you can come in here and brush that. And when we come up here to the valve stem, I told you I would share a technique. So, these work good for getting in there. Look, there’s a little barrel right there around the valve stem. So, it’s really good for getting in there.
But the tip I wanted to share with you kind of goes back to your wheel cleaning brush as you’re cleaning your rims. This is a rubber valve stem. See it flexing there? Over time, this rubber here will crack. And if you hit that too hard with your brush, you’ll break it off. And then instead of cleaning your car and detailing it, now you’re fixing a flat tire.
So, I teach classes here. We teach car detailing classes. And I’m always telling my students when we go over extreme prep wash to avoid knocking that and breaking it off. It’s happened to me. It could happen to you. So, just do not knock it.
Rinsing Technique (Including the Back of Spokes)
At this point, we’re ready to rinse. And this is where I like to come in and use the shower setting first. Just a nice gentle spray. Get the calipers. And then here’s my technique for getting the back of the spokes. So, as you can see from out here, I can’t get to the back of the spokes. So, what I do is I put my hand back here and then I spray my hand and the water kind of bounces off my hand and hits the back of the spoke. I can also, you know, obviously rub it a little bit.
And it’s always a good idea to wear protective equipment like nitrile gloves. The only thing I know is that anytime I wear nitrile gloves when I clean wheels, I seem to get just as much water and cleaner inside the glove as I would if I just have my hands like this and rinse them as I work around the car.
Anyway, that is how I would clean a rim using a variety of different brushes, a quality wheel cleaner and a good sprayer. And again, you could also use a pressure washer. Then at this point, I would go ahead and clean the tire. But we’re going to save that for the next video. And next thing we’re going to do is we’re going to move on to another type of wheel cuz I’m going to share more tips and techniques and tools for getting different types of wheels clean.
Matte Finish Wheels: Safer Steps
This is the second set of wheels we’re going to show how to clean. Now, this is an off-road Jeep. Sometimes you see a little bit of damage to the rims just because they go four-wheeling, but this has a matte finish. These are the Fuel brand wheels. Very manly looking, tough looking rim, but they need to be cleaned just like any other rim out there.
So, because this is a matte finish, this is definitely a wheel I would recommend blasting off any loose dirt that you can. You know, once you scratch a matte finish, just like on a matte body panel, there’s really no way to remove the scratch or the scuff. You’re kind of stuck with it.
So, if your goal is to keep your matte-looking wheels looking pristine all the time, then I would highly recommend starting off with a pressure washer or a garden sprayer, blast as much of the loose stuff off as you can. So, the next thing you want to do is you want to take your wheel cleaner and spray down the face, spray down the barrel.
Gel Wheel Cleaner and Barrel Work on Matte
And one of the things I just want to show is look how—this is what I talked about earlier—is by wetting the wheel first. When you spray the wheel cleaner on there, what happens is that initial spray breaks the surface tension. Then everything runs off and on the ground. But you have to weigh out the cost, benefits, and drawbacks. To me, getting the loose dirt off first before putting the wheel cleaner on is always a benefit because I know these cannot be polished.
But the cool thing about this wheel cleaner is it is a gel. You know, I worked for a company one time that offered a gel wheel cleaner and it wasn’t a gel. It was just a thin runny cleaner. There was no gel to the cleaner. Hit the lug nut barrels of course and around the valve stem. Then you want to let that—you, every time you put a wheel cleaner on, you want to let it kind of penetrate, dwell, penetrate, start to emulsify, break the traffic film and the brake dust, but you don’t ever want to let it dry on the finish.
So then, as the wheel face there is kind of getting the brake dust dissolved, first thing I want to do is I’m going to go back to my Wheel Woolies brush so I can get in here and really get these barrels clean. Now, here is the valve stem. And like the other wheel, this has a rubber valve stem. So, again, you want to be careful that you don’t break that thing off. When they’re brand new, they’re fairly flexible. But as they age, they dry rot and they’ll snap right off if you hit them too hard with the brush.
EZ Detail on Matte and Safe Face Brushing
Another thing you can do with this brush is you can actually kind of get right behind the spokes, the flat area on the barrel, just by modifying how you’re holding it. And then again, look it, you can push on this thing. That’s how—you don’t use it like this—get in there and scrub with it. Okay, this is also a good place for the EZ Detail Brush because I can bend this and get right in there behind those spokes.
Okay, then after getting the wheel barrels and the backs of the spokes, the next thing I want to do is go and tackle the front. Now, this is a good example of when you want a quality brush like this—this boar’s hair wheel brush—just because these bristles, after they get wet, they start to soften up and I don’t have to worry about damaging this delicate matte finish. And if you choose to go with matte wheels, just also factor in the fact that you got to be a lot more careful when you go to clean that matte finish just so you don’t scar it, scuff it, or scratch it.
A lot of times I like to go over twice. The reason why is just because you have a better chance of making sure these bristles get into all the nooks and crannies and get everything nice and clean. There’s nothing more disappointing than pulling your car into the garage after you’re done washing the car, the wheels and the tires, only to find you missed spots on the rim.
Small Accents and Final Rinse on Matte
Okay, so this would be another good example when you want this. They call this just a round detail brush. But we’ve got these accents up here, the Fuel accents. They look like bolts, but they’re not. They’re just a design. But you can get in there with the tips there, get those nice and clean. Get around that valve stem without breaking it off.
And then come up here. There’s an inset here where the wheel barrels are. Most brushes won’t get into there very well, but this 1-inch round detail brush will. And of course, then there’s the center cap right here. Boom. That’s how I’d clean that wheel. Then we’re back to our shower setting for the initial rinse. And then my little technique—spray the water against my hand so it hits the backs of the spokes.
And that way you get the backs all rinsed off, cleaned, you don’t got wheel cleaner dripping down everywhere. Then if you want to, you can always put on the jet setting or grab your pressure washer and then just really flush out those intricate areas. And last but not least, don’t forget the calipers on this. There, I didn’t see them at first cuz they’re so far back there, but it’s always a good idea to try to keep those clean. That way when you go to show off your monster Jeep, your brake calipers look good.
Okay, so that’s how I would tackle a matte finish wheel safely to get it clean. No acid was used, quality wheel cleaner, quality brushes, focus on the task at hand.
Clear-Coated Aluminum: Identify Before You Clean
So these are clear-coated aluminum rims. And in the old days, a lot of cars had slotted mags or some kind of kidney bean mags. And what would happen over time is the aluminum oxidizes and oxidizes fairly quickly exposed to the elements. Both oxygen in air, free radicals in the air attach themselves to the aluminum, pull off little bits and they turn dull and chalky looking.
So manufacturers started polishing them and then clear coating them. What the clear coat does is it keeps the aluminum out of the elements so they don’t oxidize. So, the people that buy the cars are happy because the wheels look nicer longer and they don’t got to get down and polish them.
But the question is, how can you tell a clear-coated aluminum rim from an uncoated, polished or unpolished aluminum rim? And the way you do that is you take some metal polish and a white applicator of some sort and you’re going to rub in a small area.
The Metal Polish Test for Coating
Now, it’s important to not—there’s dirt on here—I don’t want to rub the dirt against that finish. So, just to do this little test and make sure that nobody watching this video points out a mistake. I’ll go ahead and just lightly clean this section right here. Okay. So, we know there’s no dirt on there. Okay. So, that is dirt free—loose dirt free at least.
Here’s some metal polish. I’m going to pour just a little bit—just a little bit—onto there. Okay. So, there’s a little bit of polish. And then I’m going to come down here and I’m just going to lightly just kind of rub there on the spoke there. Now, if these were uncoated aluminum, when I turn this cloth over, you’ll see a blackness. Okay? That’s the oxidation coming off. If they’re clear coated, when I turn this over, you won’t see anything.
So, that’s how you can tell a clear-coated aluminum finish from an uncoated aluminum finish. If I take the same applicator, the same polish, and I polish an unpolished aluminum rim, and then turn it over, you’ll see how black it turns. And that is the visual indicator you’re working on uncoated aluminum rims, whether they’re polished or have a satin finish. But these are definitely clear coated.
Cleaning Clear-Coated Aluminum Safely
So, let me show you how to clean these wheels, okay? Because this has a clear coat, this finish, this clear paint, is actually harder than the paint that comes on the body, but it still will scratch. So, it’s a good idea to go ahead and knock off any loose stuff. I always like to put this on the jet setting. This is a—I think this is a 3/4 ton—cuz there’s eight lug nuts. Flush any dirt in around there.
Okay, now I’m ready to go ahead and apply the wheel cleaner. And same practice. You want to spray from the bottom up. And the whole purpose of that is just to avoid getting any streaks or stains from concentrated wheel cleaner running down dry surfaces. Also, just to point out, watch the technique. Don’t do this. You put a small amount of wheel cleaner to a small area. Pull back a little ways. Let that sprayer atomize the product. You’ll get more bang for your buck out of your wheel cleaner.
Barrels, Valve Stem Caution, and Face Work
So, the first thing I want to do is go back to my Wheel Woolies brush. Come back in here and get these barrels. And believe it or not, it looks like the owner takes care of this thing. Now, I’ve got the valve stem. So, I can’t really get this by without pushing on that. So, I’m not going to use this there. I’ll use the EZ Detail Brush for that.
So, barrels first. And the reason I like to do barrels first—again, I pointed this out before, but I’m going to repeat myself because that’s how I teach—is this wheel cleaner, see how it’s just dwelling? It’s a thick gel. It just sits there and it clings to the surface. So, it’s going to work removing both traffic film and road dust.
Okay, now I’m going to switch over to the EZ Detail Brush cuz now I can—these will flex so I can get by that valve stem without the fear of breaking it. And of course, I’ll go ahead and bend this a little bit, get behind the spokes, and then I’ll get the calipers with this also.
Wheels-Off? Liability Notes and Rinsing
Now, someone asked me the other day about taking the wheels off the car. We’re going to cover that topic. The thing about taking the wheels off the car—if it’s your own car, it’s all up to you. It’s your liability. Make sure you know the torque settings, the torque pattern for the wheels you’re taking off. If it’s for a customer, you better have the right insurance in case anything goes wrong.
So, I got the barrels. Now, I’m going to get the face of the wheel here, the spokes. Then, I’ll come back with the 1-inch round to get around the lug nuts. These also have this little design to them. It’s this little inset there. And to me, that’s an area that you’d want to pay some extra attention to. Dirt will get lodged in there and then it will actually corrode the paint.
And like I mentioned at the very beginning, traffic film is the oily spray other cars put on your car when you drive behind them in the rain or your own wheels and tires sling up off the road. And once that oily film starts to build on here, it’ll trap or lock the brake dust onto it. And the brake dust can actually cause pitting.
Final Flush on Clear-Coated Aluminum
And let’s grab the—here’s our round 1-inch round detail brush. These are just so handy. You know, if you’re OCD about keeping your wheels clean, you really need a good collection of brushes. A quality wheel cleaner and a pressure washer does always help. Get around the valve stem a little bit there. We are good to go. And then just blast it and get it clean. Okay. Then my little trick.
Then for these, I like to go to the jet, hit all those lug nuts. Anyway, that’s how I would tackle a clear-coated aluminum finish. I used a non-acid wheel cleaner, a variety of brushes. There’s no risk of staining or causing any problems. And the wheel now is surgically clean. And of course, then something I forgot to show, I think, on the other wheel cleaners is after you’re done, it’s always a good idea to blow dry them as you’re working around the car. Just avoid any water spots.
Glossy Black Wheels: Low-Scratch Maintenance Method
So, glossy black wheels are the latest trend in wheel design. The only thing I got against black wheels is when you’re looking at the car, the whole thing’s just a big old black round blobby area. I kind of like to see a chrome wheel or a painted wheel. So, I got definition or contrast between the rim and the tire. But that’s all personal preference.
The most important thing I want to talk to you about glossy black wheels is that most of the time you don’t really see the scratches cuz you don’t get down low and you don’t got a swirl finder light. But whether you’re cleaning your wheels or if you’re a professional and you’re detailing anybody else’s vehicle with glossy black wheels, when they drop the car off, take your swirl finder light and both of you go out there and look at the finish quality of the rim.
And I’ll bet you dollars to donuts you’re going to see scratches in there just because they have not been washed carefully. And the reason you want to do this with the owner so they can see the scratches there is so you document pre-existing damage so you don’t get the blame for it. So that’s why I always show the owner how bad their wheels look before I ever wash them.
Pre-Rinse With Cleaner to Reduce Marring
It’s also a good idea—I’ve run into this before—when there were stains and stuff on the barrels. If you see anything like that, you also want to let the owner know, you know, and usually that’s caused by using the wrong wheel cleaner, but that way you don’t get blamed for it.
So, when it comes to glossy black wheels, here’s a technique that we professionals use when we try to do a maintenance wash. So, maintenance wash is when the car is completely detailed, oftentimes ceramic coated. So, you’re trying to wash it very carefully so you don’t induce new scratches. And the technique for that is you foam the car, you let it dwell, then you rinse it. The idea being is that the cleaning agents in your car wash soap have loosened traffic film and loose dirt; you blast it off before you do the contact wash so you reduce the potential to put scratches in.
Here’s how you can apply that to your rims. Before you even start with scrubbing, take your wheel cleaner and again spray from the bottom up and equally saturate that wheel as you’re running up it so you don’t have concentrated wheel cleaner running down, potentially causing stains. Our wheel cleaner wouldn’t do that, but, you know, there’s a lot of wheel cleaners on the market. So, you want to be careful and just always incorporate that as a great first best practice.
Pressure Washer Advantage, Then the “Towel Method”
Okay. So, now I’m going to let that dwell. And then while it’s dwelling, instead of washing it, what I’m going to do is I’m going to come—just like people foam their car and then rinse it before they do the contact wash—I’m going to put the wheel cleaner on, let it dwell, and I’m going to come back and try to blast as much of the loose dirt off as I can so when I do the contact wash, and I’m going to share a special technique for that, I don’t put scratches in the rim.
Now, you can do that using the jet setting. Oops. Okay, that offers some pretty good power. But let me show you one of the benefits to a pressure washer. Pressure washer just has so much more pressure. Okay, so wheel cleaner’s been penetrating, breaking up, emulsifying, dissolving brake dust and road grime. Now it’s time to just go ahead and rinse that off. You can see the brown coming off the rim, not the tire. I’ll show you how to get the brown off that tire later on.
Okay, so that is a good best practice. If you’re the kind of person that has a vehicle with glossy black wheels, give that a try sometime. Spray the wheel cleaner on, let it dwell, then blast it off. That’ll remove a lot of the loose dirt. In fact, it’ll remove at least 50% of any loose dirt and grime on the rim so you don’t push it against the rim when you wash it.
Secret Technique: Four Microfiber Towels
So, the next thing I want to do is I want to share my secret technique. So, most of the time when you’re cleaning wheels, you’re going to be using tools like this—brushes, you know—and as soft as they may be, in my opinion, over time they will scratch a glossy black wheel. And because these are clear-coated black and the paint is very hard, they’re really hard to polish scratches out of and it takes real specialized micro tools with small buffing pads to get in there. It is very laborious, very time-consuming. What’s better is don’t scratch the rim in the first place.
So here’s my technique and you’ll be amazed at how simple it is. So instead of using brushes, what I do is I take four microfiber towels. I mix up some water. I have this little bucket just for glossy wheels. I also use this on semi-gloss and satin finish black wheels cuz they’re sensitive too. Not emotionally sensitive, but physically sensitive.
Okay, so I got some sudsy water there. Then I put four towels in there. One, two, three, four. And what I’m going to do is I’m going to use one towel per wheel. And then when I’m done with that, in most cases, these towels are getting thrown away because what happens is every time you hit the brakes, you got metallic particles building up on the face and the barrel of the rim. Those metallic particles come from the rotors and the pads. So, two things every time you hit the brakes.
Disposable Towels and Barrel Brushes Still Apply
And if you embed that into this towel, then later on you try to wipe paint with it, chances are you’re going to scratch it. So, you need to kind of factor in the cost of some disposable towels. Usually, the cheaper ones will work just as fine as anything else.
Okay. Can’t tell you how much I love these things. They call it a knee and back cushion. I call it a butt cushion. So now I’ve got my microfiber towels all separated to go. I’m going to go ahead and respray the wheel cleaner. Although these look almost flawlessly clean. Now I still use the brushes for the barrels. It’s just the face of the rim that I want to be careful of.
So we’ll go ahead and we’ll start out—back to the Wheel Woolies—and get these barrels clean. And these are real durable. I don’t know if I’ve ever worn one out. I had one come apart on me and the company replaced it. That’s probably something made on a Monday. What I like about these rims already though is since the back is also painted, they clean real easy.
Hand-Washing the Face With a Towel
Okay, so there’s the Wheel Woolies. I always like to do two-step approach. Come back with my EZ Detail Brush. Anything the Wheel Woolies didn’t get, this will usually agitate and get for a really clean wheel. Kind of important if it’s your car, you know, it’s just nice to keep all your equipment clean. If you’re doing this professionally, your customers seem to always expect this to be done, so you want to make sure it looks good when they pick up the car.
Okay. Then you can also use this to get behind the spokes. As I’m doing this one, I’m also getting the brake caliper. Okay. And I am doing this kind of fast just to kind of save time. Now, here’s where I use the towel. Okay, so grab one towel. And I purposely pulled some white towels out to show you this, even though usually it doesn’t really matter what color I use.
Um, but then I just carefully hand wash, kind of like if you were, you know, washing dishes with the cloth or anything. Anyway, I just think this is a safer approach than using a brush. And again, it’s not that the brushes are dangerous. But over time, I don’t know, whenever I look at glossy black wheels, I mean, they’re always scratched up, you know? So, where’s it coming from?
Small Brush Work on Gloss Black and Rinse
Anyway, so this is what I do. And then obviously this one is done. It’s going in my cart over there. Then I will grab my—come here—my round detail brush. Okay. And that’s just to get into these deep recessed lug nut barrels and matching black colored lug nuts. And here’s the valve stem. Now, this has a steel-mounted valve stem, so you don’t got to worry about breaking it off, but the round detail brush works good for getting into there. And then don’t forget the Jeep insignia.
Then at that point, it is time to rinse them. And since I got the pressure washer out, we’ll go ahead and go back to the pressure washer. This thing turns off after a few seconds. Anyway, that’s how I would take care of glossy black rims.
Chrome Wheels: Impervious but Keep Them Clean
So, this is a chrome wheel. This is also a very common wheel, especially with aftermarket wheels. One thing I want to tell you about chrome, and I’ve been doing this for a long time. Chrome is pretty much impervious to everything. So, as long as you keep the dirt, the traffic film and the brake dust off here, that chrome will last a long time.
Here’s what happens if you don’t clean your chrome wheels often. Once they get dirty and they got a stain of traffic film and brake dust on there, that film will tend to hold moisture on; the moisture can actually penetrate into the chrome. It’ll get to the underlying metal. It’ll cause the chrome to peel and flake off. If you would just keep them clean, that would never happen. It’s the dirt that holds the moisture in that causes chrome to peel.
Cleaning Chrome and Thoughts on Acid
So anyway, cleaning chrome wheels, because it’s impervious, is pretty basic, but just like I taught in the other wheels—remember we covered matte wheels, glossy black, clear-coated aluminum, and factory painted—you want to spray from the bottom up, even though it’d be really hard to stain these with this wheel cleaner. It’s just a good best practice, you know. So every time you go out to detail a car, you shouldn’t be like guessing, hm, how should I do it this time? You want to have best practices in place or what they call an SOP, standard operating procedure, whether you’re an enthusiast and especially if you’re a professional with employees.
Okay. And then I got the barrels. And then this is a six lug. So I’m just going to go ahead and put a little extra in here. And I can tell already that there’s already pitting taking place in here because most people simply just don’t clean their wheels very well.
Okay. So then you let that penetrate. And then the first thing I like to do while this outside is going to work, I like to grab my Wheel Woolies. And then I got some soapy water in here. So, it’s already wet and clean and ready to go. And then again, this is what’s nice about this. You get in here and you can push on here to get rid of years and years of built-up, baked-on neglect, you know, the traffic film and the brake dust together. And a good wheel cleaner actually will remove both. It’ll release the bond of the brake dust to the rim, but it’ll also break up oily traffic film. Sometimes people call it road film.
Chrome Face, Lug Barrels, and Porosity Note
Okay, so we got the barrel done. This is the EZ Detail Brush. And what’s nice about this is you can get in behind those spokes. Kind of only really matters if you’re OCD about your wheels because no one ever sees the backside of the spokes. But I get it. Everybody likes everything nice and clean.
Okay. Then we’ll move to the face of the wheel. For this, since chrome’s fairly impervious, this is the Dr. Beasley’s wheel brush. I like it. It’s got these long bristles. Works really good. Earlier, we were cleaning—it was a Jeep with glossy black wheels—and I mentioned I’m not a fan of black wheels, whether they’re semi-gloss, glossy, or matte. And that’s because the whole wheel area just becomes this big black blob. But as you can see with the chrome and black, you’ve got contrast, you got definition. So to me, that’s just a more appealing look.
Then we’ll take our little 1-inch round brush. And this is where it really excels, is you can just get into those barrels and get that dirt out of there, which—the dirt again is what’s going to cause chrome to fail, to lift, to peel—because it holds the moisture in. And believe it or not, the chrome has a porosity to it. So the water over time can seep in and penetrate in. It gets to the underlying metal and it causes rust and that’s what causes the chrome to peel, to lift off. And then once that happens, there’s nothing you can do to fix it.
Acid on Chrome: If You Must
Okay, then we’ll give it a good rinse. Chrome wheels are my favorite to clean. You know, they’re pretty much impervious. This is where you’re usually fairly safe to use acid, an acid wheel cleaner. But let me talk about acid real quick because there’s a lot of misinformation out there about acid. Besides having to wear protective gloves, eye protection, maybe even breathing protection cuz it’s hydrofluoric acid—you don’t want to breathe that into you or get it on your skin.
But even if it’s safe for chrome, this does not have fancy painted brake calipers, but a lot of cars might. And you got to be careful with the acid on those. You stain those and then you really got a mess on your hands. But the other thing about acid is, if you decide to use an acid wheel cleaner, I’ve worked for a couple of huge manufacturers that make what are called a retail line. And here’s what I would recommend. Seek out an established brand that makes a dedicated chrome wire wheel cleaner.
And the reason why is cuz if they’ve offered it to the masses, you know, to the public, to consumers, they’ve dumbed that down to make it incredibly safe. So even the lowest common denominator among us cannot make a mistake with it. But that’s the kind of acid I would choose. I would choose one from the big names that make a dedicated chrome cleaner because it’s going to be a diluted version of acid. It’s going to be a safe form of hydrofluoric acid. So, it’s going to be a lot safer for you.
But anyway, that’s then how I would do that. And of course, you’d want to come back and dry that off so you don’t have any water spots. So, we’re going to go ahead and we’re going to go inside now and I’m going to show you how to protect your wheels to make future cleaning faster and easier. And it’s real simple to do. So, it’s just a little bit on the tedious side, but I’ll share that with you.
Protecting Wheels With a Ceramic Coating
At the beginning of this video, I shared that I was going to show you how to protect your rims after you’ve got them clean to make washing faster, safer, and easier moving into the future, and that’s to use a ceramic coating on the rim itself. Now, there are some other options on the market. There are sealants and waxes, kind of like we used on the car paint in the old days. But to be honest, the wheels get so hot, most sealants and waxes simply aren’t going to hold up.
Coatings—most professional-grade coatings like this Nano Resin 2.0 that I’m using here—they’re good up to 1,000°. So, they’re not going to wear off just cuz the wheel gets hot. So, that’s just something to keep in mind when you’re looking at options. Plus, because it’s a ceramic coating, it becomes a semi-permanent part of the rim. It’s not going to wear off as fast as a wax or a sealant.
Which Wheels to Coat (and Matte-Specific Note)
So when it comes to putting a coating onto the rim, and in this video, we’ve covered glossy black rims, and of course, I shared the techniques of using a microfiber towel to wash them instead of a brush. We covered chrome wheels, we covered clear-coated aluminum wheels, we covered matte finish wheels, and we covered factory painted wheels. And all of those, you could put a ceramic coating on them. For the matte wheels, however, I would suggest using a matte-specific ceramic coating just so you don’t alter how it looks.
Now, when it comes to actually putting the coating on, as you can see, this is very tedious. So, one of the things you want to have, just like when putting a coating on the car paint, you want to have a swirl finder light and you want to be able to inspect for high spots because if you don’t get a high spot off there—and a high spot is basically just some coating that dried that you didn’t wipe off—well, in most cases, the only way to get a coating off after it’s dried is to polish it either by hand or machine.
So what’s more important is don’t leave any high spots. You don’t got to come back and do that. And because this wheel is kind of intricate, it is tedious. It’s intricate, it’s hard, difficult to put the coating on and get it off perfectly.
So, a couple tips. First of all, I just wanted to point out, um, this is a Rupes long neck micro tool in rotary mode with a 3-in extension and a 1-in pad. And even with this, it would still be difficult to go in and pull the scratches out. So that’s why I was telling you to use the microfiber towel instead of a brush to clean glossy finish wheels, because it can be done. It’s just very, very tedious. Plus, you got to buy the tool.
Work One Section at a Time
Okay. So, uh, when it comes to putting a coating on a rim, probably the most important tip I could share with you is just focus on one section of the rim at a time. So, I’m going to look at just this set of spokes because they’re kind of tied together. And I’m just going to apply the coating and remove it to here.
The problem with applying the coating to the entire wheel or half the wheel is you’re going to find out the wipe-off is tedious and that coating could be drying, even a high spot, before you get to it. So instead, divide the wheel up into its natural sections and apply and remove to one section at a time.
Applicator Options and Techniques
So when it comes to applying a coating, there’s a lot of different options. This is probably the most common and the original: you would get these microfiber suede cloths. You’d wrap them around a foam block. One side of the foam block has soft foam, so it can flex if you’re, say, doing a hood that has a curve.
Um, these could be used, but they’re kind of awkward to get in here. So, I don’t really care to use these. Another option would be just to take the microfiber suede cloth that comes with it, fold it in half, and use this. This actually works pretty good.
A couple other options, this is a coating saver. Um, this would work pretty good, especially since it’s very flexible, unlike the block which is rigid. You could get in here and coat this. Uh, and then another option would be just a simple yellow microfiber applicator pad. The only thing I don’t like about this is two things. One, it’s going to soak up a lot of your expensive coating. So, I don’t want to waste coating. The other thing is because the coating’s clear, it can be hard to tell where you’re putting it. I don’t want to put coating on a new place every time. It’s just going to fill the pad up with coating.
So, if you do want to use these, here’s a technique: take and put a black mark on one side and then you’ll know to put the coating on the opposite side of the black mark. But now you can visually see where you’re putting the coat cuz you marked it. But again, I don’t really like to use those so much.
So, let me show you the easy way and that’s just to take this cloth right here, put some coating on. We’ll just tackle one set of spokes here. Okay. And then I’m going to blast this with water and I will show you what I mean about making the wheel faster and easier to clean in the future.
So just massage this on. And this is real important. Do not get coating any place you cannot wipe. Okay? And so that begs the question, what about the lug nut barrels? Well, you can get coating in there, but I would recommend you could actually pull lug nuts off without taking the wheel and tire off. Just do one or two at a time, then put them back on and pull the other ones off. I’m not going to do that for this Jeep. I’m just going to go ahead and massage this coating in, and then I’ll wipe it off and work around the wheel and tire.
Wipe-Off, Inspection, and What Coatings Do
Okay, so I’ve put the coating on. I’m going to come back with a clean microfiber towel. And then this is where I like to use my light. The other day, I helped a friend to do his first ceramic coating on his truck, Ford F-150. And I told him to be careful for high spots. And he says, “I’ve heard that term. What does it mean?” And I says, “Well, a high spot is where you get coating on, but you don’t get it off and then it dries.” And it’s kind of like super glue. He says, “Well, I’ll be real careful.”
So then he coated his entire truck. Looked good. And then I went over it with the swirl finder light and inspected it and showed him about five places he had high spots. And then he said, “How do you remove those?” And I go, “You got to polish it and then prep it, put the coating back on.”
So he learned right away it’s important to have a good light. Put the coating on, make sure you wipe 100% of it off, and then just continue to work around the different spokes.
This is our Nano Resin 2.0. Uh, there are a lot of good quality coatings on the market. This is kind of our entry-level coating, but it does offer really good water beading, which a lot of people like.
What to Expect From a Coated Rim
And let me just kind of talk about the effects of coating a rim. So, uh, some people are under the misconception that if they coat the rim, ceramic coat the rim, it will never get dirty. That is simply not true. It’s still going to get really dirty. The brake dust and the traffic film are going to land on the rim and build up there.
The difference between a coated rim and an uncoated rim is that when you go to clean it, you can pretty much just blast it with a pressure washer or the jet stream on a sprayer and pretty much 90% of everything’s just going to blast right off. That’s why putting a coating on not only makes the wheel look better and keeps it looking better longer, but it makes it faster and easier and even safer to clean because everything wants to just peel off that ceramic-coated surface.
Okay, let me inspect.
Wheel-Off Detailing Considerations
Now, someone asked me the other day, going to message Mike, “What about removing the wheels and tires and then you could get the back of the barrel?” Of course, that’s an option. This video is not going to cover that. We’ll cover that in a future video.
But something you got to keep in mind: if you’re going to do wheel-off detailing, uh, you want to make sure you got a good lug nut wrench. Uh, you want to make sure you find out the recommended torque pattern to tighten the lug nuts back down and the torque settings. So every wheel, tire, and car is going to be something different. So you want to make sure if you’re going to take the wheels off that you get them put back on the correct way with the right amount of torque. And if you do this professionally, you better have insurance in case anything goes wrong. Um, you’re covered.
Methodical, Section-by-Section Approach
So, this is kind of like what I teach when we do wet extreme prep wash here in our detailing classes. Um, I cover wet wash engine detailing. So, there’s two types of engine detailing. There’s what’s called wet wash. That’s where you use a traditional degreaser and a variety of brushes. You scrub the entire engine compartment and the engine down with the degreasers. And then you blast everything off with water and then of course dry it and dress it.
Um, when I teach that, I also teach to divide the engine up into smaller sections. So, you tackle one section at a time. If you spray a degreaser over the entire engine, then, say, start working on the passenger side, by the time you get to the driver’s side, that degreaser can be drying, possibly staining. Uh, so just tackle one section at a time, like I’m doing the same thing here. Just be methodical and careful because, again, once that coating dries, the only way to get it off is to polish. And as you can see, polishing a rim like this would be very time-consuming and tedious. So have a good light, good towels, focus on the task at hand.
After Coating: Maintenance and Safety
So as you can see, this is tedious. Where did I finish off at? But it is well worth it in my opinion. And the good news is after you ceramic coat your rims, for the most part, most of the dirt, the traffic film, the brake dust will blast off. But if you do need to use a soap, a normal car wash soap will be usually more than enough to get everything off there. You don’t have to break out the heavy-duty cleaners. And of course, you wouldn’t have to use acid. And that always keeps you safe. You safe and the wheel and tire and the brake caliper safe.
I’ve read a lot of horror stories in all these Facebook groups about people that took the advice of someone else to use a wheel acid, but the person using it isn’t a pro and they don’t know what they’re doing, and then they come back and say, “Hey, how do I get rid of these stains?” So, do your research, know what you’re getting into.
Lessons From Experience
Um, I’ve been detailing cars, I hate to say this, but since the 1980s, easily, even back into the 70s when I was in high school, and I’ve never really used acid wheel cleaners, just because I know how to use a quality wheel cleaner without the acid to get the same job done and not put myself at risk.
I have a very good friend in this industry. I’m not going to say his name, but I don’t think he’d care if I did, but he’s a very respected detailer. He’s famous for kind of buffing out those aluminum World War II birds. And one time, I was running the Meguiar’s forum and someone was asking about cleaning wheels and he chimed in and he says he works on a lot of really high-end cars, Ferrari, Lamborghini, Maserati. Um, and he says his normal approach, and he does a lot of maintenance washes for cars he’s already detailed, but he says his normal approach is he will try to clean a wheel just using a good brush and his car wash soap solution in a separate bucket two or three times before he will break out a dedicated wheel cleaner, just because he’s had to buy rims before because of bad things have happened.
Okay, I think I got that all done. I’m going to hit the center cap just a little bit more here. Uh, just cuz the word Jeep is on there and we want it to look all pretty and bead water for the owner of this Jeep really good.
Demonstration: Water Behavior on Coated Rims
Okay, so that’s how you coat it. You can see it’s tedious. So, uh, you know, set a Saturday aside, clean your wheels and tires first. Try to get into the shade. Put the coating on. When you’re done, move to the next rim.
So, let me get some water. I’ll spray it on here so you can see the water beading. And I think your brain will be able to wrap around the idea that when it’s beading water, it’s releasing the dirt. It’ll make the wheel faster and easier to clean moving forward. So, let me go get that.
So, let me show you why a ceramic-coated rim will stay cleaner longer. It’ll also clean faster and easier, and it’ll also dry quicker and easier. So, here’s just some spray water. We coated this with our Nano Resin 2.0, and you’re supposed to wait at least 24 hours before you get it wet, but we’re doing this in real time. So, there’s the water. Imagine you just washed it and rinsed it. Okay.
And then watch what happens with the ceramic coating. It’s just that fast, you know. Um, and because it’s ceramic coating, it’s going to last longer. It’s also going to make the rims look better, too. So, there’s all kinds of upsides to ceramic coating your rims. The downside is just, as I showed, it’s kind of tedious, but it’s well worth it in my opinion.
Recap and Next Steps
Okay, so just to kind of recap, you know, we covered in this video—this is a very in-depth, like what I like to call a brain dump. We covered clear-coated aluminum, we covered factory painted, we covered chrome, we covered glossy rims and matte rims. The only rims we really didn’t touch on is polished aluminum and component wheels. So a component wheel would be like part of the wheel is painted, part is anodized, maybe part is polished. And for those, you definitely don’t want to use an acid wheel cleaner on there.
We talked about the benefits of choosing a wheel cleaner from an established brand that’s acid-free, but also still does a great job of removing two things: brake dust and oily traffic film. And then the importance of also having a variety of different brushes to get into the barrel behind the spokes, the wheel face, the center caps, and the lug nut barrel. So, a lot of information in there.
And then, of course, we ended up showing how to apply a ceramic coating. And then what I showed was just keeping it simple, just taking a small patch of microsuede cloth, and more importantly, break your wheel up into small sections. And of course, have a swirl finder light. You don’t have to come back and remove high spots off of a rim.
So, thank you for watching this video. If you liked it, if you found it helped you, you know, help us back and share. Hit the share button. Share with a friend, someone you think might benefit knowing how to properly clean a glossy black wheel with the microfiber towels instead of a brush or put a coating or whatever we covered in there. Hit the like button, subscribe, and remember, this is one part of a two-part video series. This was all about getting the wheels clean. The other matching video will be down in the description. The link will be in the description, and that’s how to clean the tires. And then, of course, I’m going to show my favorite way to put the dressing on.
Thank you for watching, and I hope to see you at one of my future detailing classes. You can always get more information up at the Dr. Beasley’s website.
Questions? Comments?
Email Us