


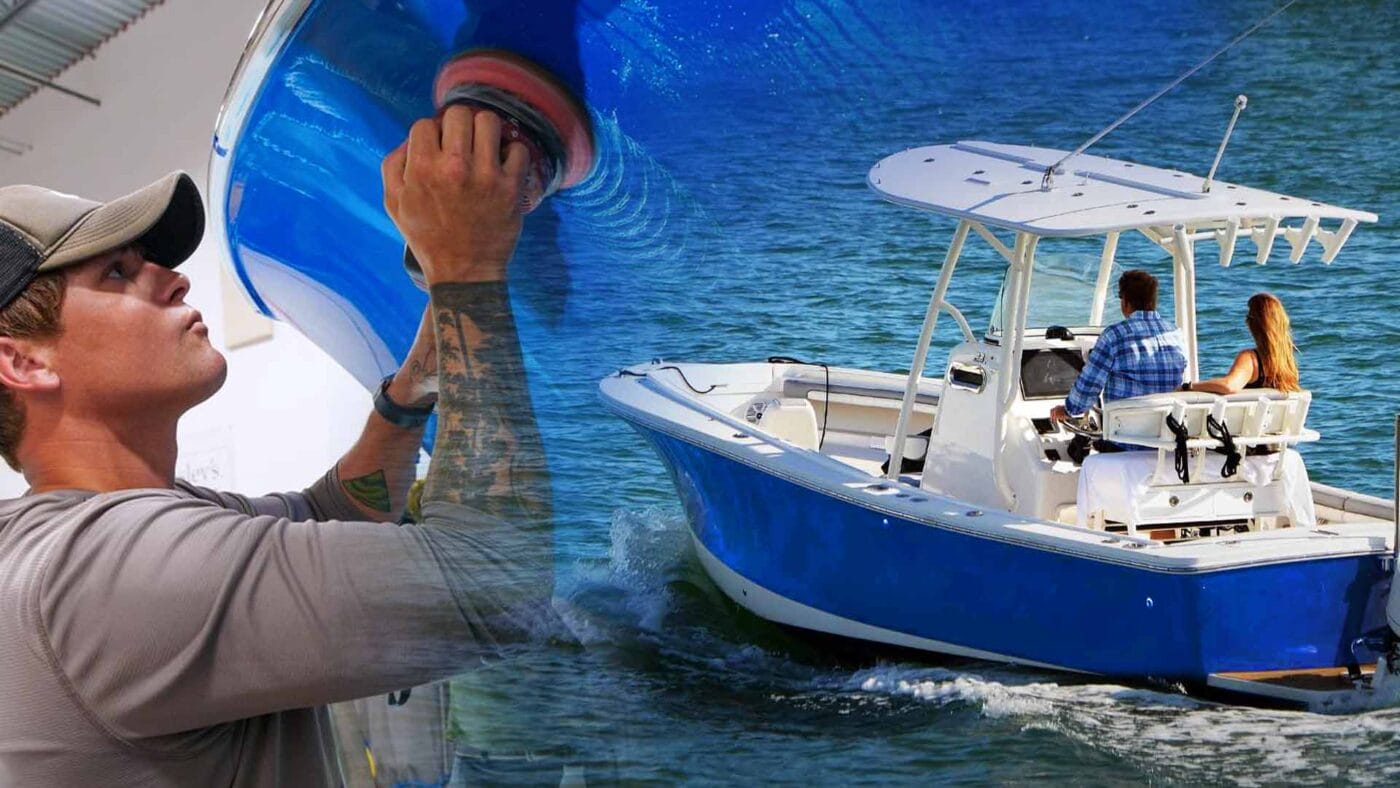
There’s nothing like spending the day on your boat enjoying some relaxing time out on the water.
But enjoying your boat is only half of what it means to own one. The other half? Maintaining your boat.
Beyond repairs and general upkeep, one of the hardest parts of owning any boat with a gelcoat hull is preventing (and removing) oxidation to keep the gelcoat shining and ready for the next day out on the water.
But what is oxidation, and why does it make your boat’s paint look chalky? How do you prevent oxidation? More importantly, how do you remove oxidation once it’s already there? That’s what I’ll be covering in this article.
What is Gelcoat Oxidation?
If you’ve ever owned a boat or at least been around older boats, you know exactly what oxidation looks like. But what is it specifically?
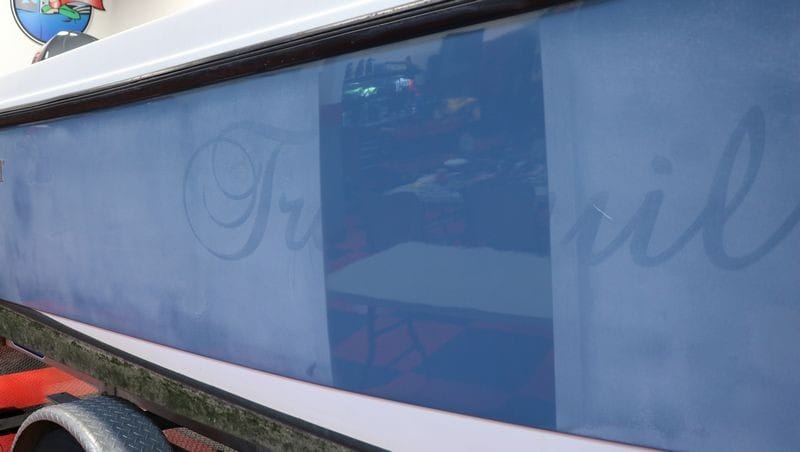
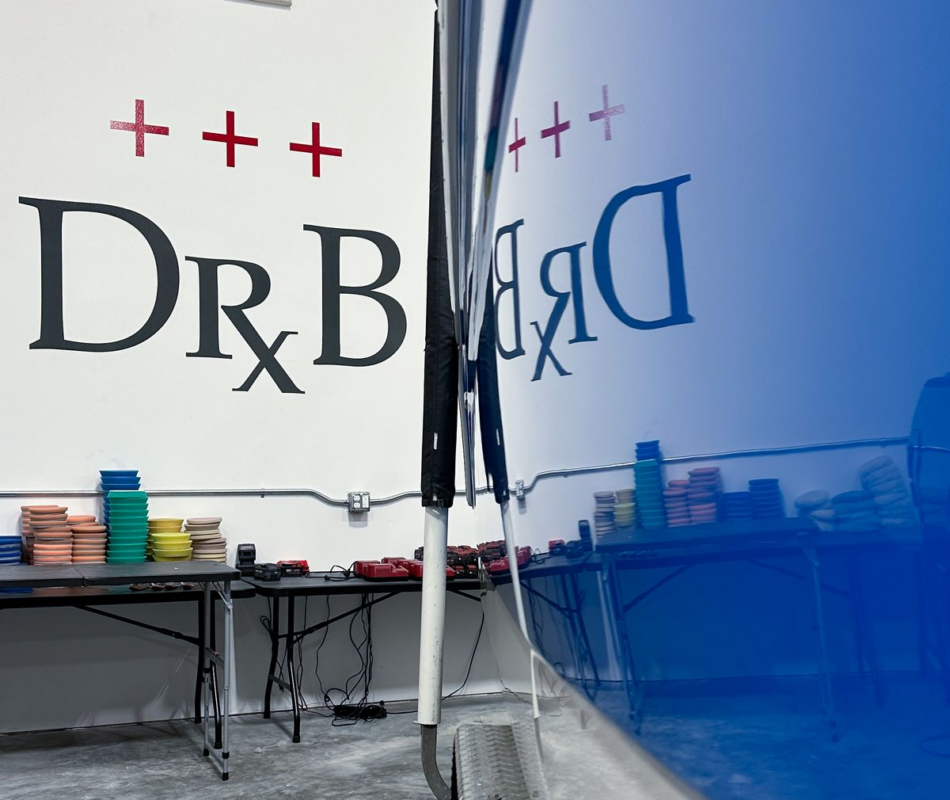
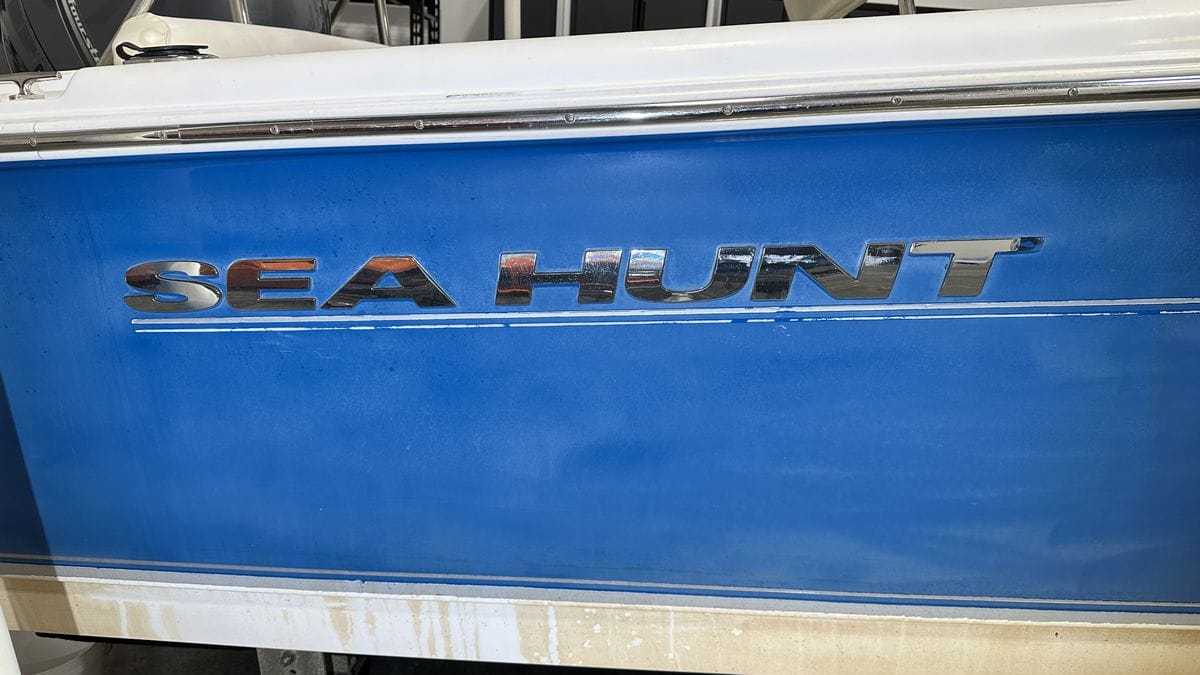
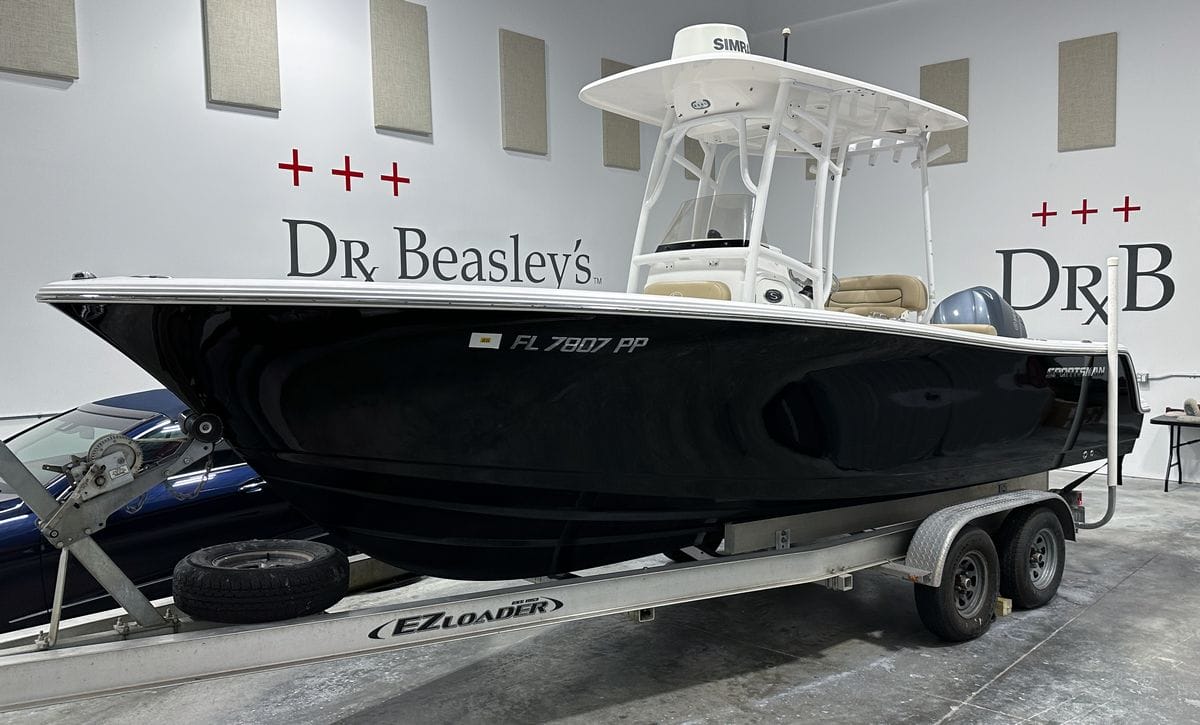
In the below pictures, you can see the before and after on a 24’ Edgewater Center Console. See how the gelcoat is chalky white with oxidation in comparison to the pristine test spot in the middle that was sanded, compounded, polished and ceramic coated.
In scientific terms, oxidation occurs when the molecules that make up the gelcoat react with the UV rays in sunlight, causing them to lose electrons and become free radicals. A free radical is an organic molecule that is unstable due to an uneven number of electrons.
These free radicals then react with atmospheric oxygen and moisture. This breaks down the gelcoat polymers, which results in fading/chalking and rough surface texture.
Can Oxidation on Boats be Prevented?
Once you know that water and oxygen are all it takes for your boat’s gelcoat to oxidize you realize there is no way to avoid oxidation. No matter where you store your boat, whether it’s a garage, shop, boat barn or in the water, it will be exposed to oxygen and water from the air, humidity and rain.
That being said, oxidation can be slowed down with protection.
What’s the Best Protection Against Oxidation for Gelcoat?
We’re lucky nowadays when it comes to protecting our boats’ gelcoat surfaces because of how many options we have. Here are the main options:
- 1-Step Boat Cleaner/Wax or AIO: The fastest option for protecting a boat is an AIO product. AIO stands for “all-in-one” which means they are able to remove oxidation, restore color and project the gelcoat in a single step. Cleaner/waxes are the most popular form of AIO, but I like to recommend more durable ceramic AIOs like NSP Z1 for longer lasting protection.
- Pure (Non-Cleaning) Boat Wax: Boat waxes are a form of organic protection against oxidation. Because they don’t clean the gelcoat or remove oxidation, you need to polish the gelcoat first before applying boat wax. Being an organic form of protection, they break down relatively quickly compared to ceramic coatings, anywhere from a few weeks to a couple months.
- Marine Ceramic Coating: Marine ceramic coatings are the most durable form of protection against oxidation for boats. They are an inorganic form of protection and therefore do not break down as easily as wax. Most marine ceramic coatings will last for a season or more, sometimes years. Because marine ceramic coatings are not “AIO” products, you will need to remove the oxidation via machine polishing prior to protection.
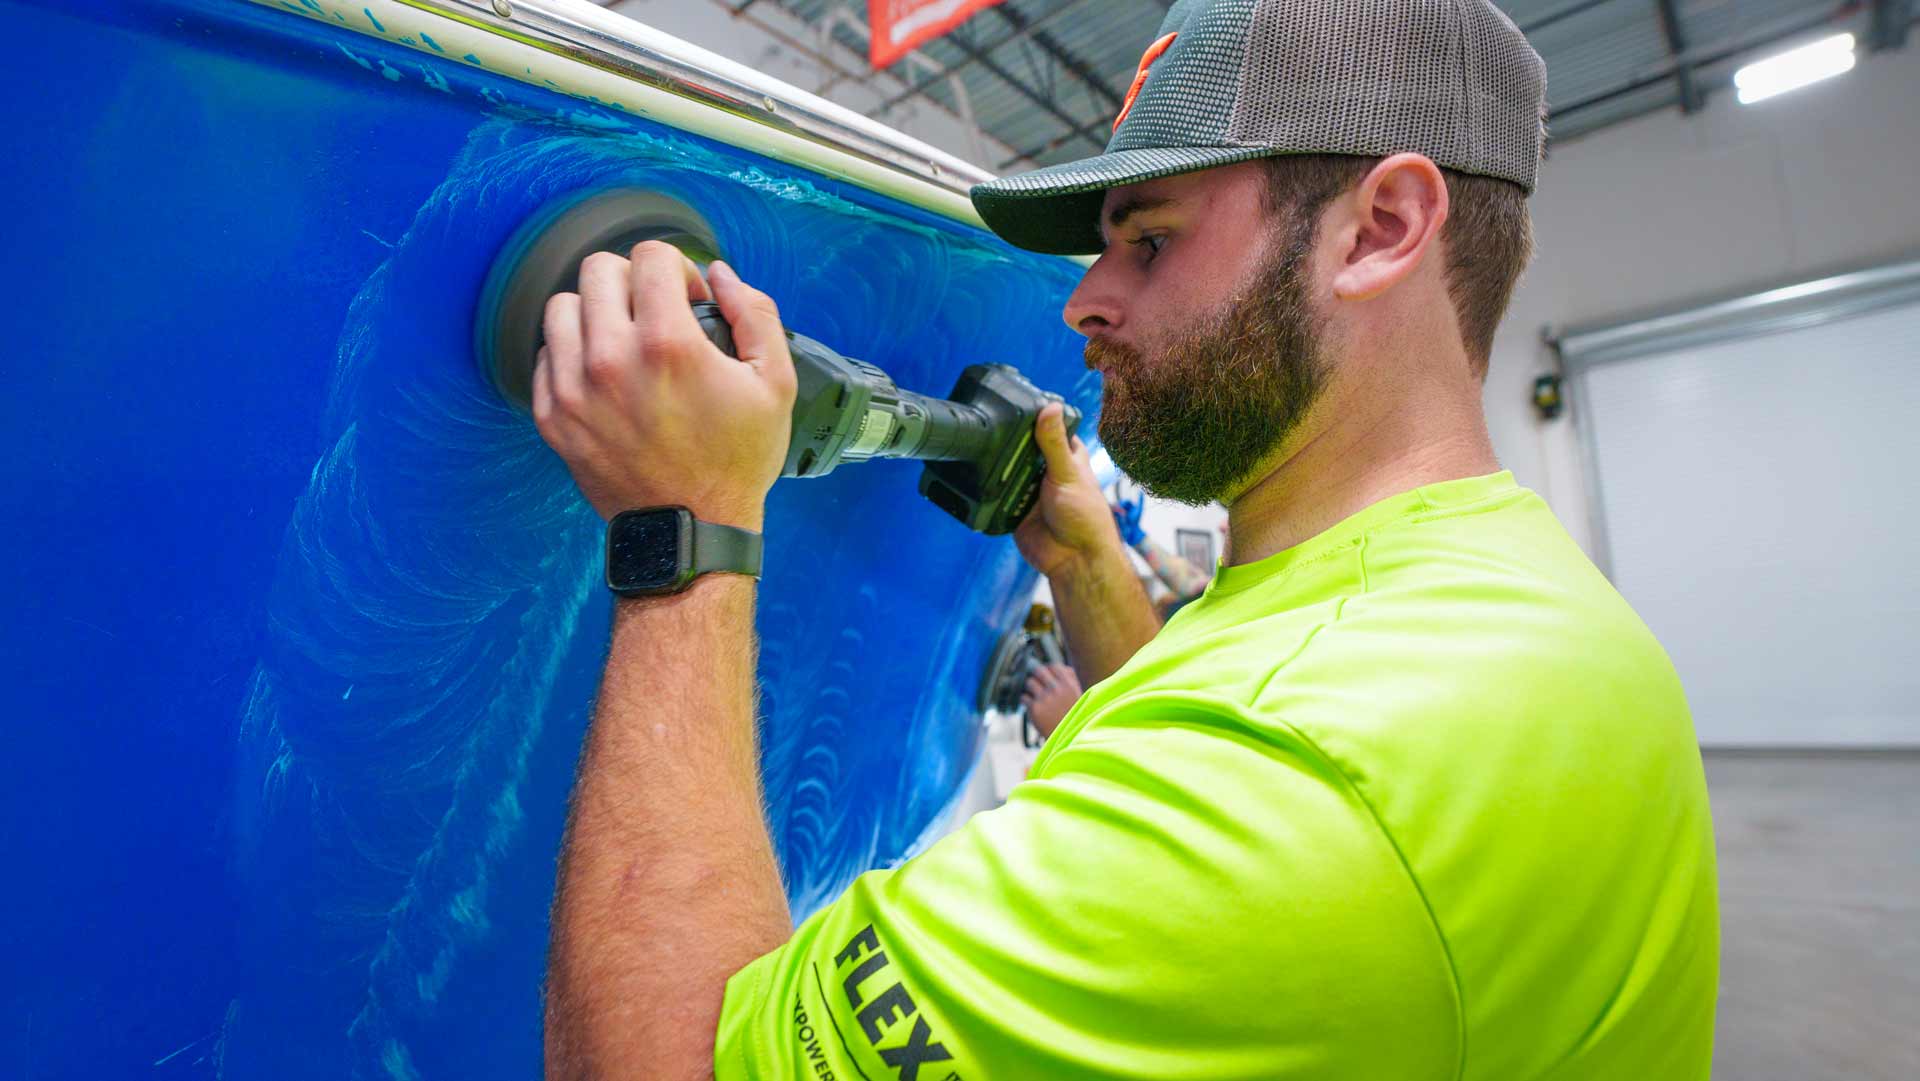
What is the Best Polisher for Removing Oxidation from Boats?
We’ve come a long way since the early days of boat detailing. There are now lots of different polishers, pads, products and even microfiber towels available for purchase.
When it comes to polishing machines, there are three primary types of tools:
- Free-Spinning Random Orbital
- Gear-Driven Orbital
- Rotary
All three of these tool types work well for removing oxidation on boat hulls. That being said, there are certain situations and contexts where one tool will work better than the others.
Free-Spinning Random Orbital Polishers: Best for Light Oxidation
Lighter oxidation does not require a powerful tool like a rotary polisher. Less severe oxidation can be removed with just about any type or brand of dual action orbital polisher, even entry-level tools like the Porter-Cable 7424XP or the Harbor Freight BAUER 8MM short throw DA.
The only real downside to using a free-spinning random orbital for oxidation removal is pad stalling. Simply put, if you don’t hold the pad completely flat to the surface, it’s easy to lose pad rotation and pad oscillation. The rotation relies entirely on momentum and is not forced, so if the pad presses too hard against something, it stops spinning.
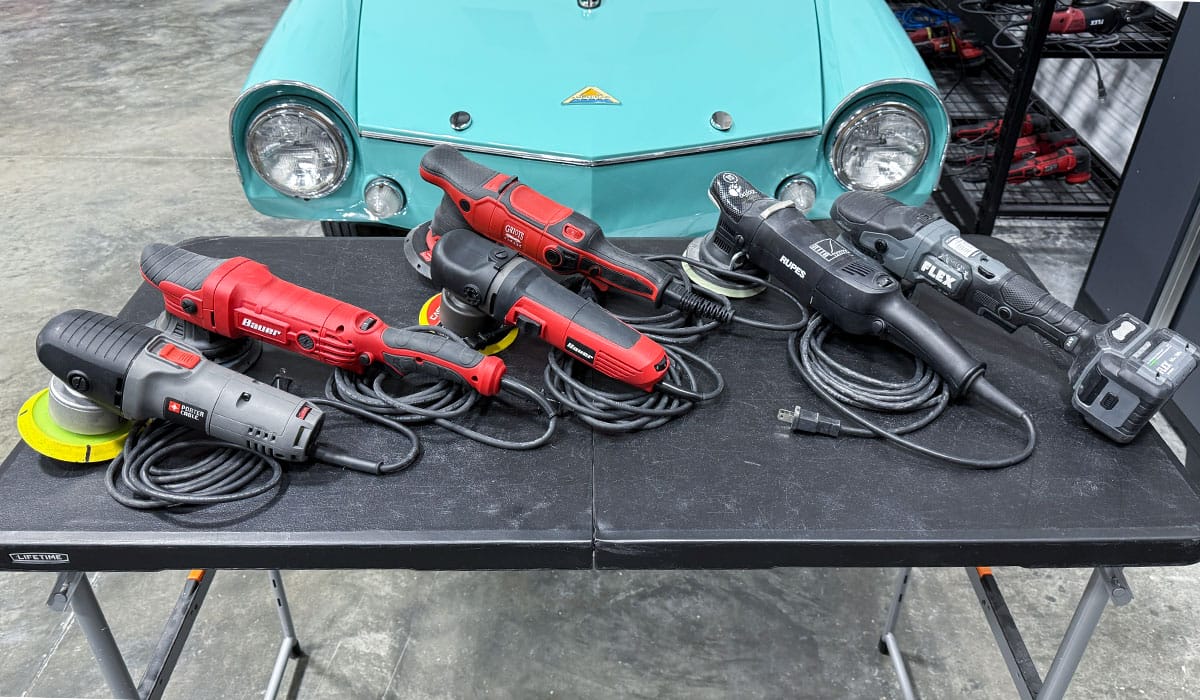
Here are a few different random orbital, free-spinning polishers I like to recommend. (Pictured left to right)
- Porter Cable 7424XP 8mm Free Spinning Random Orbital Polisher.
- Harber Freight Bauer 20mm Free Spinning Random Orbital Polisher.
- Harbor Freight Bauer 6” DA 8mm Free Spinning Random Orbital Polisher.
- Griot’s Garage BOSS G9 – 9mm Free Spinning Random Orbital Polisher.
- RUPES BigFoot 15mm Free Spinning Random Orbital Polisher.
- FLEX Cordless 15mm Free Spinning Random Orbital Polisher.
Gear-Driven Orbital Polishers: Best for Moderate to Heavy Oxidation
Gear-driven orbital polishers are like free-spinning tools in that they have a dual rotation and oscillation action. The difference is that gear-driven polishers are forced to rotate by a gear, so they don’t stall even when pushing down on a curved surface. That makes them faster at removing oxidation.
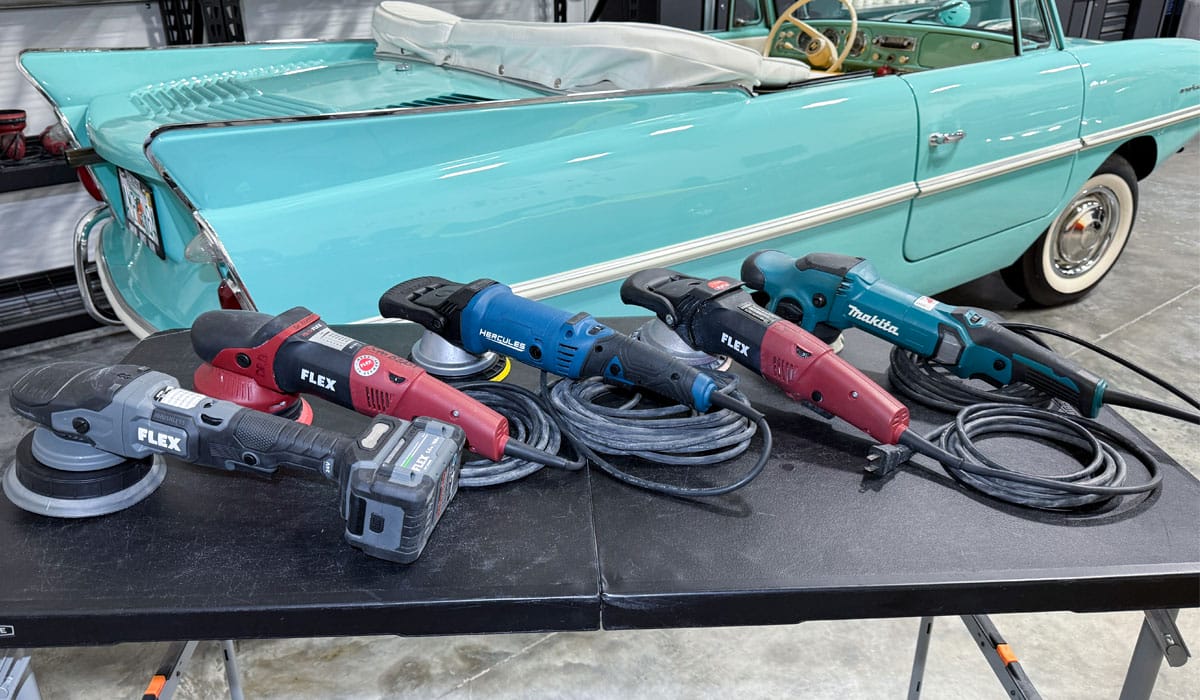
Here are a few of my favorite gear-driven polishers, pictured here from left to right:
- FLEX Cordless 8mm Gear-Driven Orbital.
- FLEX Supa BEAST 8mm Gear-Driven Orbital.
- Harbor Freight Hercules 8mm Forced Rotation Gear-Driven Orbital.
- FLEX XC 3401 VRG aka the BEAST 8mm Gear-Driven Orbital.
- Makita PO5000C 5mm Gear-Driven Orbital.
Rotary Polishers: Best for Severe Oxidation
Rotary polishers used to be heavy, loud and hard to control. Nowadays they’re lighter, quieter and even cordless for ease of maneuverability.
Rotary polishers have a single rotating action powered by a gear, which means like gear-driven polishers they don’t stall. They’re incredibly powerful and aggressive for removing defects, so they’re great for more neglected boats with severe oxidation.
The only downside to a rotary polisher is they leave a scratch pattern behind called a hologram, inflicted by the single rotating direction of the pad. These holograms don’t just look bad, they actually OPEN UP the gelcoat and cause oxidation to develop faster. That’s why you should always follow up any rotary work with some type of DA orbital polisher to produce a smooth, flat surface ready for protection.
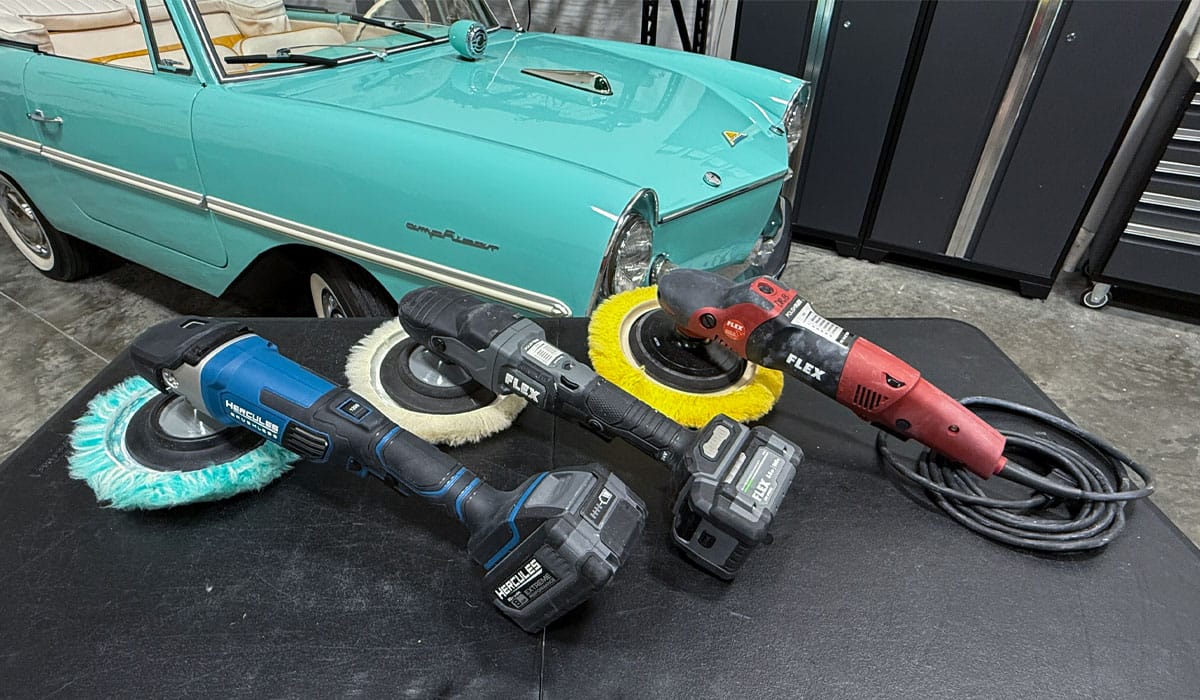
Here are my favorite rotary polishers pictured from left to right.
- Harbor Freight Hercules Cordless Rotary Polisher.
- FLEX Cordless Rotary Polisher.
- Corded FLEX Rotary Polisher.
What are the Best Pads for Removing Oxidation from Boats?
Back in the day there was only one type of buffing pad for boats, the twisted wool cutting pad. While a wool pad cuts through gelcoat quickly, their FIBERS leave behind the holograms I discussed in the previous section on rotary polishers.
Today, in the modern boat detailing world, there are two general categories of buffing pad available:
- Foam Pads
- Wool Pads
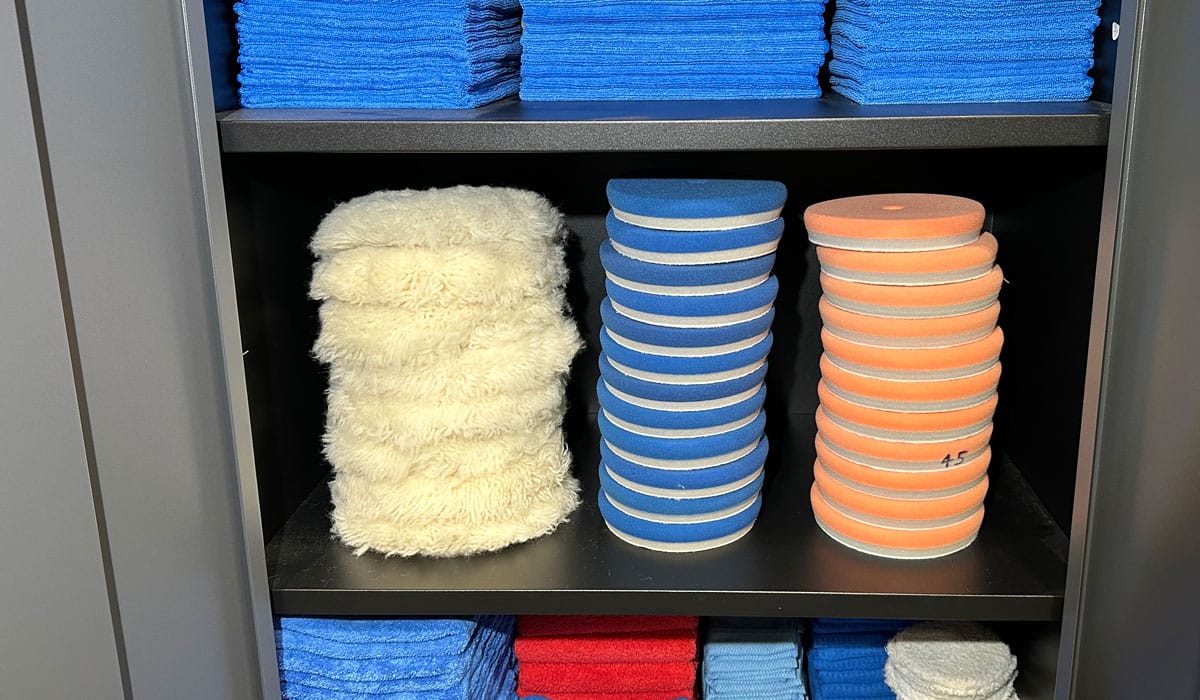
If you only need to remove light oxidation a foam polishing pad is usually all you need to restore a boat’s gelcoat. That being said, unless you’re working on a small boat, you’ll need A LOT of pads, potentially six or more.
Dealing with Saturation in Foam Pads
Why do you need so many buffing pads when working with foam? It’s because the polish or compound seeps into the pad’s foam holes whenever it’s pressed against the gelcoat. This saturates the pad, making it wet and heavy. The added weight slows the pad rotation down, resulting in SLOW or NO oxidation removal.
The only way to work FAST with a foam pad is to replace it frequently with a CLEAN, DRY pad. This will help prevent pad stalling so you can get around the entire vessel quickly.
Avoid Soft Foam Finishing/Polishing Pads
One thing I’ve learned over my many years detailing boats is that FACTORY gelcoats don’t finish out well with soft foam polishing/finishing pads.
For whatever reason more coarse foam CUTTING pads deliver a better shine on gelcoat, finishing out into a brilliant gloss. That being said, always do a test spot to be sure you’re getting the results you want before buffing out the entire boat.
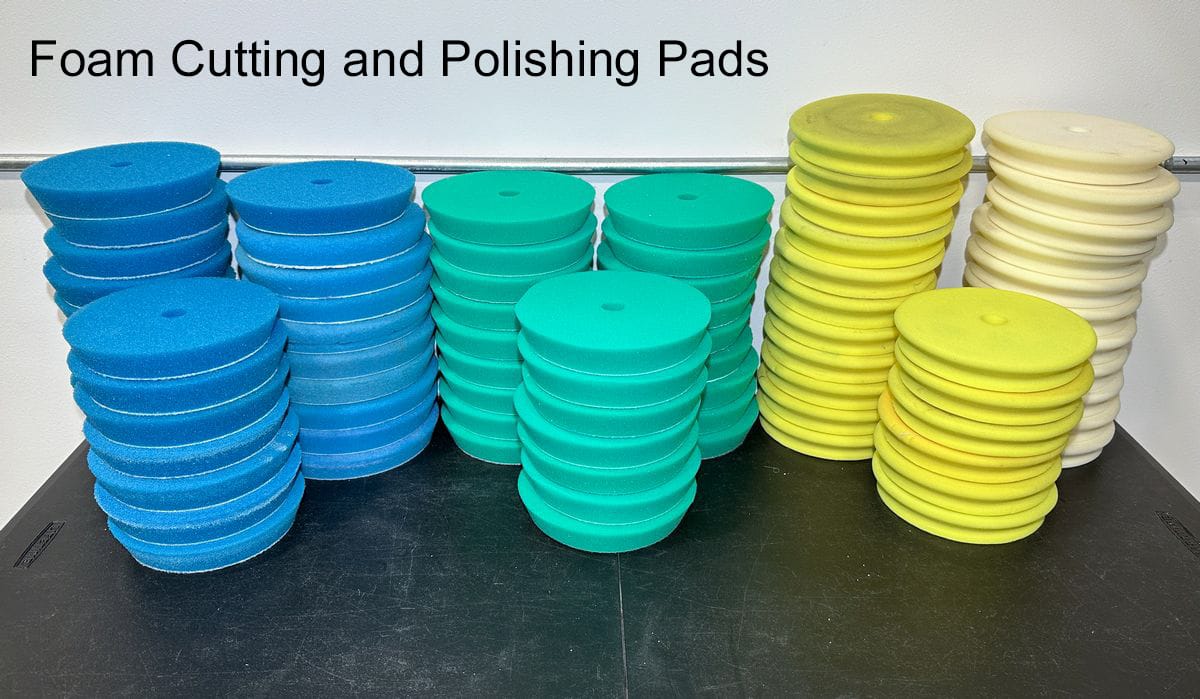
My Favorite Foam Pads for Boats? Buff and Shine EdgeGuard Pads
When I use a foam pad to buff out a boat, I like to use Buff and Shine’s EdgeGuard pads, which I’ve displayed here from left to right in order of aggression, from most to least aggressive.
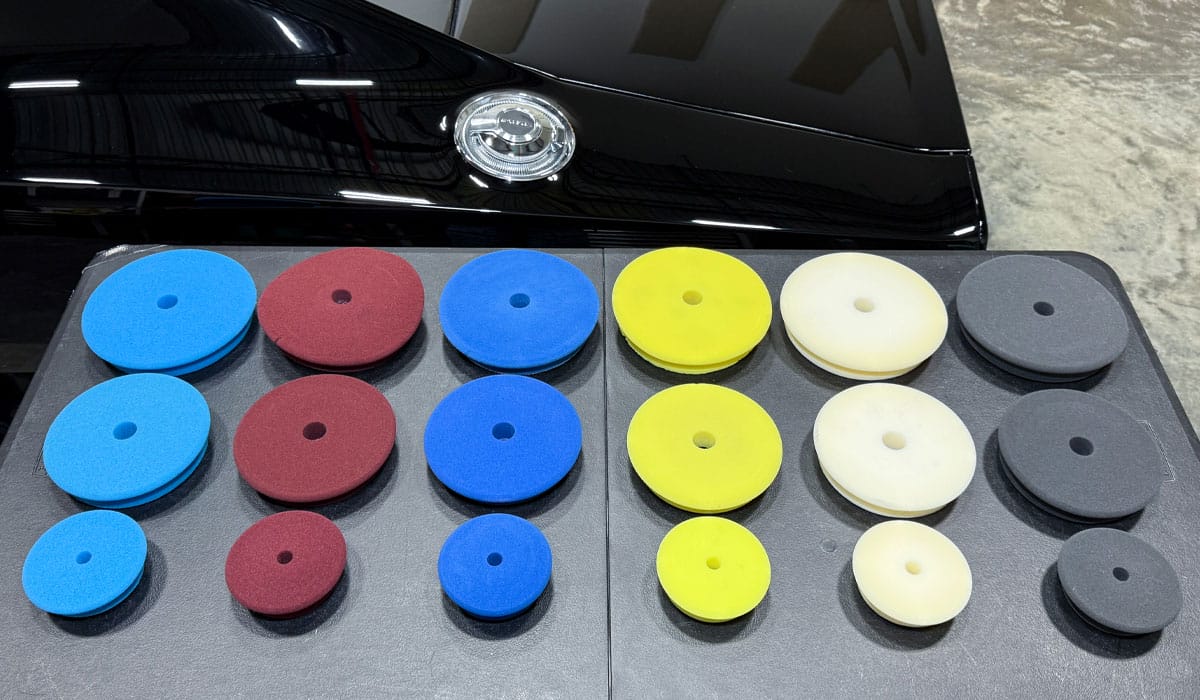
- Blue – Heavy Cutting (Best for Boats)
- Maroon – Medium Cutting (Best for Boats)
- Blueberry – Heavy Polishing.
- Yellow – Polishing.
- White – Polishing/Finishing.
- Black – Finishing.
Wool Buffing Pads: Best for Heavy Oxidation
A wool and/or fiber buffing pad paired with a rotary polisher is the go-to combination for removing oxidation on boats. Remember, any type of fiber pad will always be more aggressive than any type of foam pad due to the millions of individual fibers that cut the surface as they spin.
All the pads below are primarily for use with rotary polishers and range in texture from very aggressive to less aggressive.
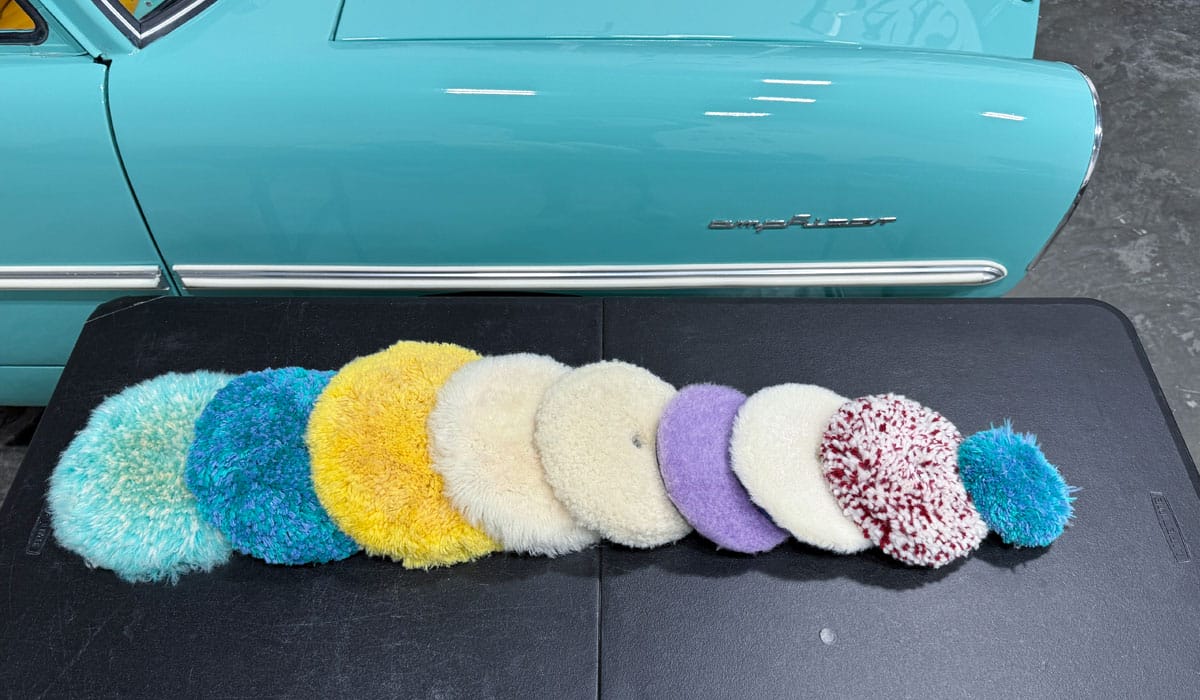
Don’t Forget to Remove the Holograms or Micro-Marring
Fiber pads are popular for buffing out boats because the fibers themselves are a form of abrasive. That means the fibers are working with the abrasives in your compound, polish or AIO to provide two levels of cutting action to remove oxidation from the gelcoat.
The downside of these fibers? They leave behind their own scratch pattern. If you’re using a rotary polisher, they’ll show up as the holograms I mentioned earlier. If you’re using a gear-driven orbital, they’ll present as micro-marring.
Either way, if you don’t re-polish using a pad with UNIFORM SURFACE TEXTURE, like a foam pad, you’ll be left with these tiny scratches that OPEN UP the gelcoat, resulting in accelerated oxidation.
So, remember, if you’re buffing out a boat with some type of fiber pad as your first step, always do at least ONE secondary polishing step with a foam buffing pad.
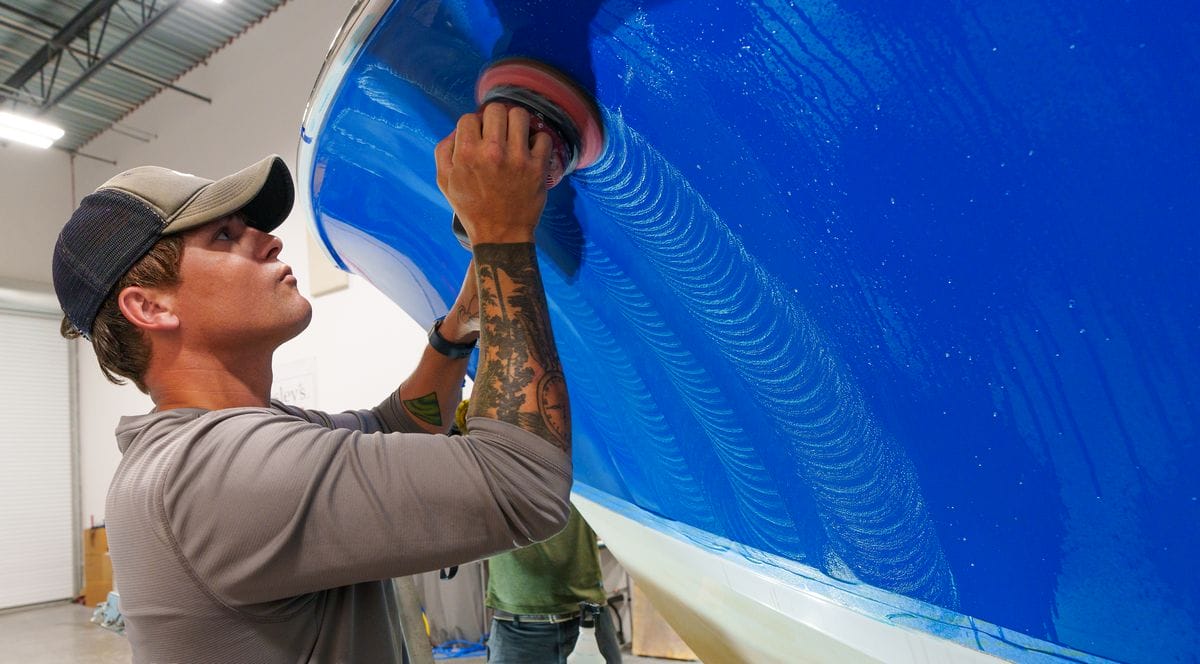
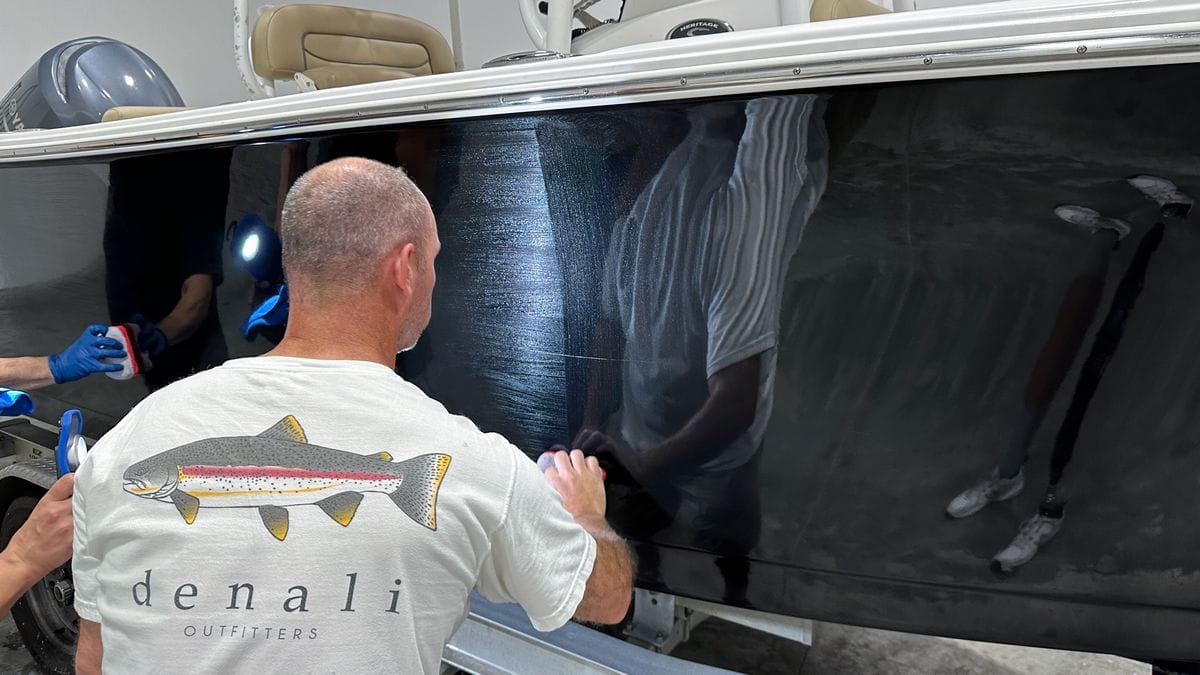
How to Remove Oxidation from Boats
It’s impossible to write a one-size-fits-all guide to removing oxidation from a boat. There’s a HUGE difference between the level of oxidation on a 1-2-year-old boat and a neglected boat that’s spent half a decade in the water.
There are too many differences between the approaches you’d take to remove the different levels of oxidation. For example, removing light oxidation requires a non-aggressive approach, while heavy oxidation might require an extremely aggressive sanding process.
For that reason, I’ve split this guide into multiple sections that address different levels of oxidation.
Different Levels of Boat Oxidation: 4 Categories
When I literally wrote the book on boat detailing for McKee’s Marine 31, I created a simple chart that classifies the different levels of boat oxidation into four different categories:
| Category #1 | Category #2 | Category #3 | Category #4 |
|---|---|---|---|
| New or Like-New: No visual signs of oxidation, stains, water spots, swirls or scratches. | Good: Very light oxidation and/or staining. No serious water spots, swirls or scratches. | Mild Neglect: Medium oxidation and staining. Light water spots, shallow swirls and scratches. | Severely Oxidized: Heavy or DEEP oxidation, deep swirls, scratches, stains and water spots. |
How to Use this Guide
This how-to article for removing boat oxidation assumes the reader already has a strong understanding of the tools, pads, products and basic procedures necessary to tackle all four categories of boat condition.
This guide also assumes you own some type of machine polisher, as doing this work by hand is incredibly time-consuming and requires an extreme amount of effort to produce good results. This guide also assumes you have already washed, decontaminated and dried the vessel beforehand.
If I were to go into intricate detail on every last aspect regarding the removal of boat oxidation, I’d have to write a book, and hey, been there done that. That being said, if you do have any questions after reading this article I’ll include my personal cell and email at the bottom.
Category #1: New or Like-New Condition, Zero to Little Oxidation
Boats with zero to little oxidation are fairly easy to restore and require much less time to get good results.
These types of boats can either be new boats or older boats that are maintained or recently restored, so keep in mind that this has less to do with the age of the boat and more to do with how it was taken care of post-purchase.
Supplies Needed
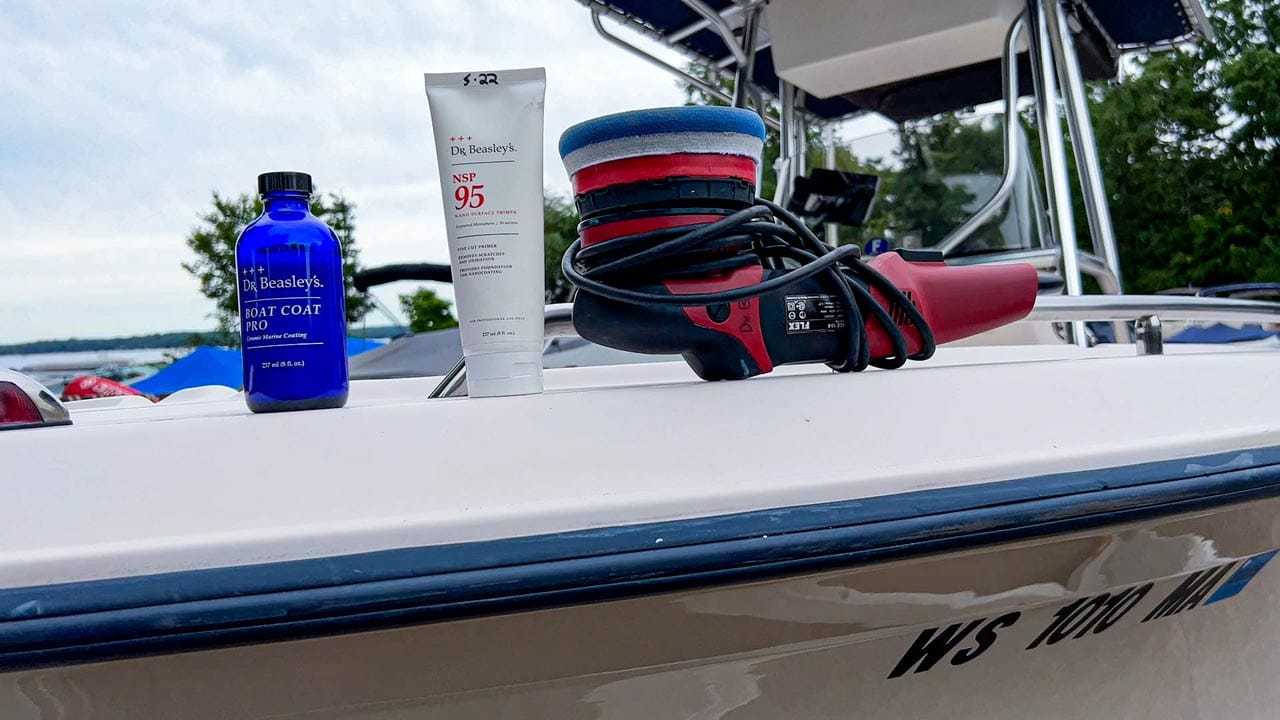
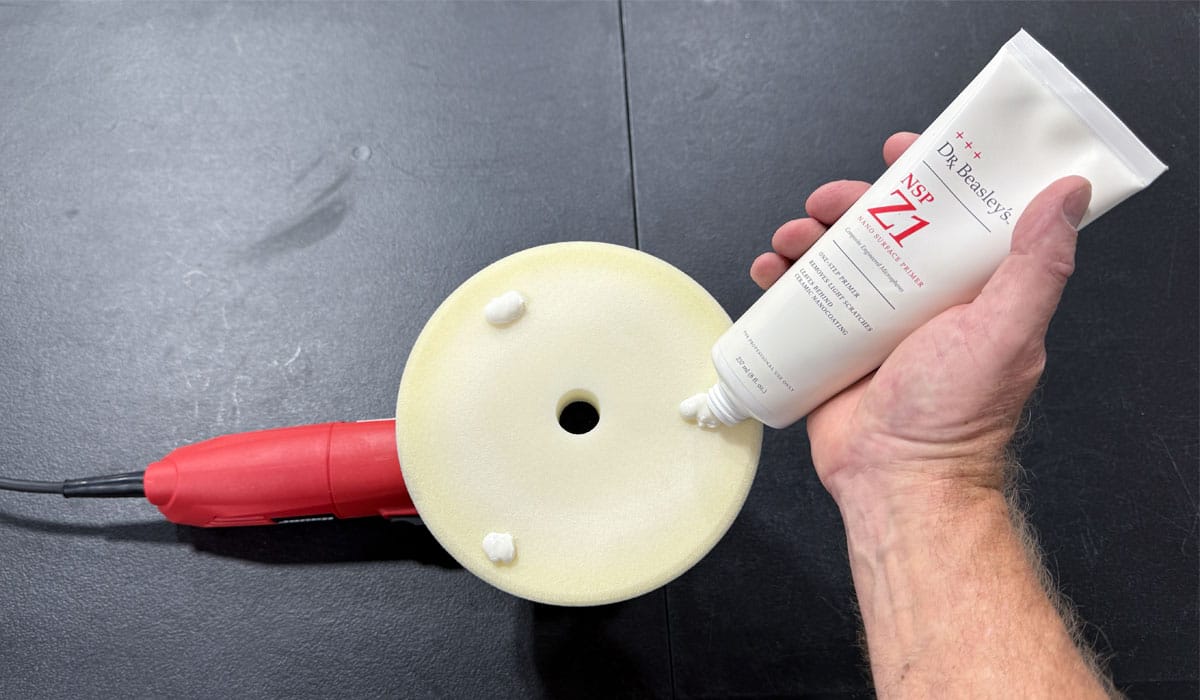
- One-step boat cleaner wax like Dr. Beasley’s NSP Z1
- Boat wax, sealant, or marine ceramic coating
- Orbital polisher
- Foam buffing pads
- Plenty of microfiber towels
Step 1: Apply Product
Apply the one-step boat cleaner wax/polish to the face of your foam buffing pad. Press the face of the pad against the oxidized gelcoat surface but do not turn the polisher on.
Step 2: Polish First Gelcoat Section
Once the face of the pad is against the gelcoat surface, turn the polisher on at a slow to medium speed. Spread product out over a section of the gelcoat. Increase speed to the highest setting and make several overlapping passes in a crosshatch pattern. After a few minutes, turn polisher off and inspect the results with a powerful light source.
Step 3: Repeat Across Rest of Boat
If your results look good, move to a new section of gelcoat and repeat steps 1 and 2 until you have polished the entire boat.
PRO TIP: Switch to a new foam pad after each panel to avoid over-saturating the pad with product.
Step 4: Protect Gelcoat
After polishing the gelcoat to a high gloss, seal the finish with a high quality boat wax, sealant or marine ceramic coating.
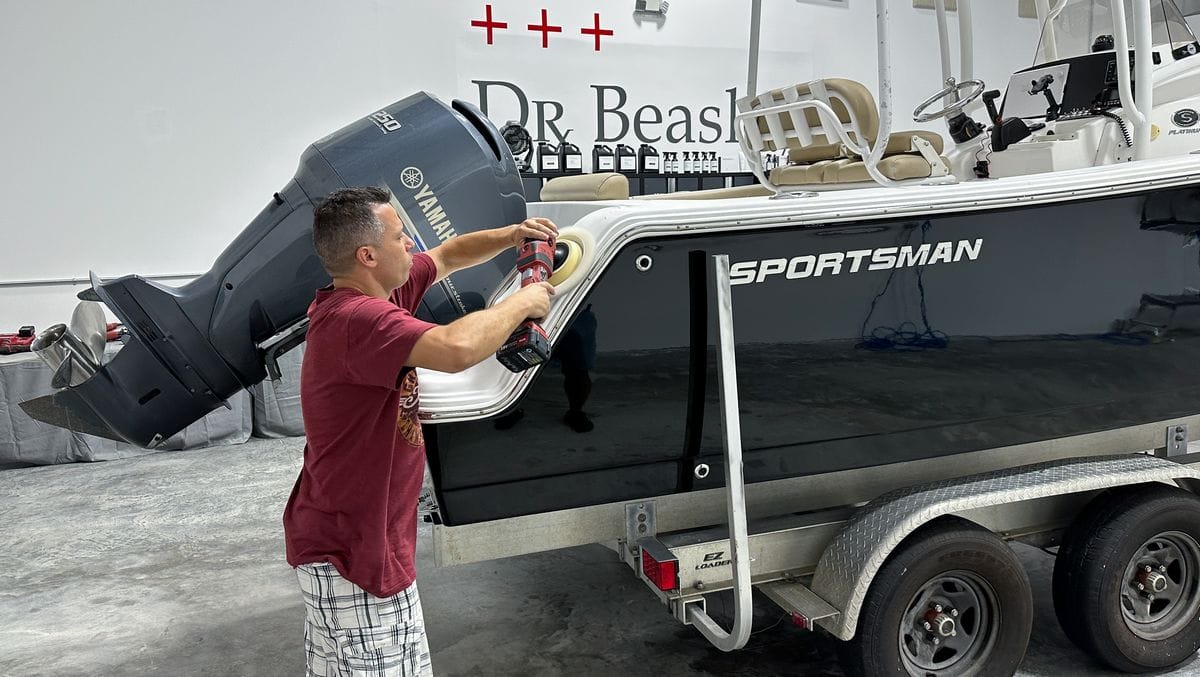
Category #2: Good Condition, Light Oxidation
Want some free advice? If your boat falls in this category, I strongly recommend you remove that oxidation NOW while it’s still shallow and not deep. Topical oxidation, stains, water spots, etc are always much faster and easier to remove compared to heavy oxidation on neglected boats in horrible condition.
I also recommend trying a foam cutting pad first before using a fiber pad. Fiber pads of any type will leave their own scratches in the gelcoat that require an additional step to remove, so do a test spot first to determine if a fiber pad is even necessary.
Supplies Needed
- One-step boat cleaner wax like Dr. Beasley’s NSP Z1
- Medium polish like Dr. Beasley’s NSP 150
- Medium Cut or Heavy Cut Compound like Dr. Beasley’s NSP CoreCut.
- Boat wax, sealant, or marine ceramic coating like Boat Coat Pro.
- Orbital polisher.
- Foam cutting pads.
- Plenty of microfiber towels.
Step 1: Doing a Test Spot
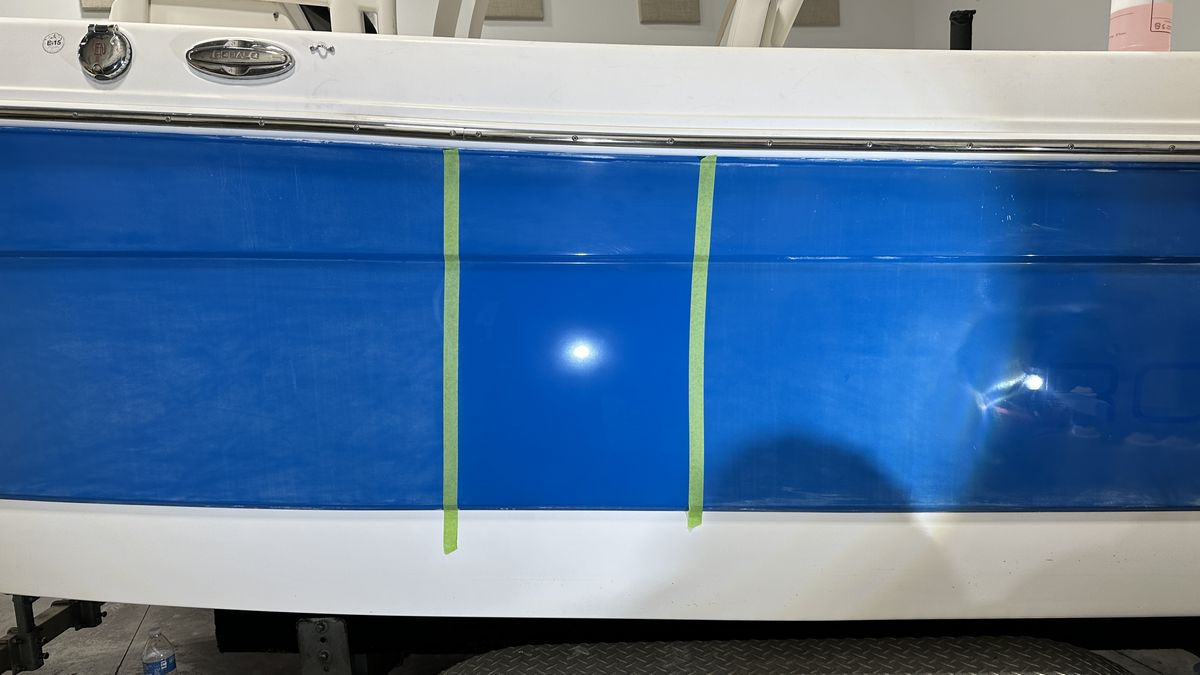
In the supplies section above I listed three categories of polish. To know which product to use, you need to test them on a small section of gelcoat that shows the most severe oxidation.
Start with a one-step product like Dr. Beasley’s NSP Z1 and a foam cutting pad. Anytime you can remove the oxidation with a one-step product you’ll save a lot of time, as you’ll only need to buff the entire boat once or twice at most. If your test section shows good results, move to step two.
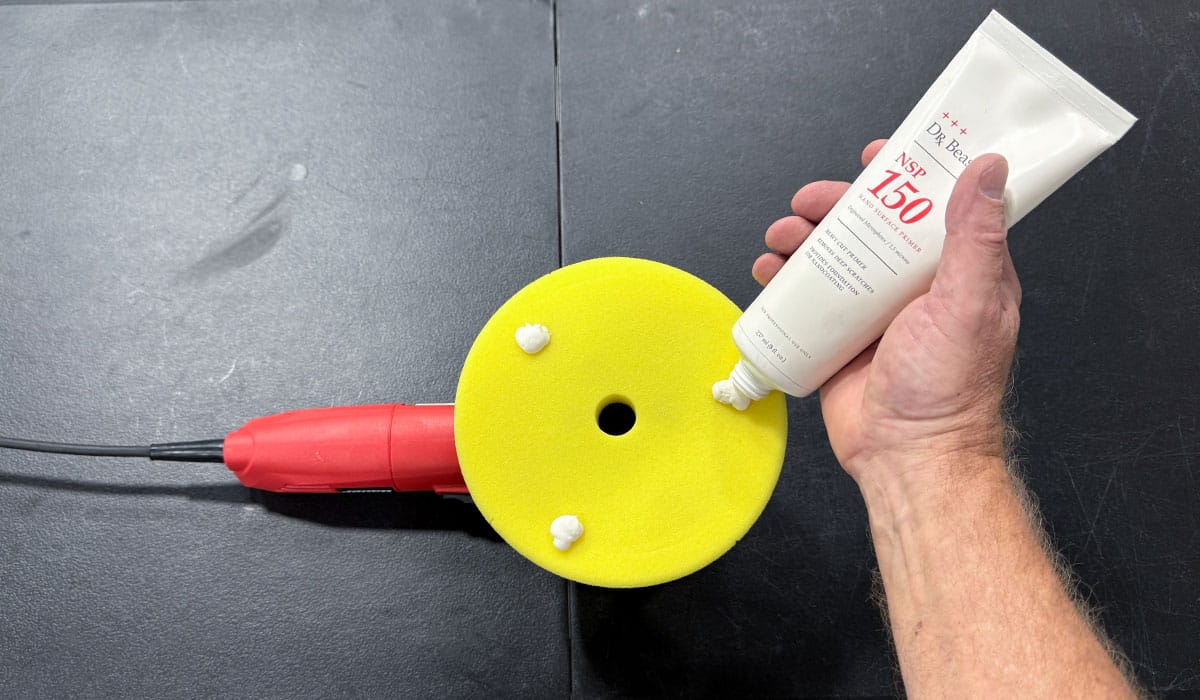
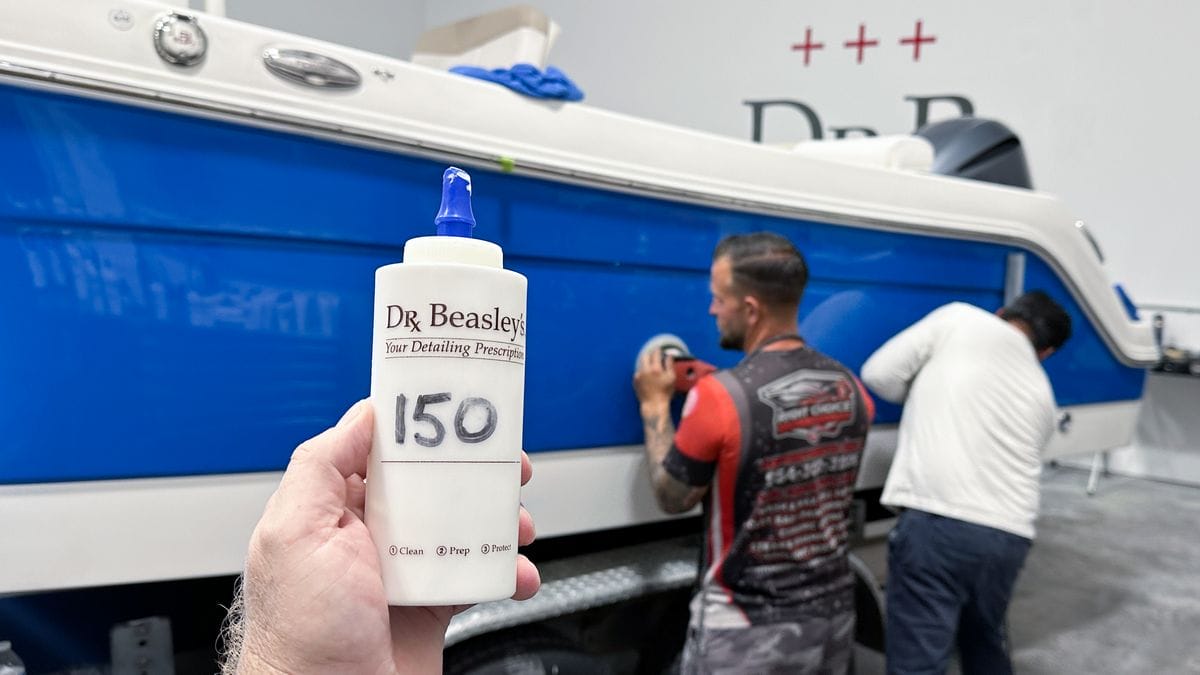
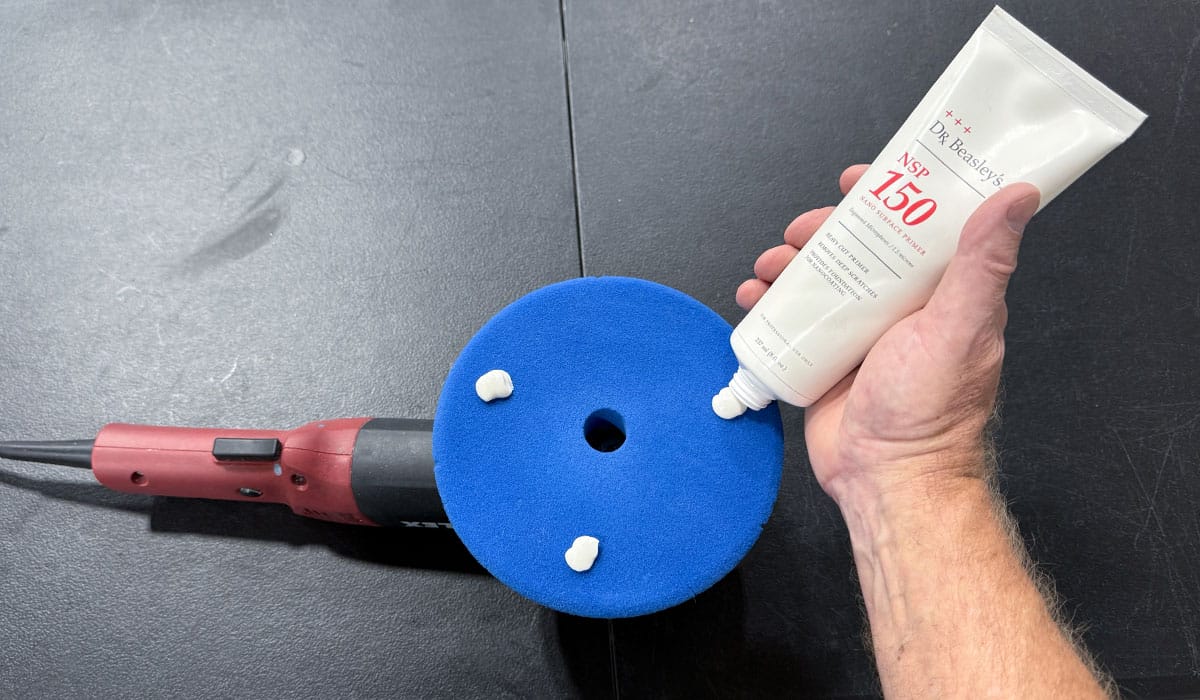
Alternatively, if you’d like to use a dedicated marine ceramic coating as protection, you can use a light polish like Dr. Beasley’s NSP 150. Start testing with a heavy polishing pad to see if that will effectively remove oxidation and leave a finish ready for sealing. If this combination shows good results on your test spot, move to step 2. If your results are unsatisfactory try a more aggressive pad or move to a medium/heavy cut compound instead.
If the one-step/AIO or light polish is not removing the oxidation effectively or quickly enough, you may need to use a more aggressive medium/heavy cut compound like Dr. Beasley’s NSP CoreCut. Just keep in mind that using a compound will require a second polishing step with a light polish like NSP 150 to maximize gloss and clarity before sealing with ceramic coating.
Step 2: Apply Product
Apply product to the face of your foam buffing pad. Press the face of the pad against the oxidized gelcoat surface but do not turn the polisher on.
Step 3: Polish First Gelcoat Section
Once the face of the pad is against the gelcoat surface, turn the polisher on at a slow to medium speed. Spread product out over a section of the gelcoat. Increase speed to the highest setting and make several overlapping passes in a crosshatch pattern. After a few minutes, turn polisher off and inspect the results with a powerful light source.
Step 4: Repeat Across Rest of Boat
If results are satisfactory, repeat your process across the rest of the boat working a small area at a time.
Step 5: Protect Gelcoat
After polishing the gelcoat to a high gloss, seal the finish with a high quality boat wax, sealant or marine ceramic coating.
Category #3: Mild Neglect, Medium Oxidation
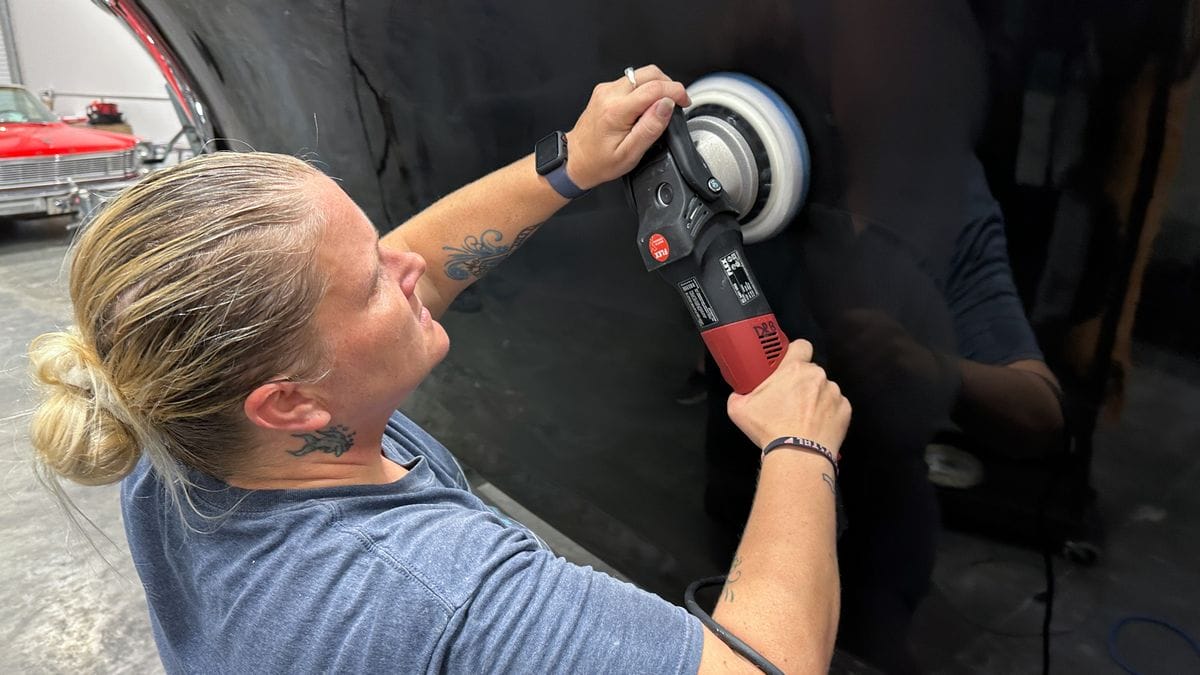
If your boat falls under Category #3, you’ve probably waited a little too long to undo the oxidation damage with just a foam pad. Instead, you’ll have to do a minimum of two polishing steps: one with a compound on wool pad using a rotary polisher and another with a foam cutting pad on an orbital polisher.
Supplies Needed
- Aggressive, fast cutting compound – Dr. Beasley’s NSP CoreCut
- Medium cut polish – Dr. Beasley’s NSP 150
- One-step boat cleaner wax like Dr. Beasley’s NSP Z1
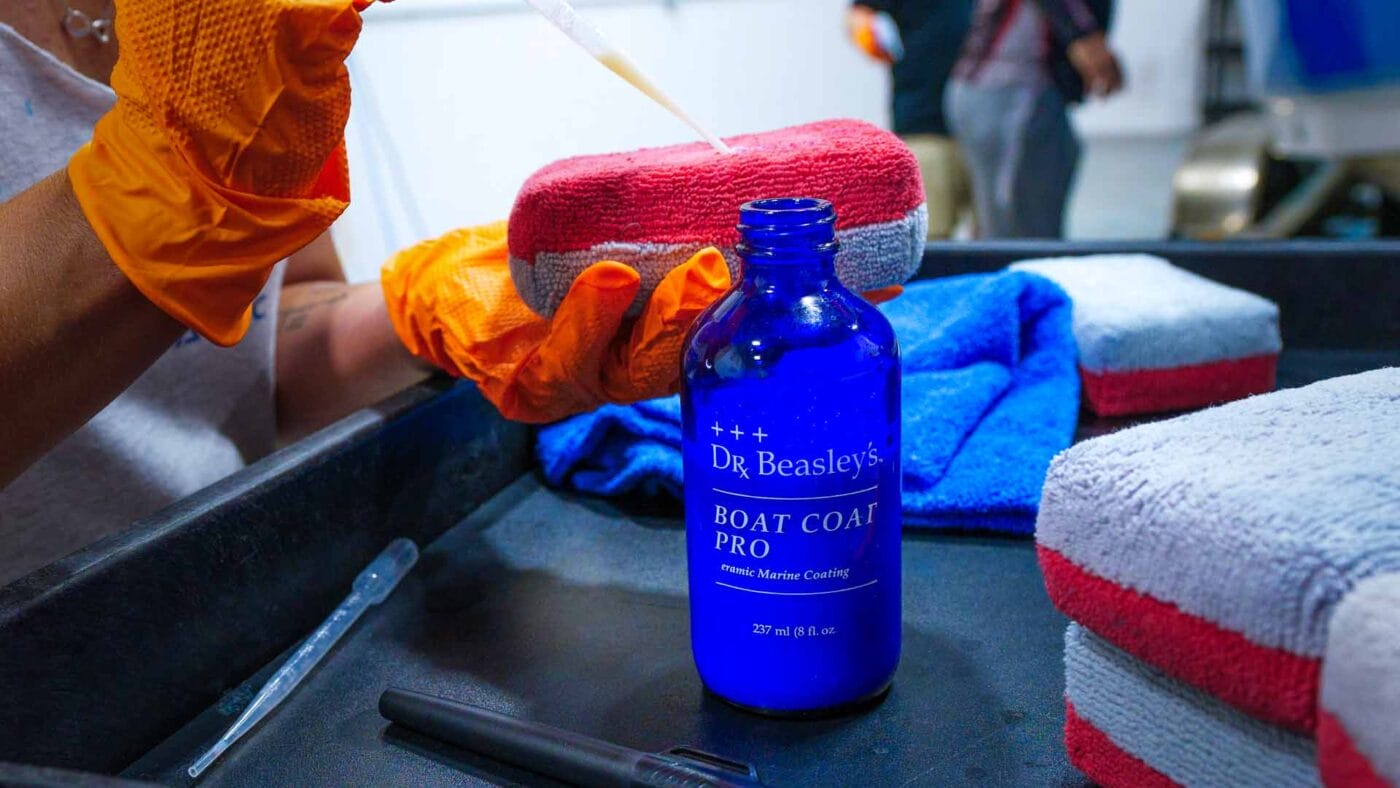
- Boat wax, sealant, or marine ceramic coating – Dr. Beasley’s Boat Coating Pro
- Rotary polisher
- Orbital polisher
- Wool cutting pad
- Foam cutting pads
- Plenty of microfiber towels
Step 1: Apply Product to Pad
Attach a wool cutting pad to a rotary polisher. Apply NSP CoreCut to the face of the pad and press against the gelcoat surface before turning polisher on.
Step 2: First Compounding Step
With pad pressed against the gelcoat, turn the polisher on at a slow to medium speed and spread the product out across a section of gelcoat.
Once you’ve spread out your product, increase your speed to the highest setting and making overlapping passes in a crosshatch pattern, working for a few minutes.
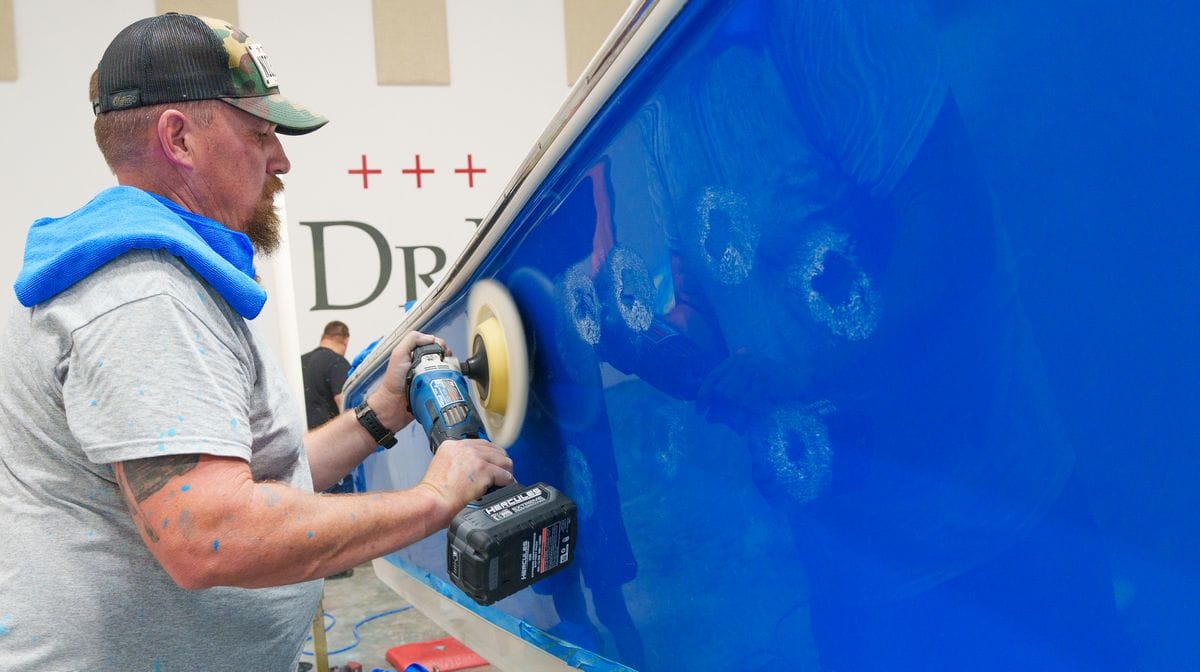
Turn the polisher off and wipe away any residue then inspect results with a powerful light source. If results are good, move to the next section of gelcoat and repeat this step across the entire boat.
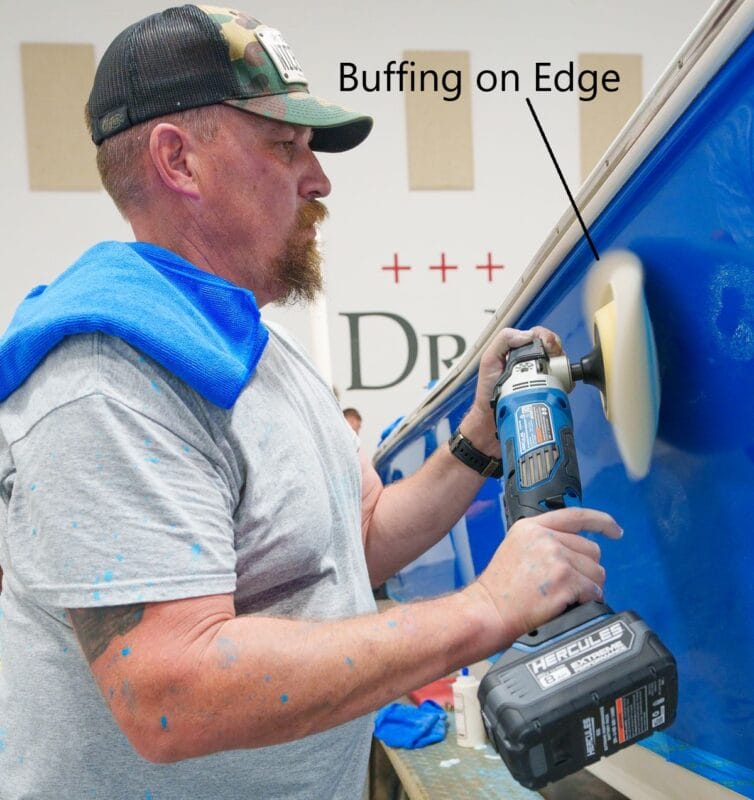
Technique Tip: Going Up on Edge
When buffing with a wool pad on a rotary polisher, it can be a little hard to control if you’re holding the pad flat and level with the boat surface. You can get better maneuverability by going up on edge with the wool pad so that only one side of the pad is making contact with the gelcoat.
Step 3: Second Polishing Step
After removing the oxidation in the first compounding step, you need to re-polish with a foam pad on an orbital polisher using a light polish. The goal here is to remove any holograms left by the wool pad and rotary to restore a completely smooth surface with a brilliant shine.
I recommend doing this the fastest way possible, with a gear-driven orbital polisher, foam cutting pad and a medium cut polish like NSP 150.

Step 4: (OPTIONAL) Third Finishing Step
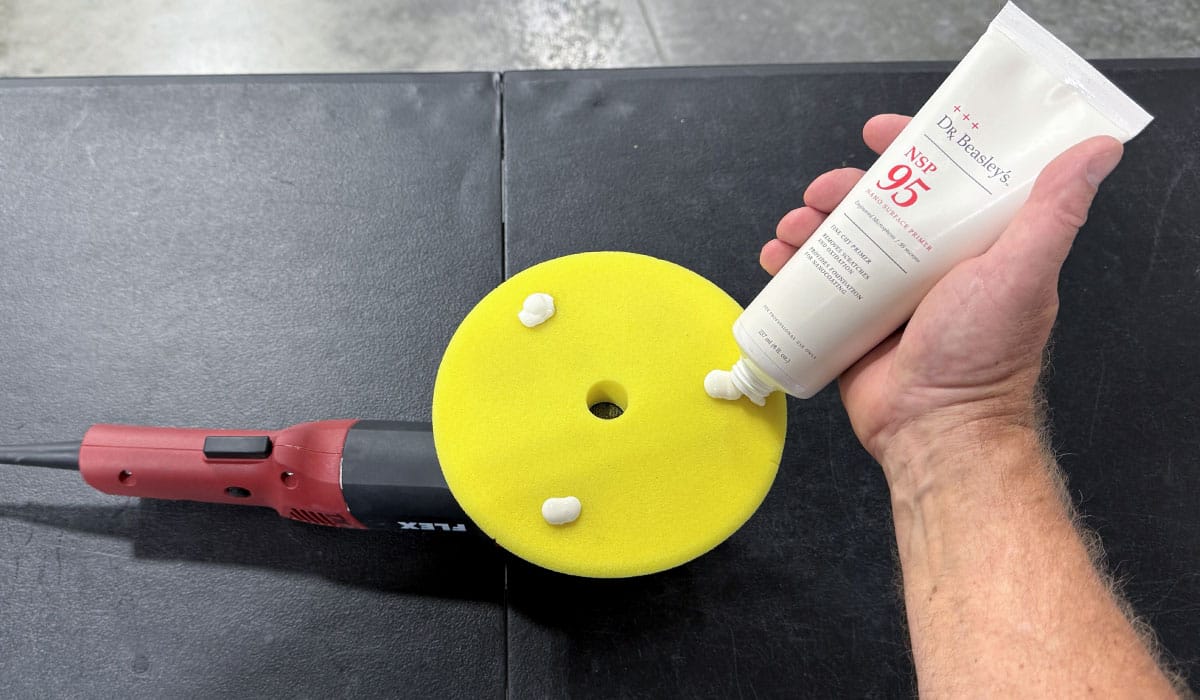
If you want the best shine possible or you’re dealing with a darker color that still looks a little dull, you can opt for a third finishing step using a less aggressive pad (either a light cutting or polishing foam pad) and a light cut polish like Dr. Beasley’s NSP 95. This will remove any haze left behind by the second polishing step and produce a true show boat finish.
That being said, if you have a boat with a light color or your expectations for shine aren’t too high, then you can typically stop after the second step.
Step 5: Protect Gelcoat
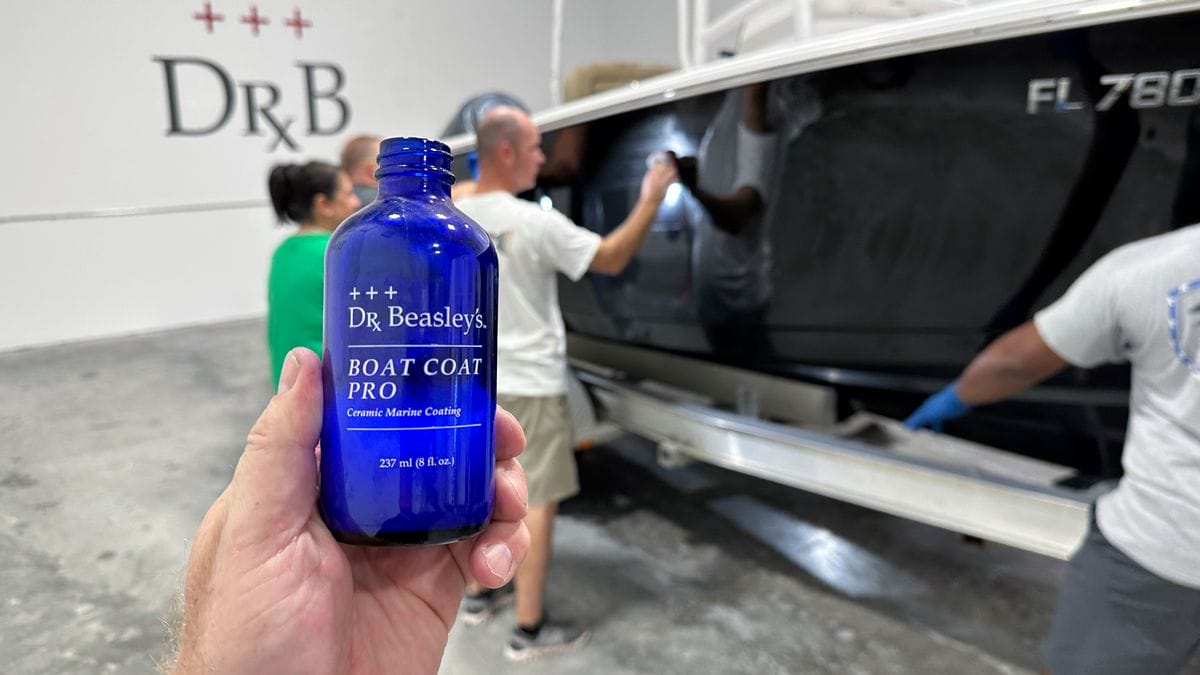
Unlike an AIO, compounds and polishes do not protect the paint against future oxidation. That means you will need to protect the paint after you finish compounding and polishing using a boat wax, sealant or marine ceramic coating.
That being said, if you used an AIO like Dr. Beasley’s NSP Z1 as the last step in a three-part process, you will not have to protect the gelcoat afterwards, as the Z1 has already applied a ceramic coating.
Whatever you end up doing, be sure to follow the manufacturer’s directions for applying the wax, sealant or coating. I prefer to use a ceramic coating for boats like Dr. Beasley’s Boat Coat Pro because they last longer than wax or sealants.

Category #4: Extreme Neglect, Severe Oxidation
Get ready: if your boat falls into Category #4, you’re in for a LOT of work and a TON of steps.
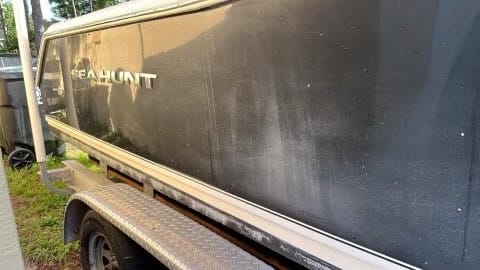
This includes sanding the gelcoat to remove deep oxidation, compounding with rotary and wool pad to remove sanding marks, polishing with orbital and foam pad to refine holograms and finally applying a marine ceramic coating to protect.
Supplies Needed
- Mirka Abralon Sanding Discs + 8mm free spinning random orbital polisher to sand with.
- Spray bottle with clean water and a few drops of car wash soap or dish washing detergent.
- Fast cutting compound – Dr. Beasley’s NSP CoreCut.
- Medium cut polish – Dr. Beasley’s NSP 150
- One-step AIO and/or boat wax, sealant, or marine ceramic coating.
- Rotary polisher with a wool cutting pad.
- Orbital polisher with a foam cutting pad.
- Plenty of microfiber towels.

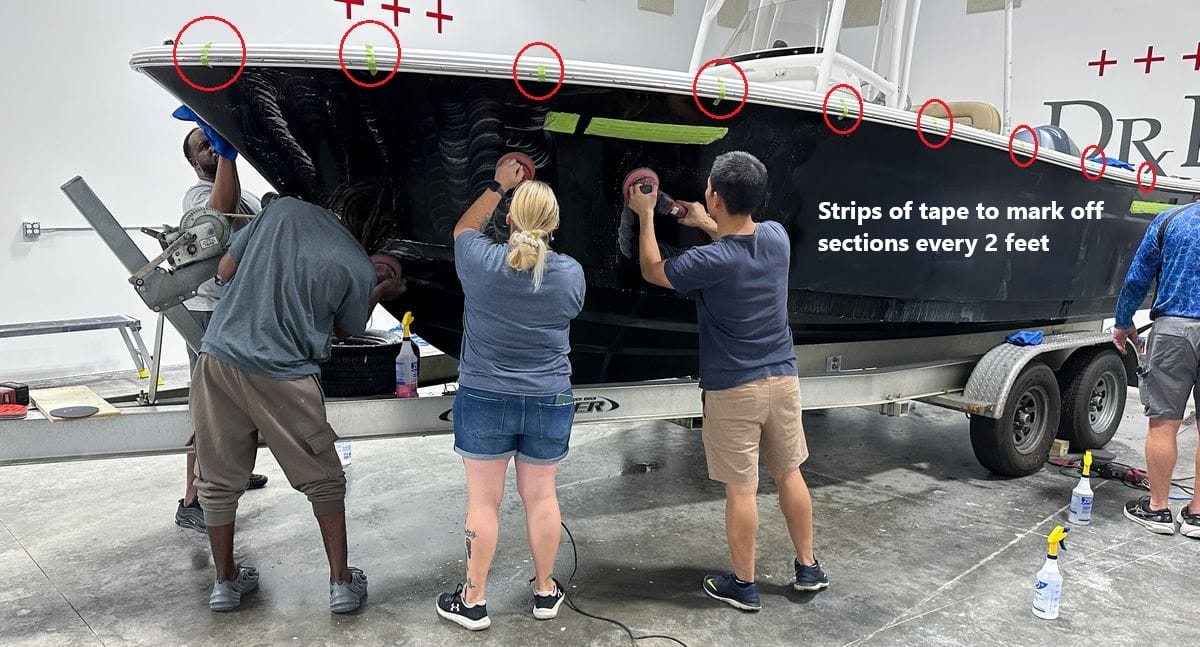
Step 1: Machine Wet Sanding to Remove Deep Oxidation
Extremely neglected boats require aggressive procedures like machine wet sanding in order to efficiently remove the layers and layers of oxidation that have built up over time.
Technically you could use a compound with a rotary polisher and wool pad like I recommend for Category #3 boats, but it would take a very long time and you wouldn’t actually remove the deepest oxidation, causing the oxidation to come back after a few months.
That’s why when I’m detailing a neglected boat myself or teaching it in a class, I always use a gear-driven orbital polisher, a foam interface pad and the appropriate Mirka Abralon sanding discs for my initial step. The gear-driven action paired with the aggressive sanding discs cuts through oxidation like a hot knife through butter, allowing me or my students to complete the job much more quickly.
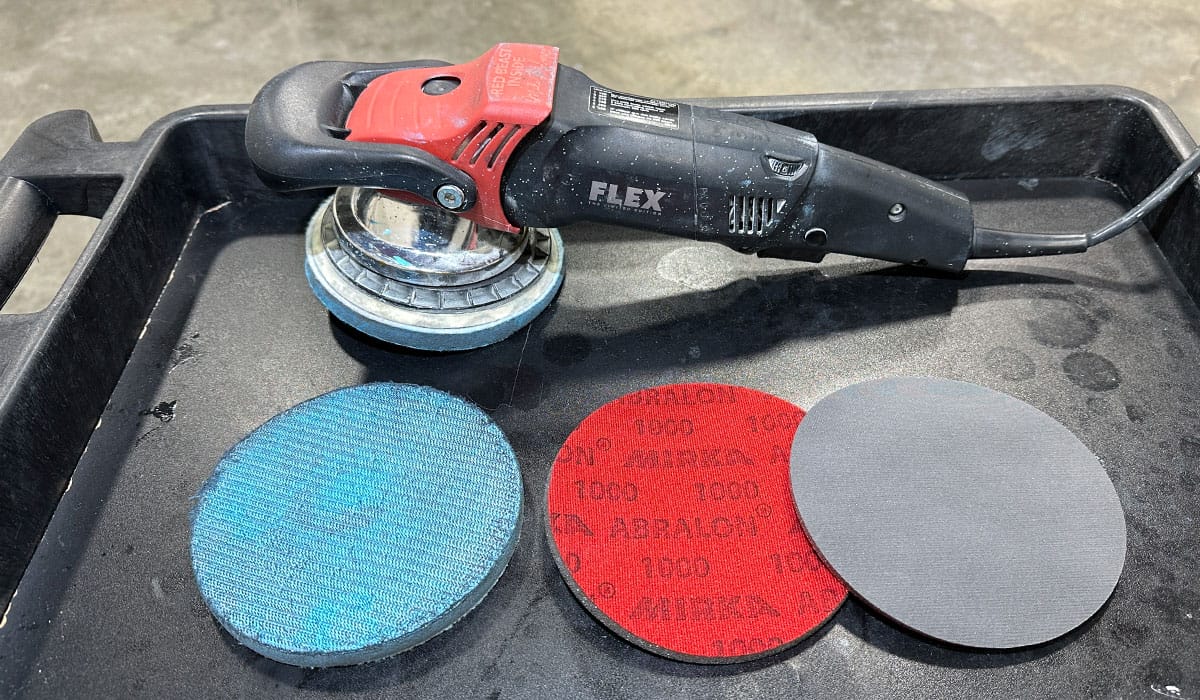
As far as grit levels go, at a minimum you will need 2000 grit sandpaper. For deeper oxidation, water spots, stains and dock rash, you may need to go as low as 1000 grit to remove it all properly.
Whichever you start with, be sure to re-sand with a higher grit to refine the scratches so they’re easier to buff out in the second step. I like to use 3000 grit when refining in my boat detailing classes to make the sanding marks as easy as possible to remove. Remember, it’s easier to sand than it is to buff.
TECHNIQUE TIP: To help you keep track of where you are in the process, place a strip of tape across the top cap of the boat every two feet. This will divide the boat into sections so you can more easily see where you started and where you stopped.
Step 2: Compounding to Remove Sanding Marks
Factory gelcoats tend to be very hard. Even if you sand out to a high grit level, you’ll still need to use an aggressive cutting compound to remove the sanding marks completely in a timely manner. For this purpose I’ll be using Dr. Beasley’s NSP CoreCut+, an incredibly fast cutting compound that’s aggressive enough even for hard gelcoats.
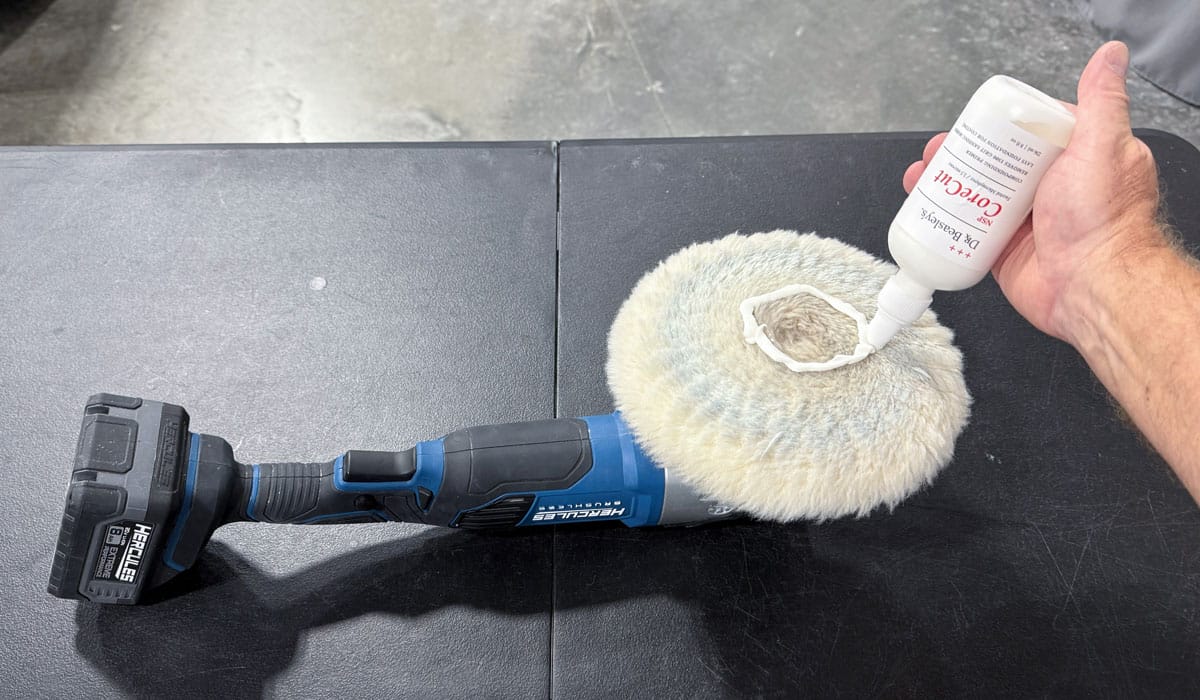
Start by applying your product in a circle to the inner part of a wool pad attached to a rotary polisher. Make sure you apply to the inner part only, as the product will sling out from centrifugal force if you apply to the outer edges.

Once you’ve primed the pad with product, press it against the gelcoat surface before turning the polisher on to a slow/medium speed. Spread the product out over a section gelcoat, then increase to the highest speed setting. Make several overlapping passes in a crosshatch pattern, working the product for a few minutes before turning the polisher off.
Wipe away any residue and inspect the results. If the sanding marks are removed to your satisfaction, repeat this process across the rest of the boat.
Step 3: Polishing to Remove Holograms
As I mentioned in the other guides, anytime you use a wool pad on a rotary polisher you will leave behind hologram scratch patterns in the finish as a result of the fibers cutting into the gelcoat.
To remove these holograms, you’ll want to use an aggressive foam cutting pad with a polish like Dr. Beasley’s NSP 150.
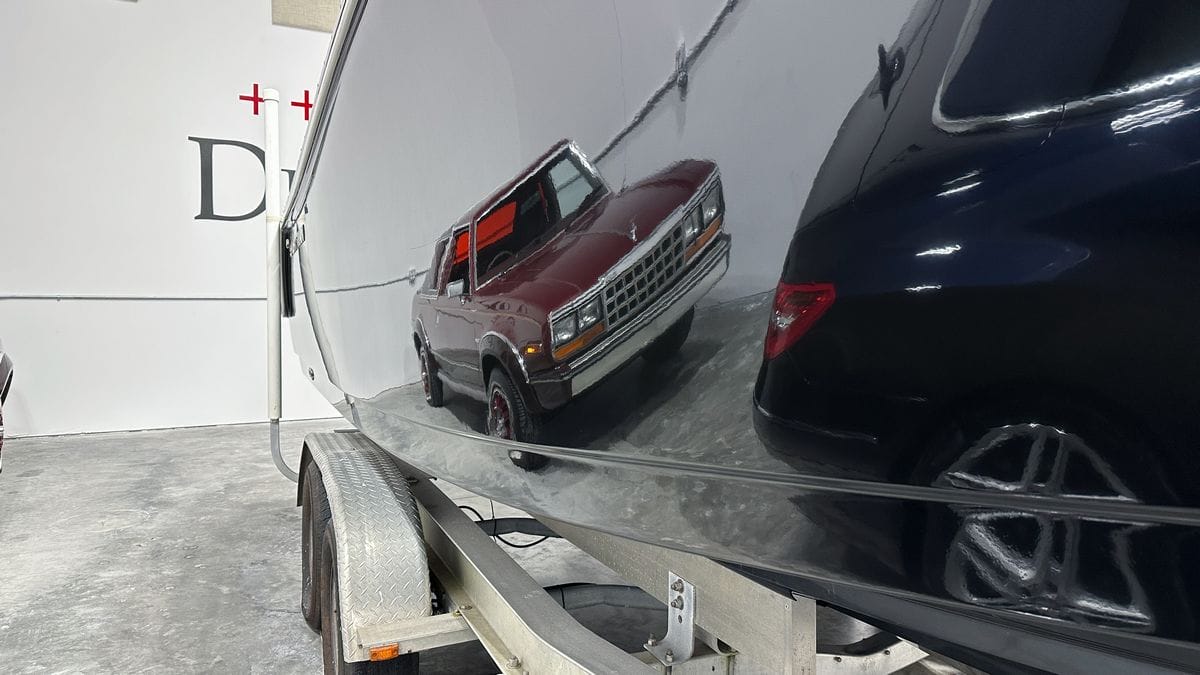
Step 4: Sealing Paint with a Marine Ceramic Coating
Once the gelcoat is in a brilliant, smooth condition, protect the newly restored finish with a marine ceramic coating like Dr. Beasley’s Boat Coat Pro.
Final Thoughts…
When it comes to removing boat oxidation, the old saying never rang more true,
An ounce of prevention is worth a pound of cure
By this I mean, removing a little boat oxidation is one thing, restoring a boat that has been neglected for years, even decades is another thing. It’s so much easier and faster to simply stay on top of the oxidation via a regular boat detailing regimen like washing and polishing the boat at least once a year. Oxidation is a given when it comes to gelcoat simply due to the fact that all it takes for oxidation to take place is the exposure of your boat to the air. Yes, it’s that simple.
Knowing your gelcoat boat is going to oxidize, instead of letting the oxidation go deep into the gelcoat surface, find a good one-step cleaner/wax or AIO – All-in-One, like the NSP Z1 shared in this how-to article, and then using a simple polisher like the Porter Cable 7424XP or the Harbor Freight 6” DA and a few buffing pads, spend a Saturday removing oxidation and restoring that factory new whine in one step.
By putting into practice the habit of machine polishing your gelcoat boat at least once a year, you can slow down and help to prevent bad oxidation before it can start. Then you can spend more time in your clean, shiny boat at your favorite watering hole on the water.
My Personal Offer to Help
I’ve been answering car detailing questions professionally since 2002 and moving forward, if after reading this article you have any questions about polishing and waxing, or how to use an AIO, my contact information is below, reach out to me, I’m always happy to help.
Would You Like to Learn How to Machine Polish Like a Pro?
- Would you like to take your detailing skills to a higher level?
- Do you find you learn better by doing versus sitting in a chair looking at a PowerPoint presentation about car detailing?
Here at Dr. Beasley’s O.R., (Operating Room), in sunny Stuart, Florida, we teach the most hands-on car and boat detailing classes on planet Earth. And we prove it too. You can find write-ups on the Dr. Beasley’s Blog that photo-documents just how hands-on our classes are plus you’ll see the kinds of cars and boats you’ll be training on.
Click the link below to find the dates, locations, topics, and prices for all upcoming detailing classes.
Upcoming Detailing Classes – Prices – Info – Topics – Locations
And if you ever have any questions, always feel free to reach out to me personally via text, phone call or email.
I hope to see you in a future detailing class!
Sincerely,
Mike Phillips
Chief Education Officer for Dr. Beasley’s
760-515-0444
Dr. Beasley’s Contact Information
Questions via Email: [email protected]
Customer Care Hotline: 773-404-1600
Wow! Great article…..wish I had read this last June when I bought an oxidized Casita camper trailer! I spent half the summer working on it and it still needs work… your article here explains why I have had such a long and difficult time. I used a G9 and Marine31 but not the pads you suggested….also sounds like a gear-driven polisher would have served me better….will start over again following your instructions.
Hi Gary,
The Griot’s Garage G9 is a great free spinning, random orbital polisher, but when restoring oxidized gelcoat, a little more power goes a long ways. And pad choice is crucial. Harbor Freight sells a copy of the FLEX XC 3401 VRG aka the BEAST for around $100.00
As far as Marine 31 products go, the only compound/polish I liked was the Captain’s One-Step Compound.
-Mike