


Last Class for 2025!
I’d like to say a HUGE thank you to everyone that attended this class just a few weeks before Christmas. This was our last car detailing class for the year 2025 and all three cars came out freaking amazing!
Certificate Graduation Ceremony
At the end of the class, it’s time for certificates and you can see by all the pictures, each one of these people earned it!
Tom – Eugene, Oregon – 3,179 miles travelled one way to take this class

Kathie – Beaverton, Oregon – 3,172 miles traveled one way to take this class.

Tom – Sarasota, Florida – Travelled 150 miles to take this class

Marvin – Georgetown, Kentucky – Travelled 980 miles one way to take this class

Victor – Stuart, Florida – Travelled 10 miles to take this class

Aaron – Macomb, Michigan – Travelled 1,323 miles to take this class

Thank you everyone for attending this class and staying focused on the topics, tools, techniques and just as important – the cars!
The first day of our class covers the 3 most popular and profitable topics.
1: Show Car Detailing – Multiple-Step Process
2: 2-Step Paint Correction and Ceramic Coating
3: Budget 1-Step Ceramic AIO Paint Correction
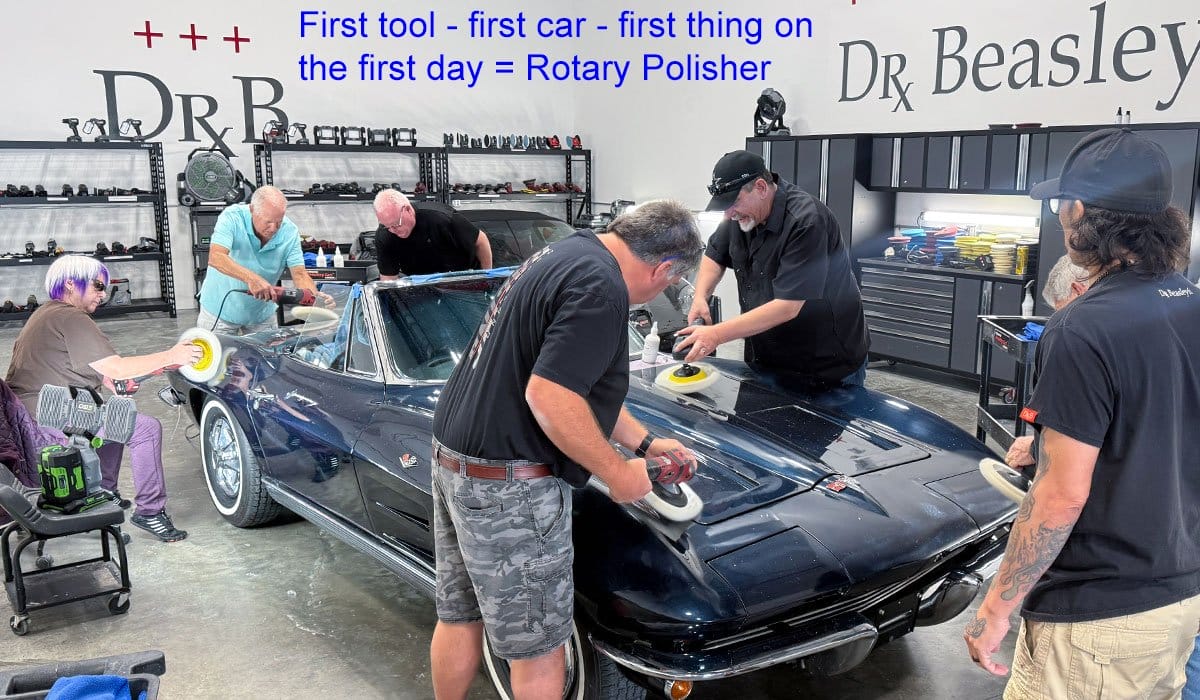
First up – Show Car Detailing – 1963 Corvette Stingray

BEFORE Condition – Documented
We show you the cars and their condition BEFORE you sign-up for any of our classes. This 1963 Corvette looks like it was washed with a lawn rake.


TEST SPOT – Before and After Results


We start EARLY because we cover so many topics, techniques and tools that the only way for you to take it all in is to start early.
It’s Go Time!
We start at 7:30am sharp, and keep in mind, before the class can get started, they need to prep each car. In this case, we used NanoSkin Clay Towels to remove all the contamination with Dr. Beasley’s Prep Wash. Afterwards, we covered the interior to protect it from any accidently compound and polish splatter. We also carefully removed the wiper arms and the hood grills.


Step 1 – Cut paint hard to remove years of neglect using rotary polishers with Dr. Beasley’s NSP 95


This is the first time Kathy has used a rotary polisher, and she quickly picked up on how to correctly use it.

Here’s Kathy doing EDGEWORK with an 8″ wool pad on a rotary polisher.

See the chrome latch?
She’s removing the swirls and scratches right next to the latch. Sure you could do this with a 1″ pad on a RUPES Nano in Rotary Mode, but I teach people how to do the job in front of them with the tool ALREADY in their hands. Both options work and of course, I show everyone how to use the RUPES Nano and the FLEX PXE-80 with 1″ pads in rotary mode for doing edgework. Your choice.

FLEX Prototype PE-150 Rotary Polisher from 2017
FLEX sent me their first cordless rotary polisher as a prototype to test and provide feedback. This polisher is now 9 years old, and it’s been used by me and our classes to literally buff out hundreds of cars and boats and it’s still going strong!

Step 2 – Remove holograms and perfect the finish using foam pads on orbital polishers with Dr. Beasley’s NSP 95
Here’s Aaron using the original FLEX BEAST to do the second machine polishing step and to also restore the shine to the chrome trim around the windshield.

Here’s Marvin using the FLEX Supa BEAST

Here’s Tom testing out the Griot’s Garage G9
This is a 9mm free spinning, random orbital polisher. The primary difference between this type of tool and any of the gear-driven orbital polishers is you must CONTINUALY look to see and monitor if the buffing pad is rotating and oscillating, or stalling out and simply jiggling or vibrating against the paint – which is wasted time.


Here’s Kathy testing out the FLEX Supa BEAST and Victor is testing out the original, FLEX XC 3401 VRG aka the BEAST.


I was surprised and IMPRESSED that Aaron was buffing out the small area in scoop. Any type or brand of free spinning, random orbital polishers would stall out, but with a gear-driven orbital, it’s all BRAWL – ZERO STALL.

Here’s Tom testing out the RUPES Mille
The Mille is a 5mm gear-driven orbital polisher. Just to note, FLEX said they measured the orbit stroke for the RUPES Mille and when they measured, the orbit stroke was 4mm.


Here’s Tom testing out the Harbor Freight Forced Rotation Dual Action Polisher

You can watch my video and read my blog article for this tool here,
Review: Harbor Freight HC109B Forced Rotation Dual Action Polisher by Mike Phillips
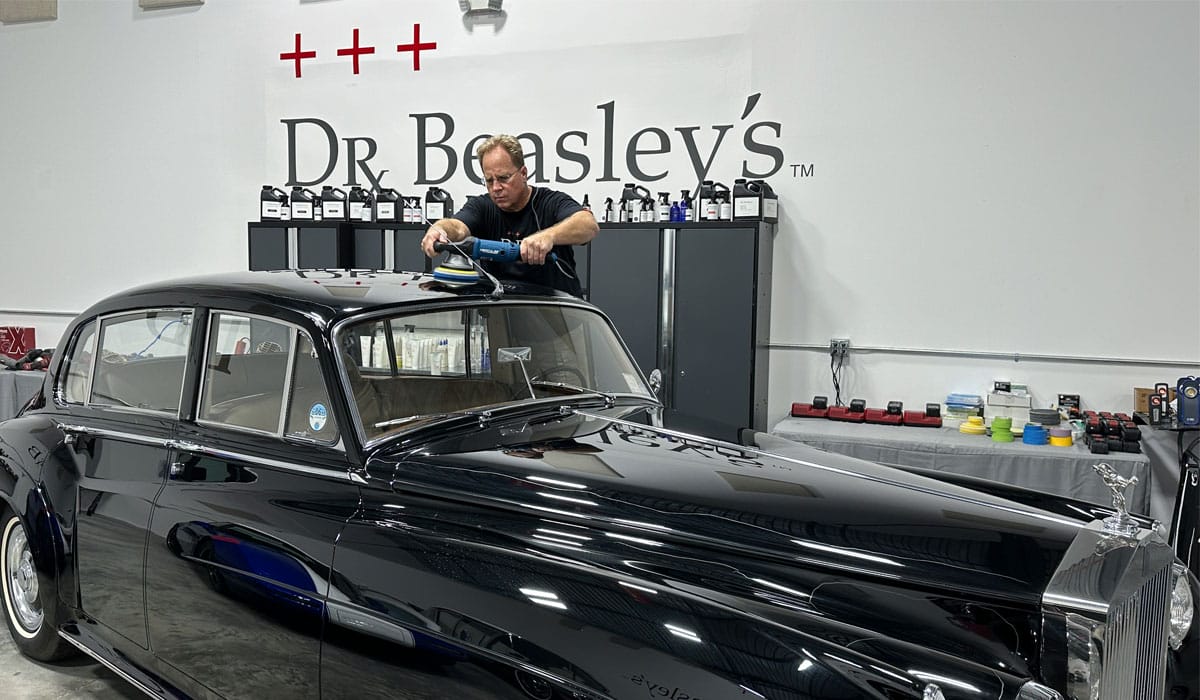
The Rolls-Royce I used to test and review this polisher was in pretty bad shape before I started.
Click the link above to see all the before, after and review pictures plus the video – this is one of the best reviews I’ve ever written.
Next up, installing the Dr. Beasley’s Nano-Resin 2.0 Ceramic Coating
This is a 2-part system with the first part applying the Paint Coating Builder.


Next up, the class installs the Nano-Resin 2.0 Ceramic Coating


Inspecting for High Spots
Here’s Kathy using an inspection light to inspect for any high spots so they can be removed before the coating hardens.

Here’s Victor installing the ceramic coating.


Here’s Marvin installing the Nano-Resin 2.0
If you look at the side of the fender carefully you can see the coating flashing with a rainbow shimmer to it.

Final Results!


Here’s the team that made the magic happen!


Awesome work everyone and I’m pretty sure after this first training car, everyone is now warmed up and ready to move onto the next training car!
Next up… 2-Step Paint Correction and Ceramic Coating – 2013 Corvette Grand Sport

BEFORE Condition
Let’s check out the current condition of the paint on this 2013 Corvette Grand Sport


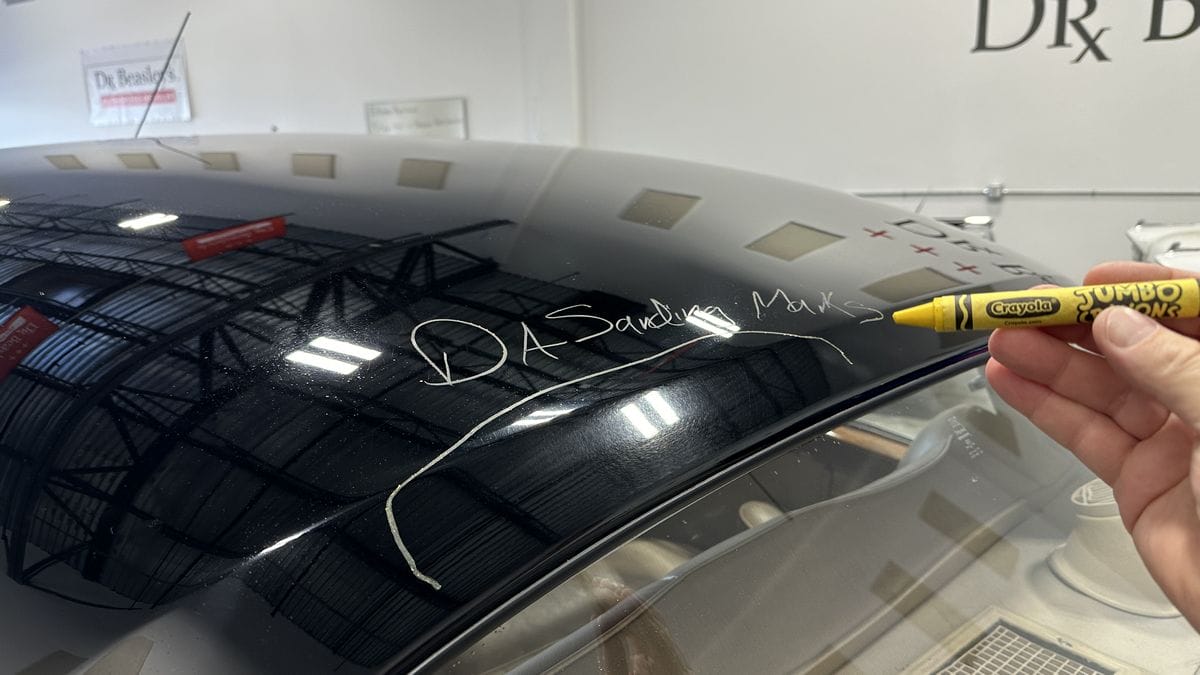
TEST SPOT
Before class, I did a little test spot to see what tools, pads and product will be required to remove the swirls and scratches and get the paint back to a black mirror.

That looks much better!

Detailometer Measurements
Here’s the Detailometer before measurements.


2-Step Panit Correction Process & Ceramic Coating
The class will be using their choice of orbital polisher, and my strong admonition is to test out all the gear-driven orbital polishers first, and then test out any free spinning, random orbital polisher they’re’ interested in. For pads we’re using the Buff and Shine maroon foam cutting pad with NSP 150 followed by the white foam polishing pads with NSP 95. To seal the paint, the class will be using the Dr. Beasley’s Nano-Resin 2.0 Ceramic Coating.

Here’s Marvin testing out the RUPES Mille

Here’s Tom testing out the Harbor Freight HC109B Forced Rotation Dual Action Polisher with the Buff and Shine EdgeGuard MAROON cutting pad.

Here’s Tom testing out the RUPES Mille

Out back Victor is revisiting the FLEX BEAST

Kathy using the FLEX Supa BEAST, which is the lighter, quieter, cooler and smoother version of the original XC 3401 VRG aka the BEAST.


Small Backing Plate with Large Pad
If you look carefully, we’re running 7″ Buff and Shine EdgeGuard foam pads on the smaller 5″ backing plate on the RUPES Mille. The larger footprint works to SMOOTH OUT the feel of the RUPES Mille making it easier to guide over different shaped body panels or when moving from one plane to a different plane.

Just to note, there is a 6″ backing plate option from RUPES for the Mille, here’s link,
Rupes Mille Backing Plate | 6″ 150mm | For Gear Driven Polisher LK900E
Here’s Kathy testing out the original FLEX BEAST!

Here’s Aaron also using the BEAST

The RUPES gear-driven, 5mm Mille

Here’s Tom testing out the Harbor Freight HC109B Forced Rotation Dual Action Polisher with the Buff and Shine EdgeGuard WHITE polishing pad.


The BEAST – All Brawl, Zero Stall!

I finally got a picture of Yancy, our video guy and my assistant for this class doing actual work. LOL

Installing a Ceramic Coating
Time to seal the deal, that is time to install the ceramic coating. First the class applies the Paint Coating Builder.


Next, the class installs the ceramic coating.


Here’s the Final Results!


Here’s the Detailometer BEFORE measurements
Here’s the Detailometer AFTER measurements

Machine vs Man
Interesting thing is that even though the paint was totally swirled out, it still had good gloss and distinction of image with low haze. In the after readings the measurements improved only slightly, but to the HUMAN EYE – the before and after results are incredibly dramatic and that’s what the class was aiming for, incredible results!

Here’s what the numbers mean,

Next up…
1-Step Ceramic AIO – Budget Detail – 1966 Corvette Race Car

Here’s the 1966 Corvette Race Car, patiently waiting for her turn in the class.

Another opportunity to practice with a rotary polisher
Normally, I bring in car with only minor swirls, scratches, water spots and/or oxidation. This is the type of paint condition that works best for doing, or in my case, teaching how to do a 1-step paint correction process that seals the paint at the same time.
But the paint on this 1966 Corvette Race Car was so badly filled with swirls and scratches, I let the class hone their rotary polisher skills as a first step, and then we used the Dr. Beasley’s NSP Z1, which is a ceramic all-in-one or AIO. In the old days these were called cleaner/waxes. Dr. Beasley’s Z1 uses ceramic for protection instead of wax – that’s the big difference.


It would be hard to find a car with worse, but savable paint.
Test Spot
Here’s before and after results for the test spot using only a rotary polisher. After the class gets going, the class will follow the rotary step with an orbital step using foam pads and Z1


Pretty easy to tell this is single stage paint.

It’s GO TIME!
Step 1: Cut hard with rotary polisher, wool pad and Dr. Beasley’s NSP CoreCut

Here’s Kathy handling the FLEX PE-150 Cordless Rotary Polisher like a BOSS! Nice work Kathy!

Here’s Aaron out back cutting hard with Dr. Beasley’s NSP CoreCut with a wool pad on a FLEX cordless rotary polisher.

Step 2: Machine polishing with Dr. Beasley’s NSP Z1 which is a Ceramic AIO – or All-in-One.


Final Results!
Here’s the after pictures for the swirled-out 1966 Corvette Race Car!


Freaking amazing results!
Thank you to everyone for working so hard and carefully on the last car of the day!

Tire Cleaning and Protecting
I also shared our new tire cleaner and tire coating using the tires on the 1966 Corvette Race Car.
BEFORE


Here’s results after using the new Dr. Beasley’s Foaming Tire Cleaner.

Next up, we dress the tires with Dr. Beasley’s new Tire Coating.


AFTER

And of course, all 4 tires were cleaned and protected.
How about You?
Are you trying to decide on which class to take? There’s a lot of options here in America. My advice would be to TRY to find any kind of write-up like this one and all the rest of the write-ups I’ve created for past classes. Try. I’m afraid you won’t find anything. But as you’ve seen here, I fully document what our classes look like.
- Train on real cars.
- Train on cool cars.
- Train on a LOT of cars.
- Use all types of tools – make up your own mind which tool is best for you.
- More topics
- More tools
- More techniques
- No chairs.
- Zero sitting.
- No boring PowerPoint
After you’ve invested hours and days trying to find any kind of documentation for any other class that shows what the class REALLY looks like then get off the fence, clear your schedule, make your travel plans and I’ll see you here at a future, fun detailing class.
Questions? Shoot me a text or give me a call: 760-515-0444
Click here for dates, locations and topics for classes in the FUTURE!

Mike
Questions? Comments?
Email Us