


Last Updated August 13, 2025

TRANSCRIPT
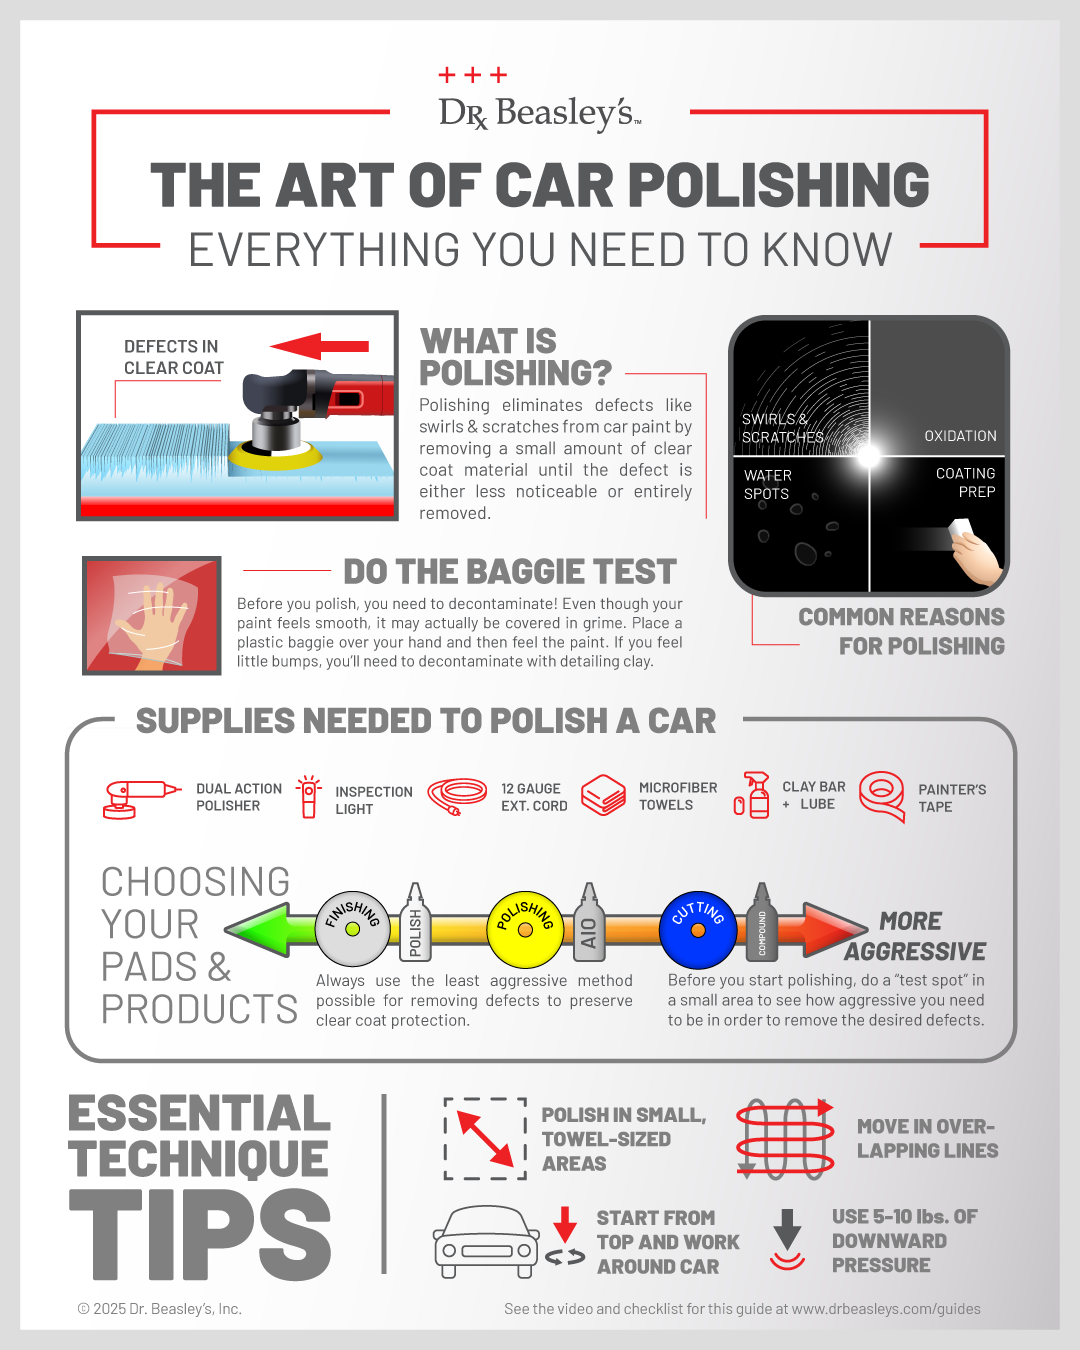
Over time your car becomes filled full of swirls, scratches, water spots, and oxidation. And if you’re a beginner—you’ve never machine polished before—trying to fix this can be kind of intimidating. Let me show you how, and I’ll make it easy.
In this video, I’m going to show you how to remove swirls and scratches starting after you’ve already washed and dried the car. I always, as a practice, if I’m going to detail something, I try to wash it at least a day before. That way any water can run out of the side markers, tail lights, door handles—things like that—so I’m working on a completely dry and clean car.
It’s also important to have a clean shop environment. So before I do any detailing, I blow this out with a leaf blower. I make sure my carts are clean. I make sure I’m clean, and I’m wearing comfortable clothes that are clean—no exposed belt, belt loop, jewelry, or watches. You want to remove anything that could potentially put an accidental scratch into the paint finish.
Supplies
Now, in order to be your own detailer—to do paint correction and detail your own car—you’re going to need some supplies. So let’s take a look at some of the things you’re going to need.
Polisher
First of all, you’re going to need a polisher. Now, I know some people want to work by hand, and that’s a novel idea—it’s a noble idea—but the problem is the car is large. And ever since the car industry switched over to base coat/clear coat technology starting in the 1980s (the first American-made car was the 1980 Corvette that had a base coat/clear coat), and then as they evolved the technology and it became more cost-affordable to mass-produce cars with base coat/clear coat, they started putting them on the high-end cars, then the mid-range cars, and then things like vans and trucks. Nowadays, you’ve got a base coat/clear coat paint finish.
The paint itself is scratch sensitive. That means even though it’s harder than old-school single-stage paints like lacquers and enamels, it still scratches easy. And to try to take your hand—which is basically four fingers holding on to some kind of applicator pad—and rub a product all over the entire car to remove the swirls and scratches is pretty much unrealistic in today’s day and age. Especially when you can go down to Harbor Freight; you can buy a small little polisher like this—usually at $65. If you wait till there’s a sale, you can even get it cheaper.
Now, this is the Harbor Freight—they call this a 6-inch DA, 8 millimeter short-stroke polisher. The “6-inch DA” is kind of confusing because it comes with a 6-inch backing plate, but that has nothing to do with the action of the tool. This is what’s called an 8 millimeter free-spinning random orbital polisher. What that means is—I’ll show you—if I put a buffing pad on here, I can easily spin the pad. It’s free spinning; it’s not gear driven. So it’s a very safe tool, a very easy tool to use.
In fact, let me show you how safe this tool is. I’ve got this on the five setting, which isn’t quite the highest setting. I am pushing as hard as I can and yet I’m not bleeding, okay? So it’s very safe. I’ll show you another way I demonstrate how safe this tool is—there you go—I’m holding the pad with the tool on and obviously nothing bad is happening to me. About the only way you can hurt a car with this tool is if you were to drop it on the hood. Please don’t do that.
So you need a polisher. And this is easily the simplest polisher on the market—short stroke, free spinning, lightweight, compact in size, and relatively inexpensive to get into. If you find after detailing your first car you kind of like this and you might want to do it as a hobby or maybe as a part-time business, you can always advance to better tools. And typically—kind of like a lot of things in life—the more money you spend, the better the tool you get. But not always. This is a good tool.
I would just like to point out this one you can also pick up at Harbor Freight. This is called the Hercules Force Rotation Dual-Action Polisher. Unlike this one, which is free spinning, this one here—let me grab a pad; I’ll show you. I’ve got a lot of pads (we teach classes here too—car detailing classes and boat detailing classes). Let me put this on here. Now watch when I try to freely spin this—oh look, it doesn’t spin. But listen to it. Hear the gears? This is an 8 mm gear-driven orbital polisher, so it has a lot more correction power and speed than a free-spinning polisher, but it does take a little bit more muscle and work to control it and use it. You’d probably be better off, if you’re brand new to polishing, to start with this and then add this.
This one costs 65 bucks. This is only a hundred bucks down at Harbor Freight. So there’s two options.
Power: Extension Cord
Something else you’re going to need for supplies is—you want to use 12-gauge extension cords. You might be using cheap tools, but you need to supply all the electricity they need or you’ll burn out the electric components and electric motor. This is something I just sourced at Home Depot. Says right on it, 12-gauge wire. What that means is it can flow plenty of electricity through to get to the tool where it’s needed.
Polishes (Dr. Beasley’s NSP Primers)
Besides a polisher and a good extension cord, you’re also going to need some polishes. In this case, I’ll be demonstrating the Dr. Beasley’s NSP primers. They’re nothing like conventional compounds. When I say “conventional,” that pretty much means everything else on the market. These use what’s called a nano gel for a carrying agent, and they use microsphere-shaped abrasive particles. They’re a man-made, synthetic—or engineered—abrasive. So the particle size, the shape, is precisely controlled. And instead of using solvents and oils from petroleum—crude oil petroleum distillates—they use a nano gel—water-based nano gel.
The benefit—the primary benefit—to that is after you’re done doing all the polishing, there’s nothing to chemically strip off before you put the ceramic coating on. So that’s just one of the benefits. But let’s keep the focus here on actually polishing.
Protection: Coating
Then you’re going to need a way to protect the paint. For this, I’m going to show the Dr. Beasley’s Nano-Resin MX ceramic coating, but you can use whatever, you know, suits your taste.
Buffing Pads (Aggressiveness Order)
You’re going to need a collection of buffing pads. Okay, so what I have right here—these are the (they call this) the 5-inch Buff and Shine pads. And in order of aggressiveness: this blue one is the most aggressive. You can actually feel a sharpness to it.
In fact, one of the most common questions I always get is, “Mike, what are the different pads?” Or, how come all the people that make pads don’t use the same color code system? Well, that genie is out of the bottle and that’s never going to happen. So the best way to find out what the pads are is go to the website or the store you bought it, look at the box, look at the website, and see what the description says.
But if you had no information at all about what the pads are, here’s how you can tell. Take your clean hand to a clean pad and feel it. You can feel a sharpness. Your cutting pads will tend to be stiff—so they’re hard to compress. And then as we work our way all the way down to this soft pad, now there’s no sharpness at all and it’s very easy to compress. So you can tell by the stiffness of the pad, the flexibility, and the sharpness.
But just real quickly—in the Buff and Shine—most aggressive is the blue, then the maroon, then the yellow, then the white, and then the last, the black finishing. So I’ve got a complete collection of different pads, and that’s important because when you’re working on paint you don’t know if it’s hard or soft. So you might need different pads. And we’ll get more into paint hardness and paint softness as we get into this video.
Mechanical Decontamination (Claying)
You need pads, you need tools, you need a power cord. And then I always—I like to do what’s called mechanical decontamination while washing the car. But there’s a problem with that.
What that means is you wash the car, you rinse it so all the loose dirt is off. And then at that moment, you could just dip your clay towel (this is a substitute for a clay bar) into your soapy water, or you could foam your car. Sometimes what I’ll do is I’ll take a clean wash mitt, dip it into my soapy water, and squish soapy water across the panel as I’m claying it. I kind of like to do that in the wet—during the wash process—because then I’m doing all the wet work at the same time.
The other option is to do all the wet work outside, wash the car, dry, bring it inside, and now get it wet again with the clay lube and clay the car, and then dry it off. So you’re kind of repeating steps.
But let me just share with you the downside of claying a car during the wash process, and I don’t think anybody’s ever covered this on YouTube. Ever.
The Problem With Claying During the Wash
Okay, so here’s the problem. Let me start by asking a question, because some of you seasoned expert detailers probably know the answer. When do you find out if the paint is hard or soft? The answer is: when you do the test spot. When do you do the test spot? After you wash and clay the car.
Okay, so if you wash the car and rinse it so the loose dirt is off, then you take your clay towel and you clay the car—at that point do you know if the paint is hard or soft? The answer is no, you don’t know. You haven’t done the test spot. You won’t do the test spot till you dry the car, bring it inside.
So here’s the downside of claying a car during the wash process: if you actually have a car with soft paint, you don’t know it—because you haven’t done the test spot. You just probably scratched the heck out of it by claying it with a clay towel. And what I would have preferred to have done is just washed it, rinsed it, and brought it in and used a fine grade clay bar. It’s much less aggressive. It’ll do the same job, but it won’t put near as many swirls and scratches into the paint. So it’s working smarter instead of working harder. That’s why I’m kind of against doing the mechanical decontamination stuff—claying the car—during the wash process. But I just want to let you know it is an option.
I’m going to show you how to clay here in a second in case you’ve never used the clay bar before. But also, we also have a full-length video on the Dr. Beasley’s YouTube channel on how to clay a car.
Other Setup
Then I’ve got some clay lube. I’ve got my coating. You’re going to need a large collection of microfiber towels. And I don’t have it over here, but one of the things I do is I like to keep a clean 5-gallon bucket near where I’m working—because the whole thing about your microfiber tools—your wash mitts, your drying towels, and your wiping towels—is you got to keep them clean and uncontaminated. One of the ways you can do that is keep them from getting onto the floor, where your feet are walking and it’s dirty. They get contaminants embedded in the weave; you don’t know it; you go to wipe the paint and you scratch the heck out of it. So have a clean place to put your dirty towels so they don’t get any more dirty.
Paint Thickness Gauge (Big Picture Indicator)
Then, besides that, it’s a good idea—you don’t have to have one—but here is a paint thickness gauge. This is some sort of—it’s a non-metal hood, so I can’t even show you on here how thick the paint is; it says “no metal.” This is the Rhopoint thickness gauge. But if I come up here to the roof, you can easily see it does work on the roof. So that means the roof is steel. Okay, that just showed 24—2.4, 242 mil. So this car has been repainted; it’s got some pretty thick paint on it.
Now let me just talk about the reason you’d want to use a paint thickness gauge. In reality, I detailed cars for decades without one. But the thing I did is I used quality products and common sense and just didn’t do stupid stuff so I’d have to buy someone else a paint job.
Here’s the reality. This is just your average Post-it note, okay? And a Post-it note is about three mils. Okay, that’s really tiny. In microns, that would be 76 microns. That’s from the factory. And keep in mind, that’s total film build—so that’s the e-coat, the primer, the base coat, and the clear coat. Unless you spend crazy money to get a paint thickness gauge that measures all the layers separately—we’re talking thousands of dollars—all the rest of the coating thickness gauges on the market measure total film build.
This is why I call them a “big picture indicator,” okay? Big picture indicator. They’re going to give you the big picture—is the paint thick or thin? Just that simple.
But if you don’t have one, you just use good products—and by good products I mean good abrasive technology. I know it’s hard to believe that today—I’m filming this in the year 2025—that there might be junk on the market, but there’s junk on the market. And that’s why sometimes, if you’re reading about people trying to remove the haze or the marring after they compound or polish something, that’s because the abrasive technology is kind of mediocre. And while they remove the swirls and scratches, the products they’re using are actually leaving scratches in the paint. So always pick an established brand that you can trust.
So the paint thickness… but anyway, the one thing I just wanted to mention is the total film build. If the total film build here is, say, 6 mils, that means from the factory they’re only putting around two or less mils [of clear]. So if you hold a Post-it note between your fingers, that means the clear coat layer on your car is as thin or thinner than that Post-it note. And I think your brain can wrap around how thin it is when you do this. You hold it between your thumb—it’s thin.
So that’s why you want to use good technique, use the right pad, and always use the least aggressive process to get the job done.
I’m going to be dropping a lot of information, but there’s no need to remember this or stop the video or back it up. Just go to the description—there will be links to all the tools and the products that I show, and there’ll be a downloadable, detailed PDF checklist to make sure you got everything you need and you do everything in the right steps.
Decontamination: The Baggie Test
We’ve already washed and dried the car—that’s a given. So the next thing is we want to do what’s called the baggie test. And it’s incredible—in the year 2025—I still meet people that have never heard of the baggie test, because it’s pretty much common knowledge, at least in the detailing world.
To do this, you just want a simple sandwich baggie like I got here. Place your hand in it. Again, this is for a car that is clean and dry—you don’t want to be rubbing dirt that’s on the car, or pollen, all over the place. Then you just want to come down and feel it. As I feel this, I actually feel a lot of little bumps. And what those bumps are—there’s some kind of contaminant, whether it’s industrial pollution, airborne pollution, overspray paint—some kind of something that was in the air, landed on the surface of the paint, and before you washed the car and removed it, it formed a bond so strong washing will no longer remove it.
Okay, that’s where clay comes into play.
Claying: How and Why
Clay—this is basically a synthetic type of Play-Doh. It’s a synthetic plastic with a pulverized abrasive in it. You can get these in different grades—you can get ultra fine, fine, medium, and aggressive. This is a fine grade.
The way you want to use this: I like to start twisting it like taffy—kind of warm it up—because what you want to do is you want to form this into like a pancake, a patty, so you can spread this out over your hand and rub this over the paint and be quick and efficient while getting all the contamination off.
Now, some people are saying, “Well, Mike, when you polish the paint won’t that take the contaminants off?” Well, it will if you’re using a wool pad and a compound on a rotary. But we’re going over basic, elementary stuff—we’re using free-spinning random DAs and foam pads. And what’ll happen is foam pads will tend to just glide over the contaminants. It’ll make them shiny; it won’t take them off.
So the most—this is the key word—the most effective way to remove above-surface bonded contaminants is through a mechanical means. That can be with a clay towel, a clay mitt, or a clay disc, or the original detailing clay.
As you can see, what I’ve done is I’ve just kneaded this into a nice-size pancake that’ll fit across the four fingers of my hand when I go to clay—like that. Then we take—this is a clay lube, so it’s a liquid meant to make the surface slippery so when you’re claying it you don’t induce any marring. Put a little bit right onto the clay surface there.
When you clay a car, it’s not like this—(slow)—you’ll be there all day. It’s like this—get busy with it. You know you’re going to be polishing it. What you want to do is just get this step over with so you can get on to the next step.
Here’s something I can tell you tactically. As I rub this clay over the paint here, I can feel it kind of grab a little bit, and what that tells me is there’s contamination there and it’s grabbing. What it’s doing is—that pulverized abrasive—a lot of people think clay pulls contaminants off, but that’s not accurate. What clay does is it abrades contaminants, and because it’s kind of sticky (or the rubber replacements are kind of sticky), it pulls the contaminants onto them; and then you gotta rinse or wash or knead that clay bar to remove them. But that’s how clay works—it doesn’t pull contaminants off; it abrades contaminants off.
I’m just going to clay this section, because I’ll have to detail this car later on—the whole thing.
Now we can come back with our baggie test. I’ve always found it to be almost impossible to get 100% no little bumps that you feel, but you can get it close. A lot of times those little bumps are just defects in the actual paint job and they’re not going to clay off. So that’s what we want—now it’s smooth.
The reason it’s important to clay is not just because, you know, buffing with a foam pad on an orbital polisher in most cases is not going to remove whatever that contaminant is. If it didn’t wash, it’s obviously not going to buff off. But here’s why we clay paint—there’s a couple reasons.
One, I think when it comes to a glossy paint job like this car has, we all agree that a glossy paint job looks good. And gloss comes from a smooth surface. So if you’ve got some kind of bonded contaminants on there, it creates surface texture that diffuses the light; when you look at it, it’s not very glossy. So just by claying contaminated paint you can restore gloss, because you restored a smooth surface.
The other reason we clay is because, ideally, whatever you’re going to use to protect the paint—in this case a ceramic coating—whatever it is, a wax, a synthetic paint sealant, that product needs to make a proper bond to the paint. If you’ve got contamination on there, it can’t get to the paint. So you want to remove the contamination to get the most performance and longevity out of your choice of paint protection product. That’s why we clay the paint.
The Test Spot (Most Important Step)
The next thing we want to do is called a test spot. Now, in the industry—I published my first how-to book in 1998, and I love that I still have an original paper copy, because if you look in the index there’s two places that it mentions “test spot”—how to do a test spot by hand (this is back in 1998; all these cool polishers we have weren’t around, so there was still a lot of hand polishing back then) and then the next place that’s referenced is how to do a test spot by machine. I’m not sure if I’m the guy that invented the term, but I’m the guy that can document it to the oldest date in writing—how to do a test spot. So I feel kind of qualified to show you how to do it.
Least Aggressive to Get the Job Done (And Why)
This Mercedes-Benz has a lot of swirls and scratches in it. What we want to do is we want to use the least aggressive process to remove the swirls and scratches. The way people say that is like this: use the least aggressive process or product to get the job done. The reason you do that is so you leave the most paint on the car. That’s the part everybody leaves off. Everybody says, “Use the least aggressive process to get the job done.” They forgot the part: the reason why is to leave the most paint on the car so the paint job can last over the service life—the mechanical service life—of the car. Nowadays, modern cars—they go 300,000 miles. But the paint might only last four or five years. So that’s why we use the least aggressive process—to remove the defects but leave the most paint on the car so it’ll last over the mechanical life of the engine and the drivetrain.
Picking Pad & Polish for the Test Spot
To do a proper test spot—because we don’t know if this paint is hard or soft—the test spot is what’s going to tell us. We come back here and we kind of look at our pad collection again. Let me just line these up. All pad lines are different, but let me just kind of line these up visually so you can see the least to the most aggressive, because I’m going to show you which pad you want to use.
In the Buff and Shine EdgeGuard line—and these are great pads, by the way—this light blue is heavy cutting; this is cutting; this is heavy polishing (they call this the blueberry); this is called polishing; the white one is called polishing/finishing; and the black is called finishing—softest to hardest.
When you’re doing a test spot, ideally you want to start in that sweet spot. You don’t want a super aggressive pad; you don’t want a super soft pad. So we’re going to go with the yellow pad. And then you want to use a polish—not a compound, not a fine cut polish, but just kind of a normal polish. By using a polish, a simple orbital polisher, and a foam polishing pad, and then doing a series of what are called “section passes,” you should be able to tell right away if the combination of products that you’ve chosen are removing the defects. That’ll also tell you if the paint is hard or soft.
Now, in my second how-to book, I actually covered the topic of how to find out if paint is hard or soft, and nobody ever likes the answer—because the answer is you need experience. The only way to get experience is to buff out a whole bunch of cars. Then you become an expert between hard and soft paint. So if this is your first time, don’t get frustrated because you’re struggling to find out if your paint is hard or soft. You got resources like myself and the whole online detailing world you can reach out to.
Machine Setup, Backing Plate & Centering
We’ve got our foam polishing pad. We’ve got our polisher, which is powered up. I’m going to put this on the three setting just to start out with.
Now let’s take a look at some polishes. This is our brand-new CoreCut Plus. Our CoreCut—this really isn’t for car paint unless it’s custom and thicker, because this cuts really fast. This is a fast-cutting compound. And this is kind of a medium cut—they call it a heavy cut primer; I’d call it a medium cut polish. So we’re just going to try NSP 150. Always shake any product that’s been standing. Our products don’t settle out because of the nano gel, but most products do—they settle out; the abrasives sink to the bottom; the carrying agent rises to the top. And if you don’t shake it up, the first product that you use won’t have any abrasives in it. So always shake everything up.
Now, just real quickly before we get started here—I’ve already taken the liberty of putting a 5-inch backing plate on this polisher. It came from the factory with a 6-inch. But when it has a 6-inch backing plate, it forces you to use a huge 7-inch pad, and these tools are not very good at maintaining pad rotation and pad oscillation when you start getting into curves and tight areas. So you’ll get better use out of the tool by spending the money to buy a 5-inch backing plate. I sourced this off Amazon—two of these for 10 bucks.
What’s nice about the EdgeGuard pad is, if you look, it’s got this plastic liner in here which helps you to center the pad—because it’s important to keep your pad centered. So keep it perfectly centered on there so you get the best action and effectiveness out of the tool.
Priming & First Application
When we talk about priming the pad—years and years ago there used to be a thing out there called the KBM. That was a method of priming. What people get confused on—it’s a method of priming microfiber pads, okay? Foam pads are a little bit different. Microfiber pads—you want to coat each and every little fiber because it’s not going to migrate around on the fibers very well like it will on foam. So you need to migrate it around with your hand or some kind of spatula, spread that product around, get the whole thing primed up, and then add like three pea-sized drops.
Foam pads are kind of different, though. Years and years ago I actually wrote an article and I showed how I applied polish to the entire pad—coated it with product—and then put three pea-sized drops on there. But you don’t really need to do that. What that does is it kind of gets the pad prematurely wet. When pads are wet, they lose their cut. They just become less efficient at removing swirls and scratches. So what I like to do is I just go ahead—if it’s a brand-new, clean, dry pad—I will take and put four (I like to call them) dime-size drops. You don’t have to do this when they’re brand new—something like that.
Then I’m just going to place this down on the paint. Notice I put the cord over my shoulder. If I don’t, the whole time I’m buffing I’ll be dragging this up and down on the fender—and plus someone will point it out to me, “Hey Mike, you forgot to put the cord over your shoulder.”
I’m going to turn this on and I just want to kind of hold it in one place and allow that polish to kind of migrate around on the pad. This kind of warms up the pad, warms up the polish—everybody’s getting all happy. There you go. You can see that product has migrated around. I have two things on this pad now. This is important to understand any time you’re doing paint correction—any time you’re polishing paint—the two things that are inside your polish that are important to you are: (A) the abrasive technology and (B) lubrication. You need them both. If you didn’t need those two things, you could just throw some gasoline and sand on there—but that ain’t going to make the paint look good. So you need products that are actually engineered to polish. What that means is they’re able to remove a defect without leaving their own defect. And, of course, the lubrication is something that just buffers that abrasive action as you’re doing the actual paint correction.
Now that I’ve done that—I kind of warmed up the pad—now I’m just going to go ahead and put three dime-size drops on here, and now I’m going to do my test spot.
Section Passes (Counting, Size, and Why)
The purpose of the test spot is to figure out—to dial in—a process that makes the paint (the worst panel on the car) look perfect. If your process will fix the worst paint panel, then it’ll fix all the paint panels. Then what you want to do is you want to dial in how many section passes it takes to get to your goal—to get to that swirl-free finish.
Let me just talk about section passes, because I wrote the definition for it too (in my first or second book). I need to do that because I write a lot of articles and I type, and I need to teach people how to detail a car with a keyboard. Nowadays we use video, but back in the old days it was with a keyboard.
A section pass is when I go over this section one time, then I change direction—so I’m going to make a cross-hatch pattern. When I go over it a second time, that would be two section passes; a third time is three. What you’re trying to do in a test spot is you’re trying to dial in how many section passes—how many times do I need to make this cross-hatch pattern—before the abrasives, the pad, the oscillating action, the lubrication, the downward pressure has removed the defects to my satisfaction.
When you’re doing the test spot—and this is what most people miss—you want to underdo the number of passes, not overdo them. Because if I did 10 section passes, the defects might have come out after two—but how would I know? I did 10. So I usually shoot for like four. You know the first one’s not going to get them all out; but by the time I’ve done four solid section passes, it’s going to tell me if the paint is hard or soft, and it’s also going to tell me if the defects are deep or shallow. But that’s ideally what you want to do.
As far as the size of area you want to work: with tools like this, it’s a good idea—this is just an average 16×16 microfiber towel—and imagine dividing up every body panel with a towel. So here’s a section; here’s a section; here’s a section; up here would be a section— and that’s how you kind of break a car—large panels—into smaller sections. You kind of think about the size of the section you want to buff and then just tackle each panel that way.
Now, when you have long, thin panels like this, instead of doing a cross-hatch pattern you just do a linear buffing style—so you just buff in the direction of the length of the panel. This became very apparent to me how important this is the first time I buffed out a C8 Corvette—there are no flat panels anywhere on a C8 Corvette. They’re all planes—a plane here, plane here, plane here—and you basically run that buffer up and down these planes or these thin panels until you remove the defects.
Do the Test (4 Passes) & Inspect
Let me go ahead and—I’m going to just do four section passes. Before I do this, I also want to talk about something else. Some people believe that what you should do is time—like have your watch or clock on the wall or a timer—and time how long you buff. And that’ll work; it’s a valid way to do it. If that’s the way you want to do it, I say go for it. But the problem with that is it takes more mental work to sit there and—what—count out “one Mississippi, two Mississippi, three Mississippi,” how many seconds you’re buffing for. What’s easier is just to count section passes. So either way you want to do it, but I’m a big fan of section passes. Not only can I do it, but when I teach classes on this it’s easy for me to teach other people how to count out their section passes.
Here’s another tip that always helps me. When I’m out here by myself buffing on a car, I do practice this technique: I count my section passes out loud. Here’s why: if I don’t, I forget where I’m at, and then I do a few extra passes to make sure I did enough passes. When you extrapolate that over the entire car, you just added an hour of buffing time. So if you just count your section passes out after you dial in how many it takes to get the paint where you want it to be, you’ll save time and save energy.
Let’s go ahead and we’ll knock out—I’ll do four section passes here. First I’m just going to spread my product out to the size of the area I would normally work with this type of tool. Okay, so this is just spread out. Notice I came right up to this fresh-air grille, but I didn’t buff onto it. What you see here—I’m going to hit this again—this is a layer of two things: it’s a layer of abrasive technology and lubrication. Now that I got it spread out, I’m going to turn my speed on this tool—I’m going to go all the way to the six—and I’m going to make four solid section passes. I’m going to move my—this is called your arm speed—how fast you move the polisher is called your arm speed, because your arm is moving the tool. I’m going to use a slow arm speed.
For downward pressure—this tool weighs five pounds—I’m going to apply about four to five pounds to the head of this. It’s important that you always apply to the head—don’t apply it to the handle or you’ll buff crooked. You’ll have air between the paint and your pad because you’re buffing crooked, and the pad won’t even rotate if you’re buffing crooked because there’ll be too much pressure on one side of the pad; it’ll just simply stall out. So put all the pressure right here.
Let’s turn this on and we’ll do four, and then we’ll inspect.
(One.)
(That’s two.)
(That’s three.)
(Four.)
Always turn the polisher off before you lift the pad off, or you’ll throw splatter dots everywhere. Not a big deal to wipe them off the windshield, but once they go down into tight areas you can’t reach, you’ll never get them out of there. So let the pad stop spinning before you wipe off; turn the polisher off; lift the polisher off the face of the pad.
Now we’ll come down here—we’ll inspect the results. I can already tell four section passes did not remove 100% of the defects. But here’s what it did: it removed all the shallow defects, so now only the deeper ones remain. What this kind of tells me about this is the paint might not be rock hard, but it’s on the hard side of medium.
Here’s my handy-dandy swirl-finder light. You can see kind of right here in the middle—it removed about 80% of the scratches. But the thing that’s left behind are now the deeper ones.
If you think about it, when you’re abrading the surface—here’s what polishing paint is: polishing paint is scratching the paint. You’re taking something that’s abrasive and you’re abrading the paint to remove scratches. So you’re replacing those with a different scratch pattern, and you keep working up to finer, finer grades till—hopefully—the products you’re using leave an absolutely flawless, scratch-free finish. That’s where the magic comes in with fine cut and ultra fine cut polishes, especially when you’re working on soft black paint.
Step Up Cut (Blueberry Pad + Core Cut, 8 Passes)
Since four didn’t fix that for me—and I can tell just from experience that this pad and that product ain’t going to cut it—I’m going to go ahead and switch over to this blueberry pad. This is called a heavy polishing pad, so it’s a little more aggressive than a polishing pad but not quite a cutting pad. I’m going to jump right over to our brand-new Core Cut. (Shake first.)
This time I’m going to go ahead and do just a standard eight section passes. Now, there’s some controversy on how many section passes to do. But the thing is, it just depends on a lot of variables—like paint hardness or paint softness; the depth of the scratches. Some scratches might be very shallow—buff out really easy no matter what the paint is. Some scratches might be very deep—it’s going to take a lot more time and effort to get them all the way out. And in some cases, you can’t get them 100% out.
In fact, just real quickly: before you even start polishing the car, you should determine what your goal is. Is your goal a flawless, swirl-free, defect-free finish? Or do you just want to get the paint looking really good? Here’s how I would tell you to approach that: if the car in question is a daily driver like this, I would not aim for perfection—mostly because you can never maintain it, especially on a black car. Just get “really good.” But if you’re working on a show car, then of course that would be something that—if you were to go ahead and remove every single swirl and scratch—it’ll probably stay that way, because show cars tend to get better care; they live in a garage; they’re garage queens; and they just get better care over time. So they’ll stay flawless longer.
Let’s do eight solid section passes.
(Turn, follow up.)
(There’s one.)
(There’s two.)
(There’s three.)
(There’s four.)
(That’s five.)
(Seven.)
(Last pass.)
Generally speaking, for my last pass I’m going to bring my pressure up a little bit—and here’s why. Polishing paint is not a grinding process—step one, step two, step three. It’s an art form. We bring the human elements of care and passion—care about what I do; I got a passion for perfection—so I’m going to bring my pressure up. I know right now what I’ve got on here is I’ve got spent product and I’ve got removed paint. I’m going to be grinding that into the paint, so I’m just going to bring my pressure up just a little bit for the last pass.
Okay, that was eight solid, textbook-example section passes. Let me get a fresh towel.
Much better—much better results. Now if I grab my swirl-finder light and come up here—there’s “before”; let me come up here—and I’ve got about 98% defect removal. The only things that are remaining are just the deeper scratches. When you stand back and look at this, here’s what happens: now that we’ve removed the millions of different swirls and scratches and all that’s remaining are a few isolated scratches, they stand out like a sore thumb. These scratches that I’m looking at—like here’s one right here, here’s one right there—before I could have never seen those individual scratches because they were camouflaged; they were masked by the millions of scratches surrounding them. But now that I’ve removed all the shallow ones, the deeper ones stand out like a sore thumb.
Now I have a choice. I can keep compounding and polishing until I get them all out, or I can make a decision—you know, a common-sense decision—that, you know what, that still looks pretty good. I’m just going to be driving this back and forth to work every day; I’m just going to live with that. Because trying to take out those deeper scratches means taking more of what I told you already—remember the Post-it note?—it just means taking off more of the already preciously thin clear coat.
How the Owner Washes Determines How Far You Go
Then I always like to ask myself a question too. When I’m teaching car detailing classes, this is what I teach my students. The first question you ask somebody that’s going to bring you a car to be detailed is: how do you wash a car? That’ll tell you everything you need to know about that person.
If that person says, “Well, you know, right down the road from me is an automatic car wash and it’s just so convenient to run it through there.” Well, those spinning brushes—they put linear scratches in your car down the sides, down the roof, down the trunk lid. They’re horrendous on the car. They open the paint up; it’s going to oxidize even faster. So if someone tells me they want me to detail their car—or if this is your car—and you run it through an automatic brush-style, spinning-brush-style car wash, there’s no reason to remove all the swirls and scratches, because you’re just going to put them back in at the very first car wash. So that’s where I kind of look for just getting a good finish, not a perfect finish.
Now, if myself or the person that owns the car says, “Well, no, I hand wash my car myself out in the driveway with running water. I use a foam gun, a foam cannon. I use the two-bucket method. I’m very careful.” Well, then I would be more inclined to chase out more of the defects—the deeper defects—because the person (or myself) we’re going to take care of it. We’re going to wash it carefully so we don’t induce future scratches. So you need to make a judgment call as to how far to go, just because you got to keep in mind how preciously thin factory paints are on brand-new cars nowadays.
Two Steps (Compound/Correct, Then Polish/Refine)
That’s the first step. A lot of times when you see people talk about paint polishing, they talk about one step, two step, three steps. How many steps you do kind of depends on the level of defects you’re trying to remove, the paint hardness/paint softness, what your goal is—are you just trying to get it good; are you trying to get it perfect?
In most cases you’re going to do probably two steps: a heavy step—that was this first step; most people call that compounding or a heavy paint correction step. Then we’re going to follow that up with a less aggressive polishing step.
Now I’m going to get rid of this blue heavy polishing pad. Out of the pads that I have here—because this pretty much looks good after the first step—I’m going to switch over to the white. They call this a polishing/finishing pad. It’s not quite as soft as this black pad, but it’s not quite as aggressive as this yellow pad—it’s just that sweet spot in between. For that, I’m going to jump down to the Dr. Beasley’s NSP 95. (Whoops, that was 150—there we go.) So this is a fine cut polish, is how you would think of this.
Pad Stalling (Sharpie Trick)
Again, I’m just going to go ahead—oh, I want to show you something first. This is real important. Sometimes when you’re online—you’re reading, you’re watching videos—you hear people talk about pad stalling. Pad stalling happens any time you’re using a tool that has a free-spinning random orbital action. It’s free spinning.
Here’s a technique to help you to monitor for pad stalling—and that means both pad rotation and pad oscillation; you can get both stalling. Take a Sharpie marker and you can do one of two things. One is you can place a marker right on the backing plate—usually put like two or three on there—and then once you do that, the rest of your life you don’t gotta do it again because they’re not going to really wear off. Or you can do the side of the pad (you don’t gotta make them line up; for the video I will, though).
Let me explain why you do this. Gosh, I showed this in my first class probably like 30 years ago—back when the Porter Cable was all the rage. The reason you put a mark on this is because without the mark—I’ve got a yellow-lipped backing plate and a white pad—and when it’s spinning, when I look at it with my eyes, it’s just a blur. It’s a blur of yellow; it’s a blur of white. If I was using a blue pad, it’d be a blur of blue. By putting these dedicated marks on here—it’s kind of like timing an engine, if anybody’s ever done that before (that’s kind of old-school stuff). When you go to set the timing on a motor, there’s a timing mark, and you put a strobe light—it’s a timing light—on there. You can see when the line comes around—it’s flashing—so you can see where it’s at, and you can adjust the distributor to set the timing. Well, this does the same thing. By putting those lines on there, I can quickly see if the pad is either completely rotating and oscillating, or if it’s just kind of vibrating and jiggling against the paint.
Let me turn the speed down, because this tool actually has quite a bit of power, and I’ll show you what pad stalling would look like. See? I’m not really getting a lot of good rotation. Actually, with this tool I’m getting a little bit of rotation, but pad stalling would just be when that thing just stops like that—you just don’t see that line moving.
Here’s what good pad rotation and oscillation looks like. You know why this isn’t spinning very well? There’s no lubrication. Let’s go ahead—hey, it’s always funny when you do things live, you know?
Let me put my product on here. What was happening is the foam was actually grabbing the paint there. Let me kind of warm this up. Okay—there’s good pad rotation, good pad oscillation. If I crank this down—there we got weak pad oscillation, weak pad rotation.
Usually on a flat surface like this your pad isn’t going to stall out—it’s when you start getting into these curves. So here’s what happens when you get into a curve: like right here is a concave curve, and when you get on a curve, all of a sudden you’ve got pressure on one side of the pad—over here you’ve got pressure on this side—and down this concave cutout here (this indent that runs along the panel here) there’s no pressure down the center. So you have uneven pressure on the pad, and that’s what causes pad stalling.
Another thing that causes pad stalling is if you don’t hold the tool perfectly flat. I talked about this earlier. This tool weighs about 5 lbs; you want to put about 4 to 5—just light—pressure on here, just to keep that pad flat as it’s spinning. You don’t want to push down back here or you have an air gap here—so you’re buffing crooked. When you do that and you have unequal pressure on just one side of the pad, that will cause pad stalling also.
It’s something that I always tell people: if you’re brand new at detailing a car—and by that I mean using a polisher to machine-correct the paint—by the time you buff out the front clip (that’s the hood and the front fenders), you’re going to have a pretty good feel for how to hold the polisher to keep it flat to the surface to maintain good pad rotation and good pad oscillation.
Refining Step (NSP 95, 6 Passes + UMR)
Let me go ahead and we’ll polish this out and we’ll get on to how to put a coating on. First I’m just kind of letting this warm up, and if we look—it’s hard to see in white—but that product has now migrated around. I’ll put on just—we’re talking pea-size drops when it comes to this ultra-fine cut polish; a little bit goes a long way.
Now I’m going to spread my product out. I just want to stress this—this is the size of the area that I’m working; it’s about the size of a microfiber towel with this type of tool. More powerful tools—you can tackle bigger areas. But I have a layer of two things here: abrasive technology and lubrication. You need both to create beauty—to make the ugly go away and create beauty.
Usually when you’re refining—you’re doing the second step—you don’t have to do as many of the section passes as you had to do the first time. Just real quickly on the section passes: every paint job that you work on is possibly going to be different. And this is key—the depth of the defects you’re trying to remove is always going to be different. So that’s why it’s so important to dial in your test spot—how many section passes (or if you want to count in your head or use a clock on the wall and watch a second hand)—if you’re going to buff for 10 seconds, or 20 seconds, or 50 seconds—before you’ve removed the defects with your process to your satisfaction. Me, I’d rather just count section passes and count them out loud.
Let me do six and we’ll wipe off and take a look.
(Light pressure.)
(One… two… three… four… five… last one—just the weight of the machine.)
It’s always hard when I’m doing these types of videos—and even when I’m teaching classes—to remember everything that’s in here to get it out. But one of the things—if you watch when I was doing that—every time I made a pass I overlapped by 50%. Here—I’ll just show you that real quickly. As I make a pass from side to side, when I move over to come back, it’s half the diameter of the pad. So I passed by one half. That’s important.
The reason that’s important is so you have what’s called UMR. What does UMR stand for? Uniform Material Removal. When you have a car that’s completely and uniformly—like this one—filled with swirls and scratches, in order to make this finish flawless you need to remove the same amount of paint here as you do here, as you do here, as you do here, as you’re doing your section passes. That’s what’s called UMR. If you have good UMR, you’ll have a good-looking finish because everything that needed to be removed will be out of the paint.
Here’s a technique real quick just on using towels. First of all, always inspect them before you wipe paint—inspect them with your eyes; feel them with your hands. I don’t have it with me, but I always keep—I got four sets of tweezers out here, different types of tweezers—and when I come across something and I can’t see it but maybe I feel it, I can pick it out with the tweezers. But I stress this so much: if you have a car that’s brand new and you look at it a couple years later down the road after you wash it and it’s got swirls and scratches, you have to ask yourself—well, if it didn’t have any scratches from the factory, how did all these scratches get in there? They got in there by the way we touch it. And we touch it with wash mitts, drying towels, and wiping towels. So keep those things clean.
So, there’s the two-step process. We did eight section passes for the compounding step; we did six section passes for the finishing step—for the polishing step. I don’t know what the camera sees, but I’ll tell you one thing—that looks like a flawless finish to me. I would coat that all day long. In fact, I don’t think the guy that owns this keeps it that nice.
Let me see if I got everything I wanted to remember about using an orbital polisher for beginners.
- Wash the car the day before if you can—that way it’s just completely dry. I actually bring it in here and turn a fan on so there’s air circulating.
- You can either clay it during the wash step, or you can clay it afterwards. The benefit to claying a car while you’re washing it—and it’s important to wash it and rinse it; you don’t want to bring clay or a clay towel and grab dirt on the car and rub it into the paint—so that’s why if you’re going to do the mechanical decontamination step in the wash process, you’ve got to do it after you’ve washed and thoroughly rinsed the car. Then you can grab some soapy water, a soapy sponge, a mitt, and do the mechanical step outside.
- I prefer not to do that because at that point I don’t know if the paint is hard or soft, and I’d rather know that before I start rubbing a mechanical tool over it to remove the contamination. The safest way, in my opinion, is to use a fine grade or an ultra fine grade. An ultra fine grade and a fine grade clay bar will remove the same amount of contaminants as an aggressive clay bar—it just takes more passes. That’s the key. But you’re not being more aggressive with the actual clay itself and putting marring into the paint (or with towels, discs, or mitts).
When you’re doing your test spot, you want to do it on a panel that you can look down on. A lot of shops don’t have the good lights we have here. Some people don’t have a swirl-finder light. If you’re going to put a coating on, you better get one of these—you need it to check for high spots. They might not have good lights. So you want to be able to use your overhead lights or pull a car out in the sun. You want to be able to look down on it; you want to be able to inspect and go, “Yes, that looks good,” or, “Oh, that does not look good.” But you need to be able to do it.
Typically, just generally speaking, the body panels on a car that get the most defects are the horizontal panels—just because they take the brunt of Mother Nature. So that’s the hood, the roof, and the trunk lid. Typically the sides won’t be as bad—sometimes they’ll be the same, but they won’t be as bad. Here’s the key point: if you dial in a process that works on the worst panel, you’re pretty much assured it’s going to work on every panel—so you’re not spinning your wheels. The last thing you want to do is buff out a car, pull it out, and suddenly go, “Ah, look at all the swirls and scratches I missed,” because you didn’t dial in your test spot. The test spot is the most important aspect of doing paint correction and detailing a car. It is the most important. You need to dial it in; you get it perfect. This is also where you’re going to find out if you’re using good abrasive technology or not.
Coating (Nano-Resin MX + Builder)
Now that we’ve done this—next, we want to put the coating on. For this I’m going to demonstrate the Dr. Beasley’s Nano-Resin MX coating. Something I want to share about this—this is a hydrophilic coating. It’s not going to create a super high water-beading finish. I chose this coating because this is a daily driver. It’s going to be parked outside. What does that mean? It’s going to get rained on; it’s going to get water spots. I want this guy to be able to drive this and have the rain land on it—no big deal. Next time he washes it, he washes it, has that same flawless, protected, coated finish—but he doesn’t have water spots everywhere. Because we got some pretty bad water here in South Florida.
This is a two-part system, and this first part is the Paint Coating Builder. (I forgot the safety seals on there.) What this is—it’s actually going to work to prepare the surface for the coating. The second part will be the actual coating. The directions for this say to apply with your applicator pad, but actually what I like to do—and I got permission from the head chemist that made this—is I just go ahead and mist some onto a towel. I just do one side, so I’m going to run the whole car. If I did this whole car—I’m going to coat the whole car—I’m going to use this side to apply the Paint Coating Builder. I might put a little mist right there, and then I’m just going to take and massage this over the paint.
Here’s what this is going to do. First of all, it’s going to completely clarify that paint—so when you put the coating on, you’re sealing in the clarity. It’s totally clear. It adds a little bit of slickness—you can feel that when you wipe it off. Directions say to let it sit two to three minutes. A lot of times what I’ll do is—if I start on the roof of a car, work my way around and down—once I get the whole car wiped down, I come back and wipe it off, and that’s usually about two to three minutes—maybe a little longer. Then just softly wipe that off. Man, that paint is just like crystal clear—a lot of people think I already put the coating on.
What that’s going to do is create a foundation for the coating to bond to. It creates anchor points on the paint for the coating to bond to. The analogy the chemist likes to use—it’s kind of like Velcro. You got a piece of Velcro, you put the other piece on, and it just kind of sucks it together—holds it tight together. That’s kind of what this Paint Coating Builder does—it creates a surface that the coating can better bond to so it’ll last longer.
Then the next part of this is the actual coating. For this I’m just going to pull some of this out of the bottle like this with this little pipette, and then I’m just going to put this across the face of this—this is called a coating saver. In a second here I’ll cut one of these in half and I’ll show you why they call it a coating saver.
Applying the Coating (Box, Cross-Hatch, Level, Inspect)
When you go to put the coating on—if you’ve never applied a ceramic coating—here’s the key things to remember.
One: always work a manageable size. Don’t try to do a whole hood. What happens is the coating is going to start to flash—you’ll see kind of a rainbow effect; that’s the solvents evaporating off, leaving the solids behind—and it’ll start to get sticky on you and you’ll have to fight to get it off. You don’t want to do that, because you’ll end up marring the paint. So you just want to tackle a small section at a time.
Some guys like to box it out—so if you notice, I just kind of made a block or a square box around it. Some guys like to make an X pattern. Either way you do it, then what happens is as you start making your passes you pick up that heavy amount that you put down at first, and you’re able to spread it out easier. (This is probably too much coating for this, but this is just demonstration purposes.) Then you make a cross-hatch pattern. There’s no real magic to the way I’m putting this on—the important key point is: get uniform coverage for uniform protection.
After that—for this coating—I think the directions say to wait about 45 seconds to a minute. Then you want to start leveling it and wiping off any excess. Right now what’s happening is this coating—most professional-grade coatings are meant to bond instantaneously to the paint (I don’t know what the chemical reaction is), but it bonds quickly to it. You want to come back, and this first wipe—I’m not so much removing it, because I can still see it—I’m leveling it. I’m leveling, making sure it’s a uniform, even layer. I’m going to flip over to this side and then just lightly buff off any excess.
Years ago—here’s a little story for you that drives home a point. Years ago when I worked at this other company, we sold a gentleman a ceramic coating, and he was going to go out for his first time and do all the paint correction like you saw me do here and put a coating on his black Tahoe. He’s just an enthusiast—just a beginner. Where are the lights in the average garage? They’re the garage door-opener light. That’s all he had. So he did the whole thing; he’s really proud. He looked at the hood (because that’s where the light was shining down) and goes, “Yeah, that looks good.” And he goes to bed. Next day, he comes out—he pulls the car outside—and looks, and he’s got high spots everywhere.
What’s a high spot? A high spot is where you didn’t get the coating wiped off. In the old days, when we used carnauba waxes, people would say, “Oh, you missed—there’s a streak or a smear of wax; you need to wipe that off.” In the coating world, they call that smear—that patch of coating—a high spot. This is where you need a great handheld light. It’s pretty easy for me to inspect the surface with my overhead lights, but when I start going down these side panels, I’m going to need this light to light up the sides of these vertical panels so I can see if there’s a high spot.
With our coatings, if you find a high spot within about a minute or so, maybe you can put some coating back on your applicator pad, you can come down and just very softly kind of massage that high spot—and if you’re lucky, it’ll wipe right off. If you’re not lucky—like you took too long, you didn’t find the high spot till the next day—then chances are you’re going to have to polish it off, because it just solidifies—kind of like super glue.
So there you go. It’s always important to have a good handheld swirl-finder light before you start doing this kind of work. You can use it to inspect for swirls before; you can use it to inspect your results after you’ve dialed in your process; and then you can inspect to make sure you removed any high spots. So there’s three major reasons to have a swirl-finder light. If you ever do this for money, it helps you to also inspect customer cars. And I’ll tell you—if you have a customer that brings a car by and you pull something like this out, they’re going to go, “What’s that?” “Oh, it’s my swirl-finder light.” They may have never seen it. They think you actually know what you’re doing because you’ve got tools they’ve never seen before—tools like a paint thickness gauge, a swirl-finder light, orbital polishers—all that kind of stuff.
That is how you would go ahead and put your shiny coating on. Of course, then you’d do this entire car.
How to Tackle an Entire Car
Let’s talk about how you would actually tackle an entire car. In this video—and in most of the videos—you see all of us people working on this nice, easy, table-high flat area. But when it comes to the rest of the car, it gets a little more challenging.
Here’s my advice, and this is just my own personal technique. You can borrow from it or not. The first thing you want to do is you want to start at the highest points first. On most cars it’s going to be the roof (even like a truck or a van).
This has a gasket around the sunroof—you’d want to tape that off to protect it. This is an older Mercedes, and I’ll guarantee you this gasket is dried out and it’s going to stain with product really easily. It’s better to tape it off, even if the tape goes over like an eighth-inch into the paint. It’s better not to stain this and maybe have an eighth-inch of paint that runs along the outside of this perimeter of the window that isn’t perfectly polished and coated—but you didn’t stain the gasket.
Here’s a key—what’s called a best practice. Whenever you’re working on large panels like this, you don’t start buffing here and move that way; you start in the middle and work your way out. Now, this panel here—because there’s a sunroof right here and there’s the edge of the windshield here—this is what you would call a long or a thin panel. It’s a linear panel. You could do a cross-hatch here, but it’d be a very short stroke when you’re going lengthwise. So a lot of times when I have a long panel, I just let the panel talk to me. Let the panel be your guide. What that means is: run the polisher in the direction of the length of the panel.
For something like this, I would probably either divide this into two sections—here’s the middle section on the driver’s side, and then there’s this section—or I might, if it’s not too bad, knock out this whole section just as one section. Then you got this linear panel which is on the other side of the sunroof here, and you’ve got the door edge here and a gasket there—but here’s another linear panel.
When I get back here, I got this huge, massive flat panel, and this is where I would have a work platform to stand on to get me up a little higher. Then I would work the center, work out; work the center, work out; hit the sail panels on the side; then jump up here and do the roof.
Here’s a little personal technique tip that I use myself. Anytime I’m working on a car, what I do first is I will knock out the entire roof. Wash it, clay it, compound it, polish, coat it—I’m done. That way, if I’ve got any kind of work platform or scaffolding, I can get that away from the car. I don’t gotta worry about it ever touching the car. Now I can tackle the lower horizontal panels and the vertical panels. That’s how I do it—maybe it’s a tip that’ll work good for you.
Maintenance After Coating
Just real quickly, let’s talk about maintenance moving forward. After you’ve done all this work to perfect the paint on your car and you put your own ceramic coating on (or a car wax or synthetic paint sealant), the next thing you want to do is you want to wash it carefully.
First, inspect your wash mitt; inspect any drying towel. Some people use a leaf blower—I do—or any wiping towel. This is a microfiber wiping towel. You want to make sure they’re clean and uncontaminated so, when you wash and dry and wipe on a maintenance spray, you do not reintroduce swirls and scratches simply because the stuff you’re using is contaminated. It’s so important to keep your stuff clean.
Then—to keep this clean—I’ll just share something with you. Here are two products in our line (and other companies have the same kind of thing): here’s AdvancedCoat: Gloss, and here’s Bead Hero. Now, because I put a coating on here that sheets water off instead of beads water up, I don’t really want to use Bead Hero because that kind of defeats the purpose—it makes water bead up. But that’s where this cool product comes in—this is AdvancedCoat: Gloss, and I really like this product. One little mist, clean towel, and after you’ve washed and dried your car you can just come back and quickly go over the whole car. This is going to kind of amp up the protection for the coating so the coating will last longer. It creates a crystal-clear finish, and it’s just a way to restore gloss, slickness, and shine—and it’s quick, fast, and easy to do.
The coating is not going to stay like it is the day you put it on. Over time—like 2 or 3 years down the road—you’re going to start seeing it doesn’t have that crisp, high-gloss look to it. But if you maintain it, it will. So an ounce of prevention is worth a pound of cure.
Common First-Time Mistakes (And Fixes)
Before I wrap up this video, I want to share with you the most common mistakes people make the first time they’re machine polishing and how to overcome them.
Too afraid of “burn through.” A lot of times people are scared they’re going to do what’s called “burn through the paint.” That means buff through the paint. Usually it can come from one of two things: creating too much heat, but also abrading it for too long with too aggressive a product. You go through the clear coat; you hit the underlying base coat; and if you’ve really done a horrible job, you might even hit primer or the body panel itself—some bare steel. I know people are scared, and so one of the most common things people do is they run the polisher at too low of a speed setting because they’re thinking, “Well, I’ll just be really careful so I won’t burn through the paint.” They’re buffing on the one or two, and then they wipe off and they go, “Oh, the swirls and scratches are still there.” It’s because you’re too slow. You need to bring that speed up to like the four, five, or six. What you want to see is good pad oscillation and good pad rotation.
Moving the polisher too fast. Let me demonstrate. Once I put this on—say this is the five setting—listen to how fast this motor sounds. Really fast. Here’s what people do: they match that sound with their arm speed. I don’t know why people do that, but they do. Instead of moving nice and slow, they get going really fast. Don’t do that—don’t be that person. You want to move the pad slowly so the oscillating action plus the abrasives—the cut of the pad—have time to affect the paint in that area before you move it forward. If you move it too fast, you’re doing what’s called “skimming.” You’re just skimming over the surface. You’re not doing anything but wasting time, wasting product.
Too much or too little product. Sometimes people overuse the product—they put too much compound or polish on. When you do that, you hyper-lubricate the surface, and now the abrasives can’t do their job—it’s just too slippery. Then some people use too little. You should always see—like even right here—there’s a film. I showed this to you twice before: there’s a film of two things—abrasive technology and lubrication. You should see a film. If you’re buffing and all of a sudden that paint is completely dry and shiny, this is what you’ve done—you’ve done what they call “buffed to a dry buff.” Once you go dry—no lubrication—now there’s a chance that the pad and the tool could actually start marring the paint. So you always want to see a film down there when you’re working on it.
Wrong pressure. Other common mistakes: putting down too much pressure—you won’t even see the pad rotating; you’re pretty much just grinding on the paint—or too little pressure (again, they’re scared to harm the paint). Try to find that balance. If you just place your hand on the top here and—this tool weighs 5 lbs—apply just about 4 to 5 (just light) pressure, that stabilizes the pad, keeps it flat to the surface, and it engages the abrasives with the paint so they can abrade it.
Dirty or saturated pads; not enough pads. As you’re buffing, you either want to switch to a clean, dry pad or you want to clean the pad. Every time you abrade paint, you have two things building up on the face of the pad. It’s easy to demonstrate this—I did a little polishing here and I got some residue. What do I do? I take a towel and wipe it off. I’ve got that same residue right here, but I’m not going to take a towel—I’m just going to take a nylon brush. If you look, I’m holding the back of the backing plate with my hand so it doesn’t spin. I just put it right here and I just scrape off any of that excess paint residue and spent polish or compound residue.
The next thing—you actually need more than one pad to buff out a car. A good rule of thumb is: for the compounding step (the first step) it’s one pad per panel. So a two-door car has nine panels—so figure six to nine pads to get through. That way, after you do like the hood, instead of trying to clean it, just take it off, set it aside, put a fresh pad on. Your pads will last longer, because if you try to buff out a car with just one or two pads, that violent oscillating action—with downward pressure and the chemicals—it’s going to destroy the pad. You won’t get many uses out of it. By buying more pads up front, you’ll get longer life out of the pads overall.
Pad washers at the wrong time. Real quick question on pad washers—there’s a lot of confusion over that. Pad washers are for use at the end of the day when you take a—this is especially true for, say, a foam cutting pad. Here’s two foam cutting pads. If you get these wet with any kind of liquid product (like a pad conditioner, distilled water, or by cleaning them in a pad washer before you use them), wet foam is soft foam. You lose the cut. So the foam pads cut best when they’re dry and they’re only using your abrasive technology. For me, a pad washer is something I would use at the end of the day to clean all my pads. I wouldn’t try to clean a pad and put it back to work. I’d want that water to evaporate and dry out; otherwise I’m not getting the potential cut from the foam itself.
Wrap-Up
I covered a lot of tips and techniques in this video. I demonstrated—live on camera—how to take some really nasty swirls and scratches out. You can do the same thing. And you don’t have to remember all this. Down in the description you’ll find a link to all the products that we use, and you’ll also see my detailed PDF checklist that you can download and use just to make sure you got everything you need and you follow all the right steps.
If you liked this video, hit the subscribe button—we’re always bringing out new videos. If you liked it, hit the like button—helps our algorithms. And if you found this helped you out—maybe you’d like to send this to somebody you know that has a swirled-out car—then share this video with them.
Besides that, thank you for watching, and stay tuned for more videos coming up soon.
Questions? Comments?
Email Us