


3 cars – 3 Primary Topics – 1 Very Intense and 100% Hands-on Day
Here’s the three cars this class detailed in a single day not including the extreme headlight correction on the Ford Escape.


From left to right,
1934 Chevy Sedan Streetrod – 1969 Dodge Dart GTS Convertible – 1977 Pontiac Grand Prix JS
(The 1977 Pontiac provided by The American Muscle Car Museum in Melbourne, Florida – thank you for your trust as well as delivering the car to our facilities in Stuart, Florida)

Before Pictures
First, I like to photo-document the condition of the car BEFORE The class. I wrote an article years ago titled,
The power in the after shots is created in the before shots
And it’s just as true today as it is the day I wrote it. So, here’s how this barn find Dodge Dart looked after being unloaded from the car hauler to Dr. Beasley’s in Stuart, Florida.


Dr. Beasley’s NSP Primers
Throughout the course of this class, we’ll be using the Dr. Beasley’s NSP Primers.

The jars below contain the specific and different types of microsphere abrasives we use in all our primers.

Nanogel Technology – Unique to Dr. Beasley’s
Besides the microsphere abrasive technology, unique to only Dr. Beasley’s products, is the carrying agent called Nanogel. Most, if not all compounds, polishes and even products called primers, use some form of organic carrying agent, usually some form of petroleum distillate. Nanogel is 100% INORGANIC. It’s a water-based, organic carrying agent that the microspheres are embodied in to form usable product. One main benefit to using our Nanogel Primers is because the Nanogel is inorganic, after wipe off, you can go straight to installing a ceramic coating. There’s no need to use a panel wipe to chemically strip the paint.

NSP Primers and Nanogel Explained
For a full explanation of what makes our compounds and polishes different and better than conventional compounds and polishes, I’ve inserted a video with an interview with Jim Lafeber, the owner and head chemist here at Dr. Beasley’s.
VIDEO GOES HERE – will be added in the next few weeks. Video is finished, jut not public.
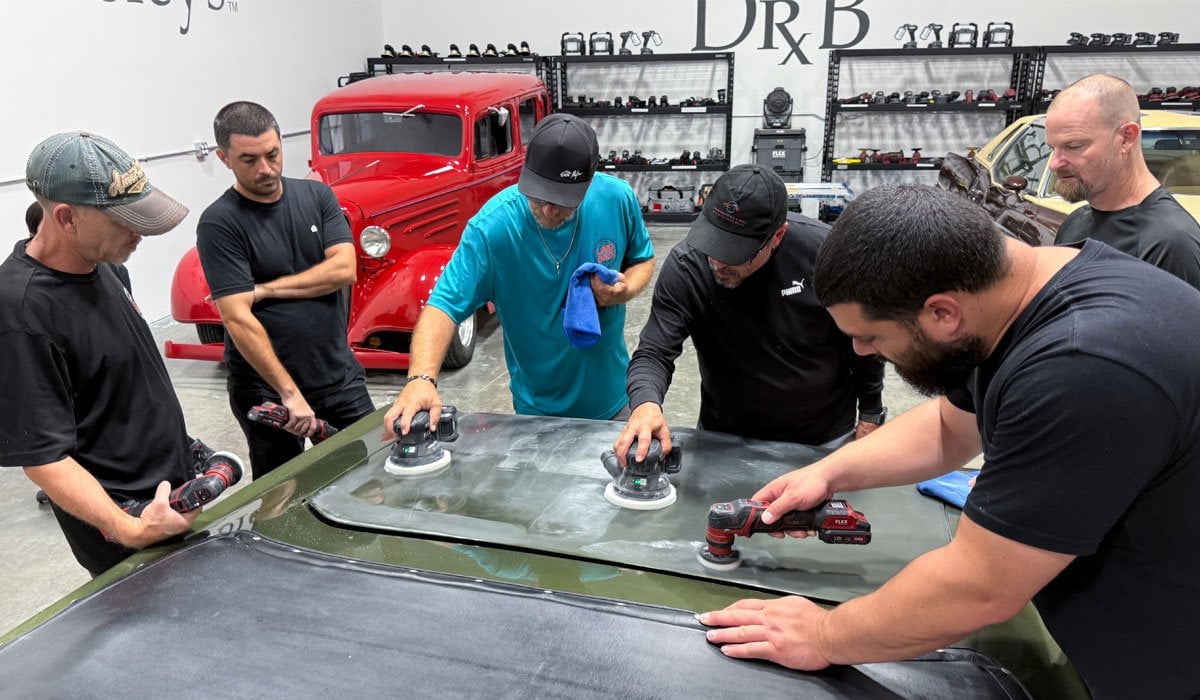
First Tool – First Day – First Thing in the Morning – The Rotary Polisher!

How to correctly use a rotary polisher
First up, the class learns how to correctly use a rotary polisher with a wool pad and NSP CoreCut. After a few technique demonstrations and an explanation as to how this type of tool works and the various dynamics involved with using this type of tool for a heavy or major paint correction, I turned the class loose.
After turning the class loose, I walk-around non-stop watching each person use the rotary and if they look comfortable using the tool and are doing everything right, I gently interrupt them and let them know they’re doing it right. If I see any room for improvement, I politely stop them and then tweak their technique and turn them loose again.
It’s GO TIME!
No chairs. Zero sitting. In our classes, you learn by doing not sitting in a chair listening to me drone on and on and on…


Minimal PowerPoint Presentation
While I promote these classes as having no PowerPoint presentation, this is true and accurate as there is no long drawn out PowerPoint presentation with dozens or even hundreds of slides. What there is however, is a single slide for each car for the class. As you can see by the picture of the slide below – it’s very basic and it’s primarily for the students to take a picture of it and then they don’t have to remember or write down the car and the tools, products and techniques used to take it from neglected to respected.


Here are the final results!


It’s worth your time
Scroll back up and LOOK at the paint surrounding the driver’s side door handle.


It’s also worth your time
Scroll back up this thread and look at the chrome trim surrounding the windshield – look at the before and after difference!


And you should even scroll back up the page and look at the before pictures of the interior – looks pretty good now!


And this is just the FIRST car this class tackled on Saturday.
Removing Orange Peel
Our one-day classes do not include sanding down an entire car or two, this is what you get to do when you take the 2-day class. That said, the paint on the 1969 Dodge Dart GTS had such HORRIBLE orange peel and lots of super deep scratches in both the hood and the trunk lid, I did share the techniques for machine dry sanding using FLEX cordless sanders and Eagle Abrasives Dry Sanding Discs.
Topics covered,
- Hand Wet Sand
- Machine Dry Sand
- Machine Damp Sand
- Re-enforce how to use a rotary polisher.
Here’s Alex learning how to Edge a Panel using the FLEX PXE-80 with 3″ sanding discs.

Here’s some of the other class members using the large FLEX 3411 Cordless Sanders with 6″ sanding discs.

Machine sanded

After compounding, polishing and ceramic coating
September Class Training Car
I’ve made the offer to the owner that if he brings this car back for the September 2-day class, that we would sand the rest of the car to remove the orange peel, which will also remove the majority of deeper scratches we could not remove via only by machine buffing.
Here’s a picture of the car being loaded onto the trailer to go home.

I moved to the other side, (the side in the shade), and took a couple of pictures to show the Orange Peel in the paint.


Sub-Surface Glass Polishing
And I might have this car here the day BEFORE class starts to teach Sub Surface Glass Polishing to remove the decades of wiper scratches in the windshield.


Full, Overhead Sun Reflection Shots!
While she was outside, I took a picture of the hood and the trunk lid to show that even though the class STARTED out using ROTARY POLISHERS with HUGE WOOL CUTTING PADS – the paint is swirl and hologram free.


And she’s gone!

Next up – learning how to do a 2-step paint correction package to a 1934 Chevy Streetrod!
After starting the day learning the most difficult tool to learn how to USE and MASTER, (that’s two very different things), and how to incorporate the rotary polisher when doing Show Car Detailing package, next the class will learn how to do a 2-Step Mid-Range Detail Package using gear-driven and free spinning, random orbital polishers.
Minimal PowerPoint Slides – this is 2 of 3 slides for this class
Here’s the 2nd PowerPoint Slide showing the actual car and listing the process so if any student wants to take picture to help jog their memory as to what we did for this car.

How to Prep Tires for a Tire Coating
I’m a big fan of tire coatings as compared to tire dressings – but only for the right tires and the right cars. I’m confident I have more articles and videos on this topic. That said, we’re not going to use a tire coating on these tires, but I wanted to share our new foaming tire cleaner and walk through the process and thus explain why you want/need a foaming tire cleaner.
Here’s what you need to get rubber, tire sidewalls surgically clean to prep them for a tire coating, and/or a tire dressing.
- Cordless Rotary Polisher – So you don’t get shocked when working in a wet environment.
- 5″ Rotary Brush – we now carry these on Dr. Beasley’s website – if you learned this from me – reciprocate by buying the brush from Dr. Beasley’s.
- Quality wheel cleaner – I’m using Dr. Beasley’s Intensive Brake Dust Remover.
- Quality tire cleaner – this is in testing mode.
- Wheel brush.
- Water sprayer/hose or pressure washer.

Look at how gross and neglected these tires are when the 34 Chevy arrived!

First Cleaning – see how the foam isn’t very foam but is very dirty looking? With tires this neglected, it takes more than ONE cleaning.

After scrubbing tires, rinse away all the dirt and browning.

And this is KEY – also rinse the brush
If you don’t rinse the brush after scrubbing – you’ll never see white foam because the brush will continue to contaminate the next machien scrubbing process.

Then spray tire cleaner onto sidewall and repeat the machine scrubbing process. NOW look at the foam? Starting to turn white isn’t it.

Then rinse the tire AND THE BRUSH!


Third Machine Scrubbing
After machine scrubbing the tire twice and rinsing both the tire and the brush each time, now look at the white foam machine scrubbing is creating? This is what you want to see.

When you see white foam
This is a good visual indicator that the tire sidewall is now clean, and you can move onto the next tire and repeat this process.

When is the last time you washed a 1934 Chevy Streetrod?
Due to the volume of cars I bring in for our classes, we can’t spend too much time learning how to do a proper Extreme Prep Wash. The class did this for the 1969 Dodge Dart, first thing Saturday morning including learning how to do a traditional Wet Wash Engine Detail, Topical Glass Polishing BEFORE washing the car, machine scrubbing tires, and mechanical decontamination.
But to save time, I washed the 34 Chevy a few days before the class including machine scrubbing the incredibly dirt-stained tires.

BEFORE
Here’s the 1934 after a thorough bath. Allow me to photo-document the before condition.


Here’s a Test Spot I did before the class just to find out a few things about the paint.


Here’s the Test Spot we did in class


Detailometer
We also took some BEFORE measurements for the current paint quality using the Detailometer.


Next up – it’s GO TIME!
How to do a Mid-Range – 2-Step Paint Correction and Ceramic Coating Package – or approach if you’re a DIYer
Our Test Spot showed us this streetrod has single stage red paint and Dr. Beasley’s NSP 150 with Buff and Shine Yellow EdgeGuard foam polishing pads on orbital polishers was more than enough to remove the defects.


I always say there are No Chairs – but I do have a couple of rolling chairs that come in handy. The No Chairs speil is that there are not 20 chairs for an academic class. As you can see, these are Hand-on Classes.


The PowerPoint mimics the Real World
I personally LOVE how my PowerPoint slide mimics the car the class is actually working on in the background photos.


Micro-Tools in Rotary Mode
You also have the chance to use micro-tools like the FLEX PXE-80 as well as the RUPES Nano Long Neck. We primarly use these in ROTARY MODE because neither really have the ability to do paint correction in orbital mode. That’s okay, I show the class how to remove micro-tool holograms in the next step.


Next up – maximizing gloss, shine and richness of color by refining the first-step results by switching over to an ultra-fine cut polish, the Dr. Beasley’s NSP 45 and soft BLACK Buff and Shine foam finishing pads on the students-choice of orbital polisher.


Next up, installing the Dr. Beasley’s Nano-Resin MX Ceramic Coating. This is the second car so far the class has trained on for how to install a ceramic coating.
First Step – Apply the Dr. Beasley’s Paint Coating Builder


Second Step – Apply the Nano-Resin MX Ceramic Coating


Final Results!


Remember the dirty tires?
Machine scrubbed followed by machine applying the Dr. Beasley’s Tire Conditioner


Budget Detailing Package – 1-Step Ceramic AIO

At this stage of the day, the class as learned, two primary packages for a detailing business or approaches for Do-it-Yourselfers.
- Show Car Detailing or Multiple Step Detailing – 1969 Dodge Dart GTS Convertible
- Mid-Range Package – 1934 Chevy Sedan Streetrod
The third primary topic for this 1-day class will be how to do a 1-step paint correction using the Dr. Beasley’s Z1 Primer, which is a ceramic AIO or All-in-One. The term All-in-One, means a product that will,
- Compound – Remover below surface defects.
- Polish – Create gloss, shine, clarity and richness-of-color.
- Protect – Leave behind a layer of protection.
The key thing that you need to learn, is that when you offer an entry level package to a customer, you need to set their expectations accordingly. Doing a one-step AIO paint correction process to a vehicle is in most cases, (depends on how severe and how neglected the paint is), will not remove 100% of all the defects. A good one-step AIO will remove all the shallow defects, but the deeper defects will remain.
If you, when detailing your own cars, or your customers, if you’re detailing for a business, want 100% defect removal, this would be the FIRST TOPIC we covered this morning, Show Car Detailing. And when it comes to detailing as a business, you are always happy to do Show Car Detailing, BUT it will COST MORE. This is what most new professional detailers don’t explain at the start of the process and when they don’t do this, it can lead to low customer satisfaction. So be sure to educate any potential customer that you have multiple packages to fit every budget but the more steps involved, the higher the cost. A Budge Detail is just that, it costs less but you’re not going to get the same results as you would from a Show Car Detailing package or a Mid-Range Detailing package.
Training Car – 1977 Pontiac Grand Prix SJ – Only 50,000 original miles
Our good friend, Ed Dedick, the Operations Manager for the American Muscle Car Museum, in Melbourne, Florida, personally delivered the 1977 Pontiac to Training Center here in Stuart, Florida.
Loading up at the American Muscle Car Museum
(see the HUGE Solar Panels behind the car? These are for powering the museum)

Arriving to Dr. Beasley’s Training Center in sunny, Stuart, Florida

Here’s the Pontiac after unloading from the car hauler. Sitting here in the SHADE – the paint looks pretty good!

Photo Documentation – Before Condition
After moving the car inside, I took some before pictures to document how the car really looks.


Even the plastic taillight lenses are filled with swirls and scratches!


I wasn’t sure what this was or what caused it – but the class fixed it!

Holograms
The wispy looking lines or patterns are the tale-tale sign of holograms from the misuse of a rotary polisher.


I think we can all agree, the true condition of the paint is completely different than how the paint looked with the car parked outside under cloudy skies.
How to do a One-Step AIO Test Spot
Here’s the results from using Dr. Beasley’s Z! Ceramic AIO on the top of the driver’s side fender. This was done using an orbital polisher with a white, Buff and Shine EdgeGuard foam polishing pad. I call this class session, FREE FOR ALL – which means the students can choose and use any brand or type of orbital polisher. They can test out as many different types of polishers they are interested in, or spend more time with polishers they’ve already used up to this point.
Looks great!
The AFTER picture shows dramatically improved finish quality by removing swirls and oxidation and restoring the full richness-of-color and all from a single one-step process.


It’s Go Time!
After demonstrating the correct technique for using a one-step AIO, I turned the class loose and then continuously walked around the car monitoring the students and their progress.


This is a Text Book Example of how to correctly hold the RUPES Cordless BigFoot 15
In my classes, I teach you how to use the Power Lock button to lock the tool in the run position and then move your hand to the back of the tool to both hold the tool and support the weight of the rechargeable battery. It takes some practice as most people start out by simply depressing the speed trigger and then holding the tool by the handle – which works, but once you train yourself to use the Power Lock button and move your hand to the back of the tool, you’ll always use this technique.


Here you can see some using FLEX cordless polishes while others are using RUPES cordless polishers – for this class session – it’s all up to you.


Another Text Book Example of how to correctly hold the RUPES Cordless BigFoot 15


Luis started out using the RUPES cordless BigFoot 15 and then compared to the FLEX 15mm cordless Finisher.


Dynabrade Renny Doyle Series DB8 | Geared Dual-Action Polisher
Brian brought his Renny Doyle Gear-Driven Polisher all the way from Texas to use in the class. I tested it out myself and was impressed that it’s smooth and powerful.

Last things last – after tackling all the paint, the students then machine polished the chrome bumpers.

Here’s the final results!
Not perfect, but damn close and remember, this was from a one-step process using a ceramic AIO.


Three Cars – Three Popular and Profitable Topics – in One Class – in One Day
This is why I say our classes are the MOST hands-on detailing classes on planet Earth. No other class comes close, but my guess is moving forward, others will copy my class format – not because of me – but because this format works and its popular with people that learn better by DOING versus sitting in a CHAIR.
This is also why we start our classes EARLY! You get MAXIMUM hands-on training – Zero sitting.
Before and After – Documented
I also took MATCHING PICTURES to show the AFTER difference like I did to show the BEFORE condition. Just in case there’s any doubting Thomases out there. LOL


Nice work everyone!
Before and After Results with the Detailometer
We took before and after readings using the Detailometer
Before

After

For a ONE-STEP process, these are dramatic results.
Extreme Headlight Correction
Besides the 3 primary packages or approaches to detailing cars, we also covered Extreme Headlight Correction. I borrowed my business neighbors Ford Escape as the plastic headlights are so far neglected, they’ve turned yellow with oxidation.
Also just to note – these are OEM Clear Coated Headlights.
You cannot tell due to the mass oxidation. As we started to sand, we could see where the OEM Clear Coating had degraded and left a jagged line where coating was present and coating was missing.


The Mike Phillips Method for FAST Headlight Correction
I’ve never seen anyone else do this or teach this until I started teaching it at our classes. Feel free to borrow this technique if you like.
Tape-off and Protect
When sanding headlights using LOW GRIT discs or sandpaper, it’s important to place at least 2 layers of protective masking tape over any nearby paint, plastic or chrome surfaces.
Why?
Because if you accidently sand the nearby paint, plastic or chrome, it can be pretty much impossible to recover from the damage.


Pop the Hood
This is a simple technique that completely removes any paint away from the headlight and thus the sanding process and that is to simply pop the hood.

Mirka Abralon Foam Backed Sanding Discs
The lowest grit I had on hand was 500 grit – I wish I would have obtained some lower grits like 180 or 360 grit. For most headlights, 500 is more than enough to do the first step. But for headlights this neglected WITH an OEM Clearcoat over the headlights that has failed, then it would be faster to sand off 100% of the OEM Clearcoat using lower grits like 360, maybe even 180.
For this process, the class will machine sand starting with 500 grit and ending with 4000 grit. In reality, anyone talented with a wool pad on a rotary polisher with a quality compound can easily remove 2000 grit sanding marks out of plastic headlights. What my normal practice is – show the MOST steps and then let everyone figure out how many steps to do when they return to their detailing world.

It’s Go TIME!
After a quick demonstration, I turned the class loose. By sanding with 5 different grit levels, this ALSO provided plenty of hands-on time for each person to learn how to machine sand headlights using a rotary polisher.

And here’s the secret to sanding with a rotary polisher without GOUGING the plastic and that is to use 2-3 foam interface pads between the backing plate and the sanding disc.


The design of these Ford Escape headlights made sanding challenging but the class powered through.
See the multiple foam interface pads?

Teamwork makes the dream work!


Removing the Sanding Marks
After all the sanding step, the next thing to do was to use Dr. Beasley’s CoreCut with a wool pad on a rotary polisher to cut or remove the sanding marks. Sorry, no pictures but this was in fact the next step.
Removing Holograms
Fiber pads on a rotary polisher ALWAYS leave holograms in the surface, even headlights. To remove the holograms and perfect the final results, the class followed the rotary step using gear-driven orbital polishers with Dr. Beasley’s NSP 150 with Buff and Shine yellow EdgeGuard foam polishing pads. If you don’t do this, not only will the holograms be visible when the car is outside in bright sunlight, but you will also leave the plastic surface MORE OPEN and this leads to faster deterioration.


Seal the Deal
After the polishing step, the class then used the Dr. Beasley’s Headlight Coating Kit to seal the headlights and protect them from UV rays and the elements.


And here’s the final results!
Now these headlights not only look better, but driving at night will be much safer.


Not bad for severely neglected headlights that are 20 years old!
Great work everyone!
Pad Cleaning
The class went through 60 buffing pads. I apologize that the class went long, (teaching how to machine dry sand at the very end of the class), and as such, we didn’t go over how to use the Grit Guard Pad Washer to clean pads. The good news is, we have a video that shows EXACTLY how to use the Grit Guard Pad Washer and I’ll share it below.

Here’s Red Paint from the 1934 Chevy Sedan Streetrod

Years of dirt staining, road grime, traffic film and clearcoat oxidation after buffing out the 1969 Dodge Dart GTS

This is just NSP Primer build-up after machine polishing the clearcoated 1969 Dodge Dart GTS

Some dirty 1″ RUPES buffing pads – mostly used around the intricate areas around the windows on the 1934 Chevy and also around the side panels of the engine cowl.

Buffing the Brightwork on Classic Cars – Chrome – Stainless Steel – Aluminum – Nickel
I purposefully took BEFORE pictures of the trim around the windshield. The GREAT you see on the below two pads is oxidation, tarnish and traffic film removed off the brighwork as the class buffed out the car.


How to use the Grit Guard Pad Washer
The process is easy, first spray the face of the pad with some PRS – aka Griot’s Garage Pad Renewing Solution. Then I scrub and agitate the face of the pad with a nylon brush. Next I place the pad on a rotary polisher and then insert the pad into the pad washer, close the Splash Guard Lid and then run the polisher at low speed as I pump the pad up and down against the Grit Guard Insert. Next lift the pad up a little and bring the rotary to high speed and let some of the water escape the pad via centrifugal force.
Then I throw groups of similar pads in the Kenmore 600 and wash using Dr. Beasley’s Fresh Start Garage detailing detergent.

Air Dry
After washing, I air dry by placing the clean, but wet pads on a large table. See the nylon brush? This is normally sold as a tire cleaning brush but I really like it for scrubbing the face of foam pads during use and after the detail. Get one (or two), and thank me later.

Good combo – Pad Renewing Solution and Fresh Start Garage

And to provide context for the GRAY looking stuff on the yellow buffing pads,
See the gray color on this pad?
Here’s where the gray came from,


The class used Dr. Beasley’s NSP 150 with the yellow foam polishing pads to buff out all the brightwork and now all the brightwork gleams with clarity and brilliance.
Pad Cleaning Video and How-to Article
How to Clean Wool Buffing Pads
Thinking About Taking a Car Detailing Class? Do your Research
Before you sign up for any class – be sure they have the supplies to actually hold a true hands-on class. You might want to look and see if they tell you or show you what you’re going to get to train on and hope it’s not demo hoods and test panels.
A full array of NSP Primers and just to note, every car came out phenomenal using only Dr. Beasley’s NSP Primers

A full array of Buff and Shine EdgeGuard Foam Buffing pads and also Wool Cutting Pads

A full array of batteries and battery charges and the power to power all the chargers and ALL THE CORDED tools.

A full array of RUPES polishers – there are $24,000.00 of all BRAND NEW RUPES polishers on these tool racks.

A full array of FLEX polishers – there’s over $25,000.00 of FLEX tools on the tool racks
(There are also tools from Harbor Freight, Griot’s Garage and Makita for the students to use)

Professional Grade Measurement Tools from Detailometer and Rhopoint

Wet Work Supplies
This class also included how to do an EXTREME PREP WASH, including,
- Wet Wash Engine Detail.
- Topical Glass Polishing.
- Machine scrubbing Tires.
- How to use a Pressure Washer and a Foam Cannon.
- How to do the Mechanical Decontamination process during the wet work.

The first tool you learn how to use – Rotary Polishers – followed by Orbital Polishers and LOTS of hands-on time with both types of polishers.

Sanding Supplies
This is my sanding supplies table, it has sanding supplies from, Nikken, Eagle Abrasives, 3M Trizact, Harbor Freight and Mirka Abralon.

ELECTRIC POWER!
Not only does it take a lot of supplies to hold a real hands-on class, a class where each person has their own tools, pads, products and towels, but it also takes a LOT of power. Our shop has a total of 66 – 110-volt electrical plug-ins and more than enough power to run 20 rotary polishers HARD and never blow a fuse.


Don’t Miss Out!
The next and LAST 2-day class is Saturday, September 20th and Sunday, September 21st.
Click here to sign-up for the September 2-day class!
As I type, this class is almost sold out. So, if you want to take this class, get signed up sooner than later.
Questions? Shoot me a text or give me a call. 760-515-0444
I hope to see you at a future class!
Mike
Questions? Comments?
Email Us