


Last Updated May 28, 2026
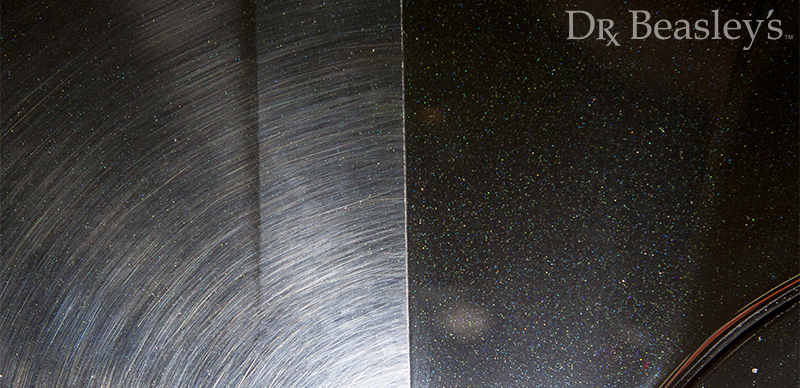
Removing swirl marks is a little like cleaning up after yourself, or at least cleaning up after someone else’s mess. Swirls may be the professional detailer’s most despised surface flaw because they are almost exclusively caused by the detailer’s polishing technique. Because they are less visible in the shade but spectacularly obvious in sunlight, even good detailers can leave them behind. However the difference between a good detailer and a poor one is whether the detailer takes the time to go back and look for them in changing light, and then diligently remove them. The best way to avoid swirl marks is to know what caused them. Here are a dozen causes for swirl marks. If you avoid these issues, you will minimize the existence of swirl marks, and the need to remove them.
1. Clay bar before polishing. Claying is an abrasive process but it removes contaminants and surface flaws. By claying before polishing, you will polish a much smoother surface and properly smooth out the surface. It’s not recommended to clay along without polishing because it is aggressive.
2. Check the hardness of your backing plate. Most detailers don’t think to check the resistance of the backing plate but if the plastic is too hard, it will not have the “give” you need to contour around rounded body panels. It can also make your normally perfect buffing pad too aggressive.
3. Using an Aggressive buffing pad. Remembering that swirls are a form of microscratches, test the aggression of your pad on a small spot, before using it over the entire car. Whether made of foam, wool, or microfiber, an aggressive buffing pad leaves swirls in the paint.
4. Using Abrasive product. As a detailer, one of your greatest assets is knowing your products. Some polishes are stronger than others are. Again, we recommend analyzing the pad as well as the chemical to ensure the desired results.
5. Avoid the need for speed. Running your buffer at full speed not only increases the chances for swirl marks, but it can burn the paint. The buffer speed speaks to aggression, not to the time it takes to buff the car.
6. Avoid excessive pressure. Learning to equalize the pressure of the buffer across the entire paint surface is imperative. Too much pressure, even if your pad and product are perfect, will make the buffing process too aggressive, heating up the surface of the paint and causing swirl marks. This is where technique and experience are vital.
7. Avoid turning your buffer up on its edge. Many detailers tilt the polisher to reach tight spots, but this can be a recipe for disaster. First, it automatically increases pressure. Secondly, there is not enough product on the edge and therefore you are dry buffing. Finally, you are driving the backing plate into the paint, which not only causes swirls, but can also cut through the clear coat and damage the paint.
8. Avoid dry buffing. Polishes provide a lubricant between the buffing pad and the clear coat/paint. Dry buffing always causes swirl marks. Without enough product on your buffer, softer clear urethane and powder clears, as well as scratch-resistant and ceramic clear coats are susceptible to swirls.
9. Use only clean buffing pads. Even microscopic dust and dirt on a buffing pad will cause microscratches, so if you use a pad that was dropped on the floor, or was used on another vehicle without being cleaned, that pad is more abrasive and will cause swirls.
10. Don’t try to polish a dirty vehicle. The idea that a professional detailer would attempt to polish a vehicle without washing it first may seem a non-starter, but suppose someone brings in a vehicle cleaned in the last day or two, and just wants you to buff out the imperfections on a small section of the car, left by the car wash. Don’t do it without washing the car yourself first. Any vehicle, especially if it has been sitting outdoors, has dirt particles on its surface that act like a rock on the surface and will cause swirl marks.
11. Do Not mix your buffing pads. We strongly recommend dedicating your pads to certain tasks. For instance, do not use a compounding pad for polishing or vice versa. If you do mix them, compounding product will rise to the surface and mix with your polish. At that point, you are compounding the vehicle and not polishing it! Use only clean, dedicated pads for buffing and polishing.
12. Avoid granulated laundry detergent and cleansers. Even if dissolved in water, granulated soaps never completely liquefy. These particles act like an abrasive on the pad or on the paint surface, and cause swirl marks.
If you have any other experience or thoughts on the matter, please share in the comments below!
I am new to using a pro buffer so your article has helped me. Thank you.
Great advice thanks so much for sharing!!
Ok I new to using a buffer what would you recommend for a beginner
Why do I get swirl marks after washing claying compound, polishing, and waxing my car
thanks very much